Leave the main line behind and the keen enthusiast will find a host of railway locomotive manufacturers whose names are unfamiliar to them. Their products are often far more interesting and varied than those owned by the 'big' railway, sometimes built specifically for the customer as one-off designs.
Tradition had it that modellers wouldn't be interested in industrial locomotives. Thanks to RTR releases, a piece of the model railway market previously the domain of kit manufacturers, has become more accessible to those without kit assembly skills.
Fortunately, there are enough industrial locomotive prototypes to go around, but how do you bridge the gap between opening a box containing a model ready for the track, and opening a box full of bits for you to turn into a finished locomotive?
Using expertise developed in the narrow gauge world, Narrow Planet, in the guise of Planet Industrials, brings us a kit unlike most you will have seen.
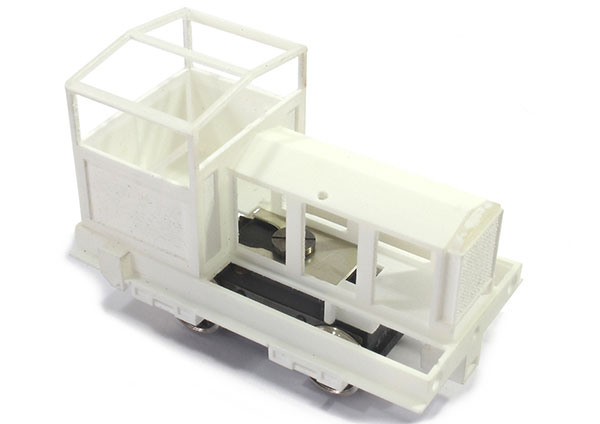
Using 3D print technology, a basic body is provided. But, because this manufacturing method isn't great at providing smooth metal-like sides, etched nickel-silver panels are used to clad it. The result makes the best use of both, to the benefit of the modeller. Add in a ready-to-use power unit that happens to be exactly right for this prototype, NEM coupling pockets, and with care, but not too much skill, a model that can stand next to the latest RTR is the result.
Founded in 1927, F. C. Hibberd & Co. were based in Park Royal, London and produced a large number of internal combustion locomotives with both petrol and diesel engines. Despite a variety of designs, the 'Planet' name was used across the range.
This model is based on an 18T diesel found on the extensive Devonport Dockyard and Chatham rail systems from the 1950s.
While it's unlikely many modellers will be using either of those dockyards as the basis for their layout, this is a standard design and could plausibly appear anywhere in the UK and around the world. Locomotives often changed hands as traffic flows changed, so there's no reason why any of us with a suitable era layout couldn't find a home for this interesting little model.
As a veteran of over a hundred locomotive kits, this gets the balance of ease of building vs. quality of the finished model just right. With a little care, this package gives you top quality results that many a seasoned kit-builder would be very proud of. I know I am.
Content continues after advertisements
1
The kit contains a 3D-printed body and a wealth of etched nickel silver parts that will be stuck to it. Details include handrail knobs and wire, but the modeller has to find a 24.5mm wheelbase Tenshodo SPUD, couplings and buffers.
2
Cleverly, many of the parts are printed as part of the body. These need to be removed – a pair of snips rather than a knife is the easiest way to do this, cutting through the supports.
3
Every flat surface has to be smoothed off using fine abrasives – 640 followed by 1200 grade are recommended. Sanding sticks or abrasive paper glued to lolly sticks work best and prevent my sanding depressions where there should be flat surfaces. Once polished, I'll wipe the dust away with a cloth, dampened with turps.
4
An etched plate fits into the bottom of the body to hold the SPUD. This should slip in and out, retained by the screw fitted in the top. It's a loose fit and the instructions suggest layers of electrical tape to take up the slack, but I'll worry about this later.
5
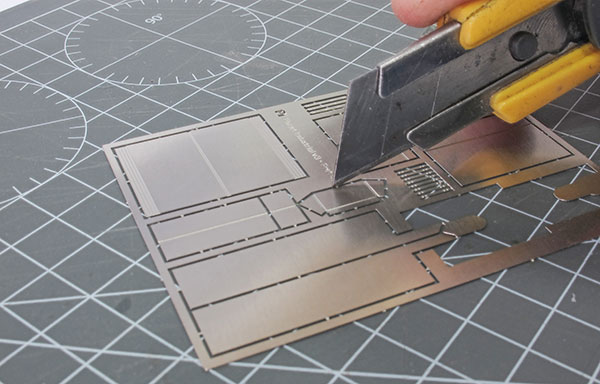
Removing parts from their etches needs a sharp knife and cutting mat. Cut through the tabs holding them in place but don't force them too much as it's possible to distort the component. If you bend something, a little tweaking between your fingers will usually sort it out.
6
The first job is to bend up the control panel, keeping the half-etched line inside the bend, and fit this and the control box into the cab. I soldered the box to the panel, but glue would work just as well.
7
A choice of buffer beams are supplied – with or without a hole that matches the NEM coupling box. As I'm fitting tension-lock couplings, I've opted for the version with.
8
Working my way around the model, all the etched panels are fitted in place. Test fit each one to ensure it's going to sit in the right place before applying any glue. Nice neat corners, especially around the cab, make a big difference to the look of the finished model.
9
The 3D-printed axleboxes, sand boxes and weights fit in place using a gel-type superglue. It's worth giving them an extra wash with turps before fitting to remove any greasy residue. I found they wouldn't stick to each other until I'd done this, something to do with the way the 3D print materials works.
10
Drill holes in the cab side for the handrail knobs. I tend to glue one knob to the end of some 0.45mm wire, thread the other on and then fit to the side. Doing this makes handling these tiny components easier. The last job is to cut the wire to length.
11
Buffers are whitemetal castings from P&D Marsh as I couldn't get my hands on the recommended Gibson 4914s. Glued in place, the body is ready for primer. It gets another wipe down with turps first, just to be on the safe side.
12
A thin spray of car primer will show up any areas on the model needing attention. In my case, you can see a little filler on the top of the buffer beam and for a couple of tiny spots, I'll run some gap-filling superglue in.
13
Since this is an industrial locomotive, I can paint it any colour I like. The main body blue is a mix of Humbrol Intermediate Matt Blue (144) and Phoenix Precision BR Rail blue (P132). Buffer beams are Humbrol Signal Red (174) and the chassis Revell Anthracite Grey (9). The body colour is airbrushed, but the rest is hand-painted. The number on the side is a leftover from the Fox Transfers sheet for J15 locomotives. Buffers heads are polished whitemetal with a bit of pencil to represent grease patches.
14
Weathering starts by dry-brushing Humbrol Matt Blue (144) over the body. The chassis and buffer beams get a brushing of track colour and rust shades. My aim at this point is to highlight the detail and add a bit of colour on the model. Dirt in the nooks and crannies comes courtesy of a thin wash of weathering ink from the Games Workshop range. Agrax Earthshade is pretty close to track colour. Just brush it on, making sure the ink pools around rivet and bolt heads. Work downward with a soft brush to replicate the effects of the weather.
15
When ordering the SPUD, I made a mistake and bought a version with spoked wheels. To cover these up, I cut some thin Plastikard discs using a pair of compasses fitted with points in both arms. Superglued in place and painted black, no-one will notice.
16
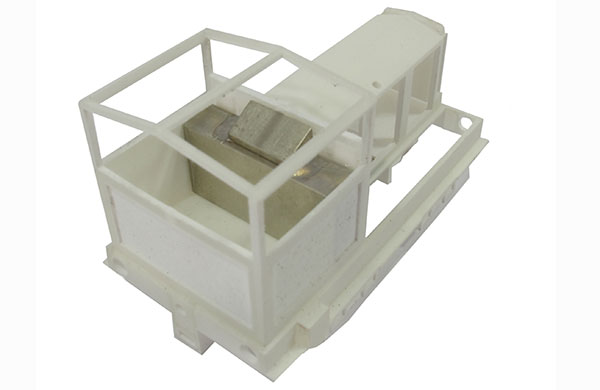
Underneath the model, a set of whitemetal weights add a useful 40g to the locomotive, bringing it up to 77g. The SPUD is held in place with big blobs of Blu-Tak; crude, but effective and leaving the unit easy to remove, if required.
17
Cab glazing is cut from scrap clear plastic packing and fitted into the recesses around the windows. A driver figure from a Hornby pack is stuck in position and then the roof can be fitted with a couple of tiny blobs of UHU in case I need to remove it. A light dusting with brown and smoke weathering powders finishes the paintwork. The final job is to clip a set of Bachmann couplings into the NEM boxes and use the locomotive on the layout. Job complete!
Need more advice? Some of the below articles may help. Also, take a look at the BRM Techniques page for all our latest guides and advice articles.
Detailing the Dapol Western
How to make a Class 20/3 from an RTR model
How to paint your models
How to make an HRA from Bachmann’s HTA
How to build a battery locomotive
How to make your model trains grubby
How to make a pre-grouping coach
Take a read of our step-by-step guide to weathering a locomotive using paint washes and powders here. Or if you’d like more general tips on weathering a locomotive, see our article here.