With a few notable exceptions, winter and snow scenes are seldom attempted by railway modellers, which is a shame as many excellent products are available off-the-shelf to help you achieve realistic results.
Think of the tremendous range of possibilities that winter offers. You could model a frosty day, a dusting of snow, deep snow, windblown drifts, melting snow or just a stark, dull winter day. There are so many exciting possibilities!
Since snow uses unique products and the effects need to be subtle, we recommend that you try out the products on small, simple scenes first until you are confident. This diorama uses easy to obtain off-the-shelf items and is simple to build. Here we show you how to portray a light snowfall followed by a hard frost and deeper snow.
Shopping List
- Hornby Skale Scenics Nordic Fir Trees (R7226)
- Hornby Skale Scenics Fir trees (R7206) and (R7199)
- Humbrol Maskol and Chrome Oxide Weathering Powder
- Humbrol Acrylic Paint (63)
- Precision Ice and Snow Krycell Fine, Brown Krycell Ice, Snow adhesive
- Busch Moorland (1314)
1
Other fir trees are best planted after the ground work has been prepared. Snip off most of the roots with side cutters as they tend to end up proud of the ground and require more work to blend them in.
2
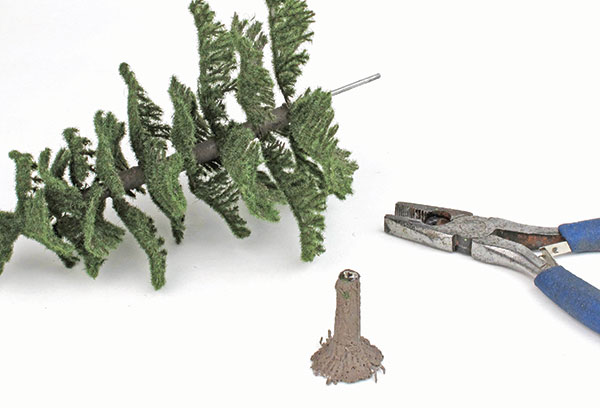
The Hornby Nordic fir trees are great, because if you grip the trunk with pliers and gently rotate the base, you can split the tree into two. This means you can plant the trunk and then model the groundwork around it.
3
Drill a hole up the centre of the tree and glue in a piece of wire with a diameter of about a millimetre or that of a cocktail stick. About 2cm of length is ideal, but be aware of the depth of your scenery and baseboard.
4
Trees with unpainted trunks look much better if the shiny plastic finish is covered. Spray or brush using a suitable dark grey/brown after using a primer. You could also apply a scatter for texture.
5
Conifer woods are damp places. Use an airbrush or weathering powders to add green to represent moss onto any part of the trunk that is visible. Add more to the north side if you’re really keen.
6
Decide on the layout of your scene. You can roughly lay the major parts out in the correct places and move things around until you are happy. Take a few test photographs to check, too.
7
Paint the area beneath any water a suitable dark brown or grey colour, ensuring that this matches the Krycell Ice that you are using. We used brown, but green and clear are also available.
8
Glue your Krycell Ice in place and then build up the area around it using cardboard. This can be held in place with PVA glue or a contact adhesive such as Copydex. Weigh down with books until dry.
9
Tear the Busch moorland sheet into pieces and position around the frozen lake. Glue in place with PVA or a contact adhesive such as Copydex.
10
Coat the cardboard with PVA glue and sprinkle on your ground cover to represent the soil/mud. Blend in the Busch Moorland sheet so that no harsh edges show.
11
Be sure to cover up the edges of the Krycell Ice and immediately wipe off any stray material that sits on top of the ice. Aim to finish with an irregular, natural shape to the ice.
12
Choose where you want the Nordic firs to go and glue the bases into position using contact adhesive.
13
Add debris to the scene. You may like to add fallen timber, fencing, a hut, or piled-up logs to represent the forest and its workings.
14
Detail the groundwork. Add static grass using an applicator and/or grass tufts to blend in the areas of moorland sheet and the ground leading into the plantation/forest.
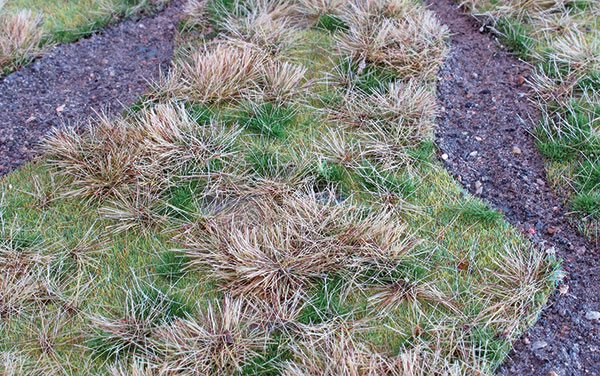
15
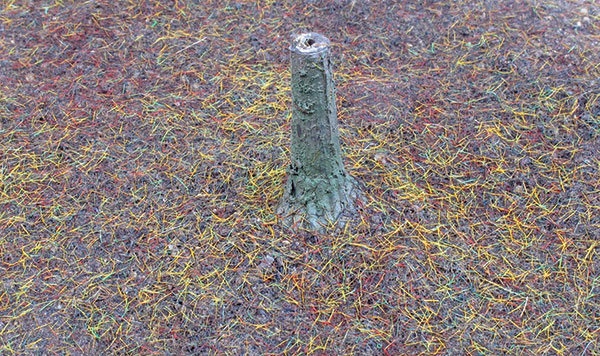
Use static grass as a scatter to represent pine needles using very light layers. Use a dark brown colour first, then a buff colour and finally a green layer to simulate the decomposition of the needles on the ground.
16
Don’t forget to add quite a lot of green to tie the groundwork in with the trees. There’s not much air movement in forests/plantations and moss/algae is prevalent. Use paint or weathering powders.
17
Drill holes in the forest area and plant other trees using PVA glue. Try to arrange for a pleasing skyline with some variety in height. Push the Nordic firs into place in their bases.
18
In order to preserve the detail on the Krycell ice, use masking tape and Humbrol Maskol. Wait for the latter to dry before proceeding.
19
The following steps are messy. Put newspaper down to aid clearing up and to give you an easy way of saving misdirected snow that you can reuse.
20
Spray the diorama with an even coat of hairspray. To represent drifting snow, you may wish to spray at an angle, but we sprayed from directly above.
21
Half fill the supplied sieve with Krycell Fine. Holding the sieve at least 30cm above the diorama, gently tap the side to release the snow.
22
After each tap, move the sieve slightly and repeat the operation until the board is covered. Wait a few minutes, then tip the board over to remove excess material.
23
You can repeat the last three steps as many times as you want until you have built up the snow to the depth required. This has to be done in little time as the hairspray dries quickly.
24
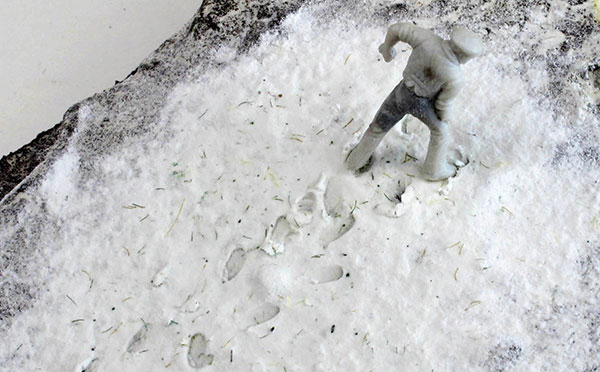
When deep enough, you may like to try adding footprints or vehicle tracks. Simply press shapes into the snow having first sprinkled on a fresh layer without any hairspray. This ensures that the snow doesn’t stick to the object.
25
Remove the masking tape from the ice and brush gently to ensure that no stray deposits remain.
26
Portraying a light dusting of snow can allow your scenery to partially show through and look very realistic. However, you must use another technique.
27
Add a very thin layer of snow without applying glue. Tap the board to shake the snow into the hollows and then spray with the PIAS adhesive sprayed from an airbrush.
28
Since hairspray and PIAS glue don’t form strong bonds, you may like to spray the finished scene with a dull matt varnish to seal it. Test the spray beforehand to ensure that it is genuinely clear.
Only basic modelling skills are needed to obtain results like this. Manufacturers such as Precision Ice and Snow have a good range of products and provide full instructions in written and video form. Trees that we associate with winter, such as the Hornby fir trees, are available in bulk packs and are very cost-effective.
We hope that this article has encouraged you to have a go. If you aren’t the best modeller in the world, there is even more incentive to model winter as you can hide a multitude of sins beneath a blanket of snow!
Content continues after advertisements
![How to model winter on your model railway]()
Looking to model other seasons? See below guides to help you capture the look.
How to create a spring scene
How to model an autumn scene
Would you like more advice on tackling water on your layout? Our guide on how to model water here should be your first port of call.
Need more advice? Take a look at the BRM Techniques page for all our latest guides and advice articles.