Autumn takes us from the bounty of produce resulting from the balmy days of summer to the decay of winter. This build concentrates on the former, as beautifully encapsulated by the words ‘Season of mists and mellow fruitfulness’ in the opening lines to John Keats poem To Autumn.
There is no doubt that the use of off-the-shelf, ready-made trees and other 'greenery' can really speed up the production of your scenery. Let’s face it, many of us are more railway-centric and would like to expedite the scenery so that we can concentrate on the areas we have a preference for. Most of the work in building a tree is spent in making an armature to hang the foliage from. The great advantage of buying a ready-made tree is that this is already done for you. It's much easier to enhance an existing tree than to start from scratch.
In this article we show you how you can take reasonably priced, easily obtainable, ready-made products and produce a realistic scene that will enhance your model railway or diorama.
Shopping List
Busch (6641) HO Fruit Trees
W: www.goldenvalleyhobbies.com
Trees (PL25103 and PL1135 AUT), Martin Welberg Forest Floor type C (WB-M053 and bushes type A WB-SABR)
W: www.themodeltreeshop.co.uk
Stubble Field (F403) and (96526) Gas Bottle Storage Kit
W: www.albionhobbies.com
4ft Post and Rail Fencing (LX236-OO)
Content continues after advertisements
W: www.scalemodelscenery.co.uk
Gaugemaster (GM108) Brown Scatter
W: www.gaugemaster.com
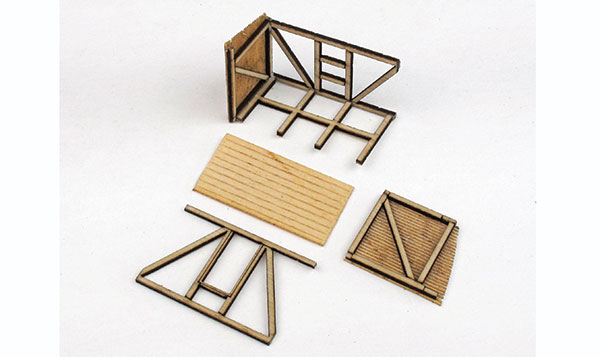
Hornby (R7160) Flockage Dark Brown, Humbrol Chrome Oxide (AV005) Weathering Powder and Humbrol Maskol
W: www.hornby.com or your local stockist
Yellow and red sugar toppings
W: www.nice-buns.co.uk
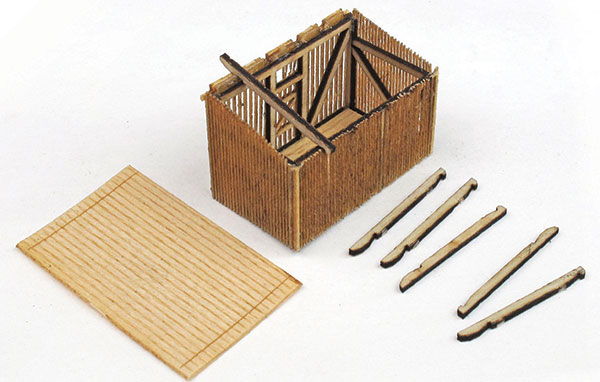
1
Examine your off-the-shelf tree for issues. Remove any stray foliage that has stuck to the trunk in transit. This tree looks great already, but the foliage could do with being airier to let more light through.
2
Use a pair of sharp scissors to cut the foliage into clumps. Once separated, gently bend each branch away from the central mass. Be careful as the frame is made of plastic, although you can always repair damage with cyanoacrylate glue.
3
Here you can see the improvement made to the tree on the right. Work over newspaper and then any foliage dropped during this operation can be stuck back to areas where required.
4
The trunk is often made from several pieces of plastic glued together. Fill in large gaps or sink holes with a filler such as Hornby Model Filler.
5
Individualise the trees by adding features such as dead branches. Drill a hole and glue a piece of wire in place using cyanoacrylate. You can use anything to hand for this - fuse wire, electric cable strands or even a staple.
6
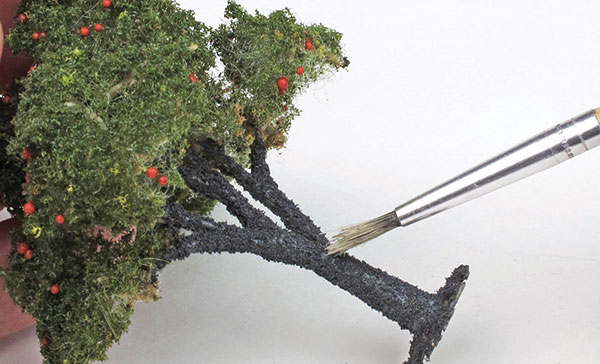
Make up a bark solution by mixing together PVA glue, powder filler and black acrylic paint. You need to make the mixture brushable, but not so thin that it runs when placed on the models.
7
If the bark mix is kept in an airtight container, such as a jam jar, it will last for years and will be immediately available when you require it again. Add water if the mix has dried out a little.
8
Once the bark mix has been brushed on, sprinkle on scatter to add texture. Experiment here and try to capture the texture of the real bark. Here we’ve used Gaugemaster Brown Scatter on some trees and Hornby Dark Brown on others
9
If needed, paint the trunk with various shades of acrylic greys and browns. Dry-brush highlights to emphasise the detail of the bark.
10
Trees are surprisingly green in our damp climate. We used Hornby Chrome Oxide weathering powders to achieve this, applied with a soft brush. You can treat the other items in this build in the same way.
11
Cut the fencing from Scale Model Scenery using a sharp craft knife.
12
Cut the post sides and stick in place using PVA glue. This is repetitive, so speed the process up by minimising the distance between the items and putting them into an order that maximises economy of movement.
13
We made a gate from one of the fence panels. Cut out a piece between two posts and cut one post away to make long planks that you can use as cross bracing.
14
Mitre the ends of the cross pieces, then stick in place with PVA glue. Notice the pattern of the cross bracing to maximise strength.
15
This Model Scene kit from Albion Hobbies builds into a very nice structure, but it isn’t the easiest kit to make, being very delicate. Previous laser-cut wooden kit building experience is recommended.
16
To minimise damage to the sides panels, glue the sides to them while still in situ on the sprues. Ensure that the glue coverage is even. Once dry, trim the sprue.
17
When gluing the sides together, we sometimes find it easier to form one corner first from two sides and the base. Glue the other pieces in place to form the box of the structure once the glue for the first panels is dry.
18
Cut the remaining side panels, leaving some of the sprue in place as a support. Trim this away once the glue has dried.
19
It is obvious in the kit instructions, but when sticking the roof rafters in place, note that the overhang should project over the door.
20
To age the wooden structures, brush them with a dilute mix of Indian ink or black acrylic paint. You only need a little of the colour as the pigments are strong in tone.
21
Paint the structures quickly. Excess liquid will affect the glued joints. To avoid warping, paint both sides of each section before moving to the next.
22
The stubble field available from Albion Hobbies is glued in place using PVA or carpet glue. Ensure that you cut it so that the furrows are in line and butt the edges up to avoid gaps. Weight it down and leave to dry.
23
Use a 3mm drill to make holes for the fence in your baseboard. If possible, route this to avoid the need to cut fencing panels up.
24
Tear pieces of the Martin Welberg scenic mat from the Model Tree Shop and arrange to form the hedgerow undergrowth. Add various lengths of straw-coloured static grass to make it look autumnal.
25
Mark where the trees are to go by dipping the end of a base in Humbrol Maskol and pressing into place. To avoid uniformity between similar trees, align the bases at different angles. Use one tree for this and clean the Maskol off afterwards.
26
Apply static grass to the orchard area and also various scatters under the trees to depict dead leaves. Add a second layer of static grass of a different colour to give a rougher finish.
27
Add fallen fruit under the trees. We used yellow and red cake decorations from Nice Buns. Be sure to get the correct colour fruit under each tree.
28
Now rub the masking fluid away to leave a space to glue the trees. Use PVA glue or contact adhesive. Imperfections can be covered with static grass tufts or scatter.
29
Alternatively, you can cut the base off the trees and use a dowel instead. Cocktail sticks work well for this and a 2.25mm hole drilled in the baseboard and in the base of the tree will allow you to achieve maximum strength.
30
To complete the look, we added some hedges from the Martin Welberg range. Simply pick out the hedge you want and glue in place with PVA.
![How to model an autumn scene]()
We’ve been surprised by how much the process of scenery production, and in particular trees, is speeded up by the use of ready-made items without sacrificing realism. Although they are quite usable straight from the box, a little attention can improve their appearance considerably. Model in a holistic way and aim to spend as much on your scenery as on the railway items. Your model is only as good as its weakest element - many otherwise good layouts or dioramas are marred by getting this balance wrong.
Looking to create bushes next? Watch one of the Woodland Scenics experts show you how.
Need more advice? Take a look at the BRM Techniques page for all our latest guides and advice articles.