


04 September 2021
|

A vital part of setting the scene for your model railway is a backscene or backdrop, in this article, we go through the various options available to modellers, plus provide some top tips.
It’s fair to say that the worst kind of backscene is no backscene at all. Perhaps your mind’s eye can screen out the rest of the world behind the baseboard. However, if you have an exhibition layout, something is very definitely better than nothing. Even at home, some kind of backscene would be better than the floral curtains or the bookshelves...
What is a model railway backscene?
A model railway backscene or backdrop is essentially the background to your layout and can take many different forms, including something as simple as a sky, a continuation of the scenery like hills or trees, buildings and urban environments, or even an image that provides forced perspective to the layout.
Why do you need a model railway backscene?
It helps to set the scene for one and can be created in a variety of different ways. You can opt to have the layout backdrop printed, have a go at painting yourself, or use photographs. Here we describe the most popular options and some best practice to help you on your way.
Another benefit of a backscene is to hide the edges of the baseboard and it helps to create a more realistic look to the scene.
What materials to use for the model railway backscene?
All backscenes need to be fixed to a rigid surface or painted directly to one. Wood is a popular choice, usually ply, or chipboard can also be used. Depending on the size of a layout, thick cardboard can be a good choice, although on bigger layouts the material can start to lose its shape. MDF is also a consideration, although its weight can become an issue.
Are model railway backscenes free?
If you are not artistic, or you don’t wish to go to the expense of a bespoke backscene, even plain-painted boards or a roll are better than nothing. This is as cheap as it can get, just using a coloured board to help created simple neutral sky tones, which can be useful for urban environments with spaces between buildings. This is preferable to something that might not look right from the perspective of the viewer.
Model railway backscenes: paint your own
A can of pale blue spray paint and a white primer works well, but maybe experiment on a large piece of paper first. Try to use paler tones at the bottom of the scene graduating to darker shades at the top to give a sense of distance.
Just by fitting a plain white, grey, or blue board, light will be reflected back onto the layout giving it a more vibrant look. If you paint a horizon, it’ll draw the eye into the layout and make it seem wider.
See our guide on how to paint a backscene here for more advice.

Ron North’s ‘Sheerness’ backscene makes great use of a low horizon and big skies to give the feel of flatlands around an estuary.
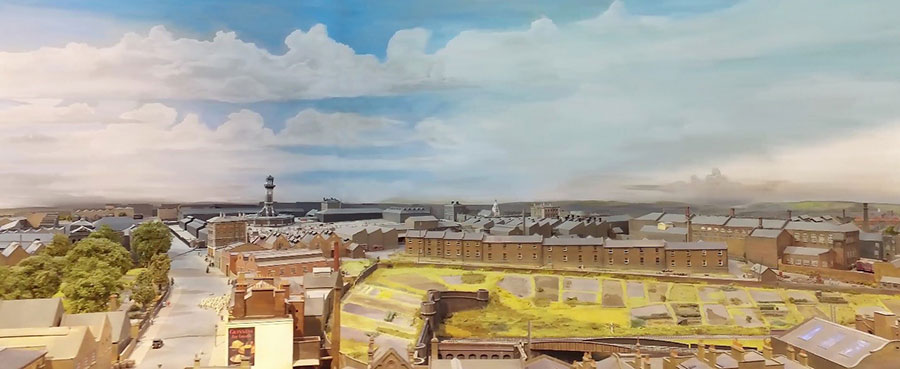
Want to go a step further? Why not have a go at painting more scenery into the backscene? It’s not as difficult as you may think, as a lot can be achieved with emulsion paint and big brushes for the sky and sponge and brushwork for vegetation. Below is an image of 'Llanidris', a stunning OO layout featured in the June 2021 issue of BRM.

This backdrop is hand-painted by Robert Brown on sheets of hardboard with cheap, oil-based undercoat, acrylics and artists' oil paints. Here are Robert’s top tips on painting your own backscene:
- Avoid drawing vertical lines that represent horizontal structures. For example, a road or a dry-stone wall receding into the distance may appear vertical when you’re standing on top of it, but if you put that in your backscene it will look wrong from almost any angle. It’s much better to use shallow diagonals – they'll make sense from most angles.
- Is the layout at, or below, eye-level? This will affect where people will expect to see the horizon in the backscene. Try using a roll of wall lining paper to make a quick cut-out paper version of the horizon, Blu-tacked to a wall behind the layout, to see if it looks right in relation to the perspective of the layout.
- Make a scaled-down painting before painting anything large. When it looks right, draw a grid of squares on it, and draw the same number of squares, scaled-up, on the surface where you’re going to paint your backscene. If it’s large or complicated, number the squares to be sure you’re copying the right part.
- Start with the sky after deciding what it should look like. It may not need to be blue! Even if it is blue, you may find you need to mix much more white than blue into your colour. Photos may be helpful. There is very often a gradient of tones and colours in the sky going from deeper more saturated colours at the top, towards lighter, less saturated colours at the bottom. Blending colours is much easier with large brushes, and with paints that don’t dry too quickly. When painting the landscape, keep in mind that distant colours are often paler and may appear to be radically changed, sometimes by being mixed with the colours visible in the sky. This effect is sometimes known as 'aerial perspective'. There are many articles on the subject to be found online.
- Avoid too much small detail, which will be a distraction from the layout. It’s generally better to think like a stage scenery painter, going for large effects and simplified detail.
What about clouds?
Cloud effects can be started by daubing or stippling light amounts of white emulsion onto the graduated blue sky. The underside of a solid cloud base can be created by a light grey above the horizon line.
Subtle tones can be seen in cloud formations of all kinds, a touch of cream or beige softly blended in can give an impression of bulk or density to the cloud formation.
When looking toward the sun, cumulus clouds often have darker tones in the thickest parts of the formation. These can be created by blending in darker beige tones. Tester pots of emulsion are cheap to obtain a variety of tones.
Pre-printed backscenes
There are some very good ready-made backscenes available from a wide range of suppliers, and some come very keenly priced. If you are looking to commission a more unique backscene, this can start to become expensive, although the end result will probably be very rewarding.
You need to think about how you will join the sheets and what to mount them onto. Fixing the paper to the mounting surface is perhaps the most tricky aspect of the construction. A spray glue, which allows the paper to be re-positioned, is a good choice, or a watered-down PVA. Always start at one end and use a cloth to smooth the paper down onto the boards so that you don’t get ugly bubbles and wrinkles in the sky! Also, make sure you allow the glue to sink into the wood before applying so your backscene does not get soaked and sticks better.
Using photographs for your model railway backscene
There’s nothing better than a backscene that is readily identifiable with the location being modelled. If you are not great with a paintbrush, it may be worth tackling it from a more technical perspective and making your own photographic backscene or acquiring a photograph and getting it printed. Here are some top tips if you are planning to take your own.
- A bright but overcast day can often give good results, but strong or low sunlight can give awkward shadows to deal with.
- What season do you want the backscene to represent? There’s no point in taking a series of pictures in winter if all your trees on the layout are in full leaf, for example.
- Consider the extreme left and right positions of the scene you want to capture and take your photos when the light is behind you.
- Work out the exposures needed to correctly capture each frame of the scene. Choose the most appropriate exposure that you can use for the whole scene without changing it.
- Mount the camera on a tripod to ensure that all of the shots are level and the horizon lines up as accurately as possible.
- Zoom in as much as you can, but try to include the upper and lower limits of the scene to capture as much detail as possible.
- Manually focus on a fixed distance with a narrow aperture (i.e. a high F-number) to gain the best depth-of-field. All of the scene needs to be in focus.
- Use a shutter-release cable, or the camera’s timer, to minimize any vibration or movement. This will reduce the risk of blurring, which is especially important at long zoom lengths.
- Take the first shot on the left and include what will be just ‘off-scene’ as a reference point. It can always be cropped out later.
- Move the camera to the right in stages, overlapping the previous shot by about fifty percent. This is so that the software stands the best chance of aligning the pictures.
- Take the final shot on the right to include what will be just ‘off-scene’. Once again, this can be cropped out later.
- Re-take all those shots again, just so you have some spare frames if needed. It’s easier to do this now rather than having to return on another day.
- Re-take the scene with slightly different exposures – a little under and a little over, to make sure you have enough back-up shots. This might also reveal a little more detail in the sky or landscape.
Stitching the images together
Once you have your pictures transfer them to the computer. You’ll need some software to blend them together. Microsoft’s Image Composite Editor is free to download – just search for Microsoft ICE.
The software compares all of the images and blends them together giving you the base panorama. After that, you will need some image editing software to crop the image, adjust brightness, colour saturation and sharpness. Adobe Photoshop is the industry standard, but free alternatives such as GNU Image Manipulation Program (also known as GIMP) are easy to download and install.
What about forced perspective?
‘Copenhagen Fields’ layout makes excellent use of forced perspective by modelling buildings into the distance, at diminishing scale and with muted colours. The scene feels as though it is miles deep, rather than just a few feet.
The basic principle of forced perspective is that objects appear to get smaller with distance and so, by making models of diminishing scale one can create a false impression of great distance within a finite space. Scale diminishes in exponential steps. What this means is you divide the scale, at each step, by some fraction rather than subtract from it. So the effect is gradual in the foreground but gets progressively more extreme towards the back.
This effect will be achieved by both the backscene and the objects in the foreground. It can be a little tricky and time consuming to get right, but the end result can be well worth it.
More useful guides
Still tied up with the model railway terminology? Visit our Glossary section.
Undecided on which railway era to model? We explain the key eras of railway history used when modelling in our guide.
There are a few trackplan types around which model railways are based. Our guide here takes a look at the most common...
Looking for trackplan inspiration? - Our guide explains all.
If you're thinking of tackling water on your layout? Our guide on how to model water here should be your first port of call.
Need more advice? Take a look at the Techniques page for all our latest guides and advice articles.
Your weekly World of Railways newsletter
Are you subscribed to our weekly email newsletter? Don't miss the latest news, reviews, modelling advice and competitions.