Whenever the railway needs raising above the surrounding land, an embankment is required. They are a common feature and a pleasing way of looking at a train since they raise the vista above obstacles and give it prominence. Photographic planks often employ an embankment for this very reason.
Railway embankments are tipped into place when built and the material they are formed from will naturally find its own angle of repose. This will vary depending on the material, but in general, a ratio of 1:1.5 or about 35% is a good approximation to make. In modelling terms, since we often compress distances and the like, and the material will be glued in place, you could make the angle as steep as you want, but it won’t look right if you overdo it. You stand more chance of getting away with a steep angle if the embankment is hidden under undergrowth. Having said that, during the days of steam, embankments tended to be kept clear of vegetation. It is only in relatively recent times that large trees and bushes have proliferated at the trackside.
One feature that it is essential to model in Britain is restricted access to the lineside. Some countries, like the US for example, lack this feature, which means that trains need to make a great deal of noise when passing through built-up areas to warn of their presence. So, you need to build a fence/wall/hedge of some kind. Consider drainage too, a ditch was usually dug inside the railway boundary to remove water.
This article concentrates on decorating a pre-existing embankment and its environs. Since sweetcorn and runner beans are modelled, the season is late summer.
Shopping List:
Hot Wire Foam Factory Styrogoo
W: www.terrascenic.co.uk
Hornby Skale Scenics (R7174) Brown Scatter material, (R7178) Meadow Static Grass and (R7166) Limestone Ballast
W: www.hornby.com
GreenScene green natural plastic-free flock
W: www.greenscene.online
Polak (2762) Naturex F Medium Brown
W: www.polakscenics.uk
Noch (07101) Beige Wildgras, Noch (23102) Embankment Vegetation, Gaugemaster (GM160) Light Green Hedgerow, (GM169) Static Grass Glue (SGG), (GM103) Dark Green Scatter, Busch (7042) Green Scatter
W: www.gaugemasterretail.com
3ft Chain link fencing (LX183-OO)
W: www.scalemodelscenery.co.uk
2mm Spring Static Grass
W: www.finescalemodelworld.co.uk
Citadel Agrellan Earth
W: www.games-workshop.com
Slaters 1.4mm plastic rod
W: www.slatersplastikard.com
Tasma Products (00901) Runner Beans and (00680) Sweetcorn
W: www.themodeltreeshop.co.uk
Carr’s (C1133) Tree Leaves and (C1091) Spriggs
W: www.phoenix-paints.co.uk/products/carrs
Peco (PSG-11) Layering Spray
W: www.peco-uk.com
Lifecolor (UA705) Dust
W: www.airbrushes.com
Dapol (C002) Railway Workmen
W: www.dapol.co.uk
Strong Tone Quickshade ink
Content continues after advertisements
Creating the embankment
1
We made my embankment from foam because it is light and easy to carve. The pieces were glued using Styrogoo. A gap was left between the slope and the level ground to form the drainage ditch.
2
After a skim over with filler, with added ground coloured acrylic, we sprinkled scatters onto Static Grass Glue (SGG) to form a base layer over the whole embankment. Use a scatter with a small particle size.
3
Sometimes embankments have had drainage gulleys dug into them that are filled with aggregate. We used Hornby Limestone ballast, held in place with SGG to represent this.
4
For coarse grass, a base green layer of Hornby Grass meadow static grass was first applied. Use SGG in a thin layer, otherwise your grass will fall over when the strands land in it.
5
Before the glue dries, apply a green scatter; We used Gaugemaster (GM103). This dulls any shine on the glue and grass and stops the latter looking thin.
6
Proceed to apply the static grass in small areas of about 10cm square until you have covered the embankment.
7
Add a second layer of grass. Use newspaper to mask grass-less areas and then apply Peco Scene Layering Spray. Spray enough to give the grass a frosted look.
8
Long grass will have flowered and been bleached in the sun and is represented using 6mm grass from Noch. Apply the fibres using a static grass applicator.
9
Avoid uniformity by using a blunt instrument to gently move the fibres around to give a random tufted appearance. This mimics the effects of wind and rain on the long stalks.
10
Make Fireweed using bristles snipped from a brush. Dip into SGG and then into Hornby Grass Meadow scatter. Leave to dry.
11
Once dry, lightly coat the ends of each Fireweed plant with SGG and then into Hornby light brown scatter. We used this colour as the plants are about to commence
12
Foxgloves will have flowered and the seeds will be turning a brown colour at the time of year modelled. We used hairs from a paint brush for this, dipped in SGG then then into Polak Naturex F brown scatter.
13
Brambles are made from Carr’s rubberised horse hair. Apply Peco Scene Layering Spray and then dip into Carr’s Tree Leaves.
14
The bushes are made from the Noch Embankment Vegetation Kit, although we didn’t use the leaves provided. Break a piece of sea foam into the size you want, apply SGG, then dip into GreenScene natural plastic free flock.
15
Plant the bushes and weeds using SGG, drilling a hole as necessary. If you are short of time, you can use a contact adhesive to speed things up. Plant Fireweed in blocks and not individual stems.
Creating the fence
1
Paint the fence posts while they are still on the sprue with acrylic paint. A light grey colour, such as Lifecolor (UA705) Dust, gives a good impression of concrete.
2
Remove the posts from the sprue and flick various shades of black, brown and grey at them with a toothbrush. Rotate the posts so that all sides receive a covering.
3
Drill a row of holes with a 1.3mm drill with a spacing of 25mm for the posts.
4
Push the posts into place, using SGG to hold each one. Use the posts with added bracing at any corners or end runs. Leave to dry.
5
Apply a strip of masking tape to the mesh. Mark a line 10mm along the tape using a marker pen and rule.
6
Cut through the tape and the mesh along the marked line using a sharp knife. Now peel away the tape to leave the cut mesh.
7
Glue the mesh into place at one end post using cyanoacrylate and wait for it to dry. Now repeat the process using the post at the far end of the length of mesh. Ensure the mesh is taut and untwisted.
8
When the two end joints are dry, glue the intermediate posts to the mesh using cyanoacrylate. Work in good light as the mesh is difficult to see.
9
Trim off excess mesh from the end posts. Use an accelerator on the glue for speed.
Creating the allotment
1
To represent the cultivated grass around the growing beds we used 2mm Spring Static Grass from FMW.
2
Many gardeners use a mulch of compost or bark to aid moisture retention during the growing season. A great way to represent this is to glue Hornby Brown scatter material across the beds.
3
To represent mud and dried-up puddles, we added patches of Citadel Agrellan Earth to the soil areas with a paintbrush. This cracks as it dries to give a realistic appearance.
4
To plant the sweetcorn, apply SGG glue to the end of the plant and press into place (drill a hole if you haven’t used a foam base). As it is wind-pollinated, sweetcorn is planted in blocks and not in rows.
5
Add the runner beans in the same manner as the sweetcorn. You can ‘plant’ these vertically or by leaning them against other poles.
6
To provide a sheltered environment, a hedge is often grown around allotments. We used Gaugemaster Hedgerow for this. Simply snip to length and glue in place with SGG.
Creating a scarecrow
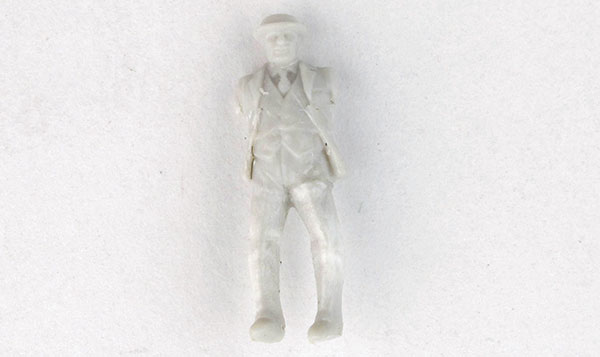
1
Use the bowler-hatted foreman from the Dapol Railway Workers set. This is what he looks like before work commences.
2
Clean the seam lines with a file, cut the base and arms off, and file the top of the hat flat. Use pliers to bend the legs inward. Pare away the face detail.
3
Using a 1.4mm drill, make a hole through the upper body and slide in a piece of 1.3mm plastic rod, then glue with Liquid Poly.
4
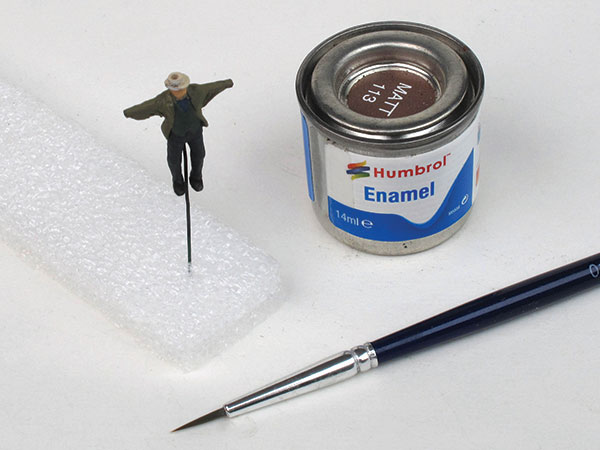
Cut some triangles from 0.020in plastic sheet and stick these to the arms. When dry, add filler to blend the sleeves into the body. Drill a hole and add a piece of wire to represent the mounting pole.
5
Paint the scarecrow with colours you have to hand using the mounting pole as a handle. You will need to apply a coat of primer first if you use acrylic paints.
6
To give depth to the figure, we painted it with Strong Tone Quickshade ink. This is designed to flow into the crevices and hollows.
![]()
Looking to model seasons? See below guides to help you capture the look.
How to create a spring scene
How to model winter
How to model an autumn scene
How to create summer scenery
Looking for more advice on adding static grass to your model railway - our video explains all.
If you're thinking of tackling water on your layout? Our guide on how to model water here should be your first port of call.
Need more advice? Take a look at the BRM Techniques page for all our latest guides and advice articles.