With the collapse of power station coal traffic over the past few years, freight operators have found themselves with large fleets of redundant coal hoppers. Although many have since been pressed into aggregate use, they are inefficient in that stone is far denser than coal and a lower train payload is carried for the same train length.
During 2016, GB Railfreight started a 'cut and shut' project on a number of similar IIA/HYA coal hoppers, by cutting out the centre bay and welding the two sections back together to form a two-bay aggregate hopper. In the middle of 2017, DB Rail followed suit with the conversion of HTA 310711 - reducing the length by 3.5m with removal of the centre bay. Recoded HRA, and renumbered 41 70 672 3 001-7, it was trialled for five months on workings from the Peak Forest area. This was deemed a success and a contract was signed for just over 100 more conversions to be carried out by WH Davis at Shirebrook.
For the same train length, 27 HRA hoppers can carry more than 22 HTAs, thus making them more efficient in aggregate use.
Shopping List
- Bachmann HTA coal hopper (various catalogue numbers)
- Railtec decals sheets 7088/7089/1053
- Phoenix Precision DB red P335
- Halfords grey and white primer
- Humbrol white/black/silver paint
1
The wagons are carefully disassembled by removing couplings, bogies, and the hopper door mouldings, before being split into the upper and lower ections, by removing the screws holding the two sections together.
2
The hopper door mouldings are glued in with locating pins. Thankfully, there isn’t much glue. The easiest way to remove the door moulding was to drill out the pin from inside the hopper while gently easing the moulding off. Some of the hopper door operating supports and rods are retained if possible – it is the set nearest the handbrake when the handbrake wheel is viewed on the right-hand side of the wagon. The others are carefully removed by prising them gently out of the mounting slots – or in the case of stubborn fittings – a sharp knife is used to remove them. These are saved for later.
3
A razor saw is used to remove 40mm from both upper and lower sections parts. The removed segments aren't in-line between the upper and lower sections to create a staggered joint for strength and alignment purposes. Cuts are made at 120 and 160mm from the end, while the lower section is cut at 90 and 130mm. The measurements are taken along the joint line between the two halves from the handbrake wheel end.
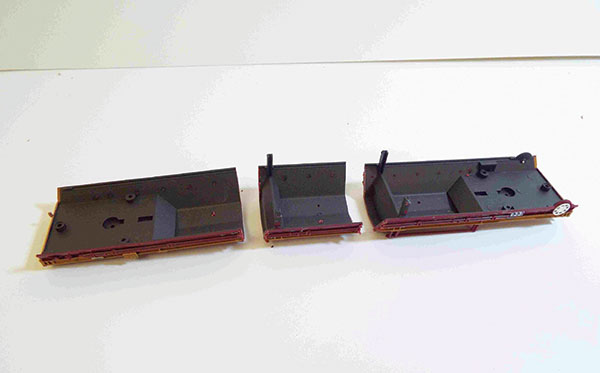
4
One of each of the upper and lower parts are first glued back together, taking care to make sure that the two sections are in alignment. Two of the screws holding the original mouldings together are used to hold them while the solvent sets.
5
The second lower part is gradually trimmed back, so that the new hopper section matches the same length as the original moulding; measuring 31mm along the inner hopper mouldings. This is then glued into position and allowed to set overnight, again, taking care that the two chassis halves are in line in both horizontal and vertical planes.
6
The upper body section is trimmed back to fit into place and left overnight to set completely. Any imperfections in the main joint are now carefully filled and sanded flush, along with the line between the upper and lower mouldings.
7
My filler of choice is Squadron White Putty, which dries quickly with minimal shrinkage for small gaps and is easily finished with needle files and fine emery paper. If the gap is large, I will fill it with a thin scrap of styrene, it with solvent and pushing into the gap.
8
Allow to cure for 48 hours, before finishing the joint with filler and sanding smooth.
9
The wagon bodies are given a quick dusting of Halfords Grey Primer and refilled/refinished as necessary, with primer used again to check the quality of the joint.
10
The prototype has a staggered joint that would be difficult to recreate accurately, so we opted for a smooth joint, later recreating the strengthening bands using thin strips of self-adhesive paper, sealed with varnish.
11
The hopper door operating bars and supports are refitted using parts that have been previously saved. Then it was time to paint, with a coat of white primer, followed by DB red from Precision Paints, with black hoppers and doors.
12
During the project, Steve at Railtec was contacted with a view to supplying suitable transfers and necessary information was exchanged. A few weeks later, a sheet of transfers arrived for test purposes. There are over 50 individual markings per wagon and only one minor adjustment was required before production of the main batch of transfers, which also includes the one-off white panel for the prototype wagon.
The HTA fleet was originally fitted with knuckle couplers and EWS Class 66s were regular traction. A few HTAs were fitted with a pair of buffers at one end when they were used as outer wagons on coal traffic from Liverpool Docks with Class 60s. Similarly, about 10 of the HRA fleet have been similarly fitted, so they can be hauled by Class 60s on the tough gradients from the Peak Forest/Mendips areas where they will be used.
The rake has been fitted with Kadee 142 couplers, mounted in the original Bachmann E-Z Mate pockets and will run as a fixed set on the layout. However, the outer two will be buffer-fitted and have Kadees mounted at the standard height. They will also be fitted with DCC-controlled tail lights so they can be turned on or off as required.
Content continues after advertisements
Overall, the project has resulted in a very distinct set of rolling stock to run on any layout.
Need more advice? Some of the below articles may help. Also, take a look at the BRM Techniques page for all our latest guides and advice articles.
Detailing the Dapol Western
How to paint your models
How to make your model trains grubby
Take a read of our step-by-step guide to weathering a locomotive using paint washes and powders here. Or if you’d like more general tips on weathering a locomotive, see our article here.