We all know that London Underground trains are electrically-powered, picking up power from rails in the centre and at the side of the track. Obviously, this isn't a good idea when there are permanent way staff working nearby. In these instances battery-powered locomotives are required.
The first examples were built in 1905, but the 1936 batch set the template for future examples being designed to the tube line loading gauge. In total, 52 locomotives were acquired in six batches from four different manufacturers. As you would expect, every batch was slightly different and the machines have been modified and upgraded throughout their lives.
The kit started life with Harrow Models before being passed on to Radley and it has been upgraded along the way. The instructions show a whitemetal body, but this has been replaced with a single piece resin casting in current kits. They also suggest resin bogie sideframes, but there are whitemetal ones in the box.
Assembly can be with glue or solder. I chose the latter for the whitemetal parts for speed, but epoxy or superglue would be just as effective.
Thanks to all the variations of the prototype, my model isn't perfect. You'd need more modifications and photographs for that, but it went together well and looks the part. Tension-lock couplings prevent me from trying to add all the end detail that is a feature of these machines, but I'm not complaining as this is where underground machines get very complex.
1
This kit has been through several versions according to the instructions. The body is a nice one-piece resin casting and the underframe a series of whitemetal parts. Two axles with 10.5mm diameter wheels are also required, plus a power unit.
2
A Tenshodo SPUD (Self-Propelled Underfloor Device) is the magic unit that powers this model. Supplied ready-to-run, the only problem with them is that conversion to DCC is difficult.
3
The castings are pretty clean but there is a bit of flash between some of the boxes on the underframe. Folding a piece of emery paper in half allows for this to be cleaned out. Polish any moulding lines off the buffer faces and other obvious areas at the same time.
4
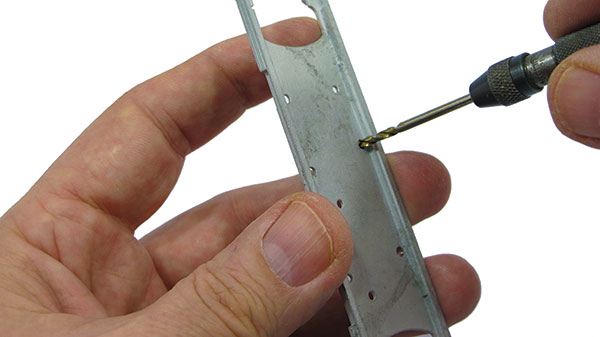
Because of limitations inherent in the casting process, holes in whitemetal normally need to be opened out a little with a drill bit or round needle file so the pegs on the castings fit nicely. You don't want a power tool for this, finger twiddling gives better control.
5
An exploded diagram in the instructions shows where all the bits go. Make sure you have the chassis the right way up when fitting them; remember the picture shows the top with parts fitted underneath. It's all too easy to get this wrong as I've found out in the past.
6
The front end slots together well but benefits from a dry run to ensure the correct side pieces are fitted the right way around.
7
The unpowered bogie should be fitted with brass bearings fixed in place with glue. Since I'm soldering the parts together, I'm using epoxy but superglue will work if you aren't heating things up. Make sure the bearings are properly seated in their holes or they will bind on the axle ends.
8
To finished the bogie, put the wheels in place, then trap them between the sides. Sadly, you can't get them out later, but as long as the build is nice and flat this won't be a problem.
9
In the SPUD box are a couple of brackets to clip in the bottom for holding sideframes. This job needs the fancy, curly end version as it holds the frames so the axles are in line with the axleboxes. For soldering, the paint has to be cleaned away, but you don't need to bother if you use glue.
10
The baseplate unscrews and then unclips from the SPUD, at which point the wheels fall out. Put them back in, making sure the pick-ups are behind them, followed by the stretcher holding the frames then the baseplate. It is a fiddle but can be done with just one pair of hands, just! Once everything works, add the stretchers on the ends (not shown here) with glue.
11
Brass nuts are fitted in the main chassis to hold the bogie supports. I'm gluing them with a smear of epoxy. Test the threads are clear by running a bolt through, but only after the glue is fully-cured.
12
The supports bolt in and bogies bolt to these. It's a nice system that allows for the parts to be easily removed in the future for painting and maintenance.
13
No provision is made for couplings other than 3-links, so I add a pad of 1mm thick Plastikard at each end then glue Bachmann cranked couplings to this. It's not ideal as the swing at the ends is quite large on tight curves, but there doesn't seem to be another solution.
14
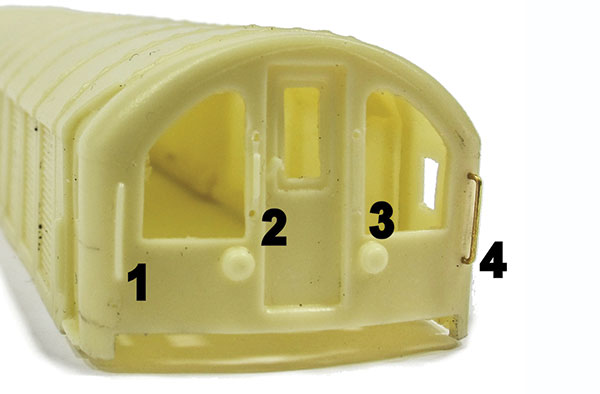
Moving on to the body, the moulded handrails need to go. My method is as follows: 1) Moulded handrail. 2) Trim the ends with a sharp knife and use these as a guide to drill 0.45mm holes. 3) Remove the rest of the handrail. 4) Superglue the replacement made from 0.45mm brass wire in place.
15
The modern locomotives are fitted with WIPAC lights that aren't in the kit. Without measurements, I've made a best guess and created them from 1.5mm square plastic strip. To make each lens, I cut half way through the strip with a fine-bladed saw, each cut being 1.5mm apart. A mitre block keeps things tidy and the cuts vertical.
16
When fitting the new lights, the old versions are sanded back to represent blanking plates. Buffers can be fitted in the conventional position, or folded up on to the footplate.
17
To extract a resin body from its mould, a greasy release chemical is used. This will repel paint and so needs to be cleaned off using washing-up liquid and lukewarm water. Don't use hot water as it can distort the resin. Rinse afterwards so there are no traces of the detergent left, then leave the model to dry.
18
Painting anything yellow can be a nightmare because it's a colour that doesn't cover well, even on a cream-coloured resin. A thin coat of white aerosol primer ensures a stronger and brighter colour.
19
To achieve a weathered blue on the sides, I paint the model with rail blue and then mix this with Humbrol 147 (Light Grey) to produce a paler shade that I dry-brush over the base colour. This is repeated with a little more grey in the mix each time to provide a variety of shades.
20
Finding the correct transfers for this era of model proved impossible. The closest I could find was Gill Light 1 and 2mm tall characters from Fox Transfers. The end numbers really need to be bold but at least the results are better than my signwriting. Because my model is generic, I've numbered it 42 which doesn't actually exist, so I can't be wrong!
21
After a light dusting of weathering from the airbrush, the glazing is fitted. It's a nice set of vac-formed clear plastic parts that can be glued in place with a suitable adhesive. If you've replaced the handrails with wire, check there aren't bits of wire sticking through the body and getting in the way. I had to clip a few off to get the glazing to sit properly.
![]()
Need more advice? Some of the below articles may help. Also, take a look at the BRM Techniques page for all our latest guides and advice articles.
Content continues after advertisements
Detailing the Dapol Western
How to make a Class 20/3 from an RTR model
How to paint your models
How to make an HRA from Bachmann’s HTA
How to make your model trains grubby
How to make a pre-grouping coach
Take a read of our step-by-step guide to weathering a locomotive using paint washes and powders here. Or if you’d like more general tips on weathering a locomotive, see our article here.