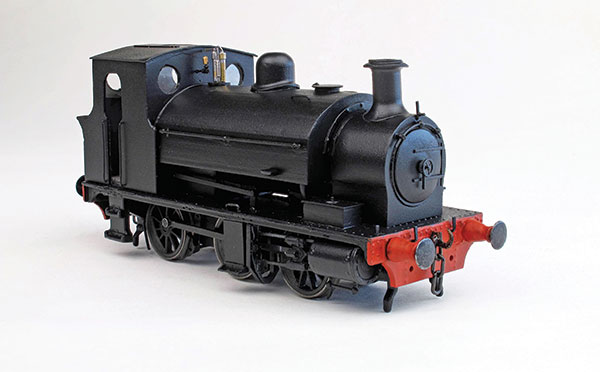
1
Undo the four screws holding the cab in place. Place the locomotive to one side while you work on this.
2
Lever the floor away from the underside of the cab. You will need to gently squeeze the cab sides from different directions until you break all the glue bonds.
3
To make the cab front and backs, cut a 10cm long piece of 0.9mm thick styrene sheet 28mm tall. Using a compass cutter set to 9cm, mark the roof angle and cut the material away to form a gentle curve.
4
For the front cab plate, mark 30mm from the top of the roof and cut the piece out. Using the old roof as a template, cut out recesses for any wires that pass in front of the cab. The rear cab plate is made in the same way, but is shorter, at 29mm tall, as it sits on the cab floor. Create the spectacle plates using a 6mm hollow punch.
5
The cab sides are made from the same 0.9mm material of size 28.5mm by 31mm. Mark the curves and the profile by looking at the side projection of the real locomotive. Use a drill to extract internal material and cut between the holes using a knife. Tidy up with a file.
6
Using the same piece of the strip that you made the cab front and backs from, cut out a piece 16mm tall for the bunker back. Score lines on one side and gently bend the top to match the bunker profile.
7
Replace some of the controls with 0.45mm and 0.3mm brass wire. For example, the regulator is an obvious candidate for an upgrade. Pare the old control away using a sharp knife. Bend the new control using pliers and glue in place with cyanoacrylate, then glue the firebox backhead in place on the new cab front.
8
Prepare the cab side with fillets to hold the cab front, back and the bunker back in place, and to strengthen the joints. Fill in any scribing lines with filler and sand flat.
9
We had to make a recess in the cab back to cater for a capacitor mounted in the bunker, we also added detail of the bunker access hole from 0.25mm styrene sheet.
10
The cab parts are painted with black enamel on their internal surfaces. Once dry, add masking tape and then paint the upper interior surfaces an off-white.
11
The cab parts were laid out and a dry run of the assembly made to check that the fit was good. The brake handle is made from 1.4mm and 1mm plastic rod, with a handle made from 0.35mm brass rod.
12
The cab roof is made from a piece of 0.9mm styrene sheet 33mm x 22mm in size. We held this in place with a rubber band and then ran Liquid Poly glue around the front and back areas. When dry, the rubber band was removed and then glued on the sides where the rubber band had been. This allows for easy and precise alignment.
13
You can make the edges of the bunker a more prototypical thickness by filing them on the inner edge.
14
We wasn’t happy with the thickness of the overhang on the cab roof. We therefore filed this back to the cab sides and added filler to smooth out any imperfections. We then added a new roof made from 0.25mm styrene sheet. The cab ventilator was made from the same material.
15
To gain entry to the saddle tank, undo the screw beneath the smokebox.
16
Remove the smokebox and the balancing pipe from below, then slide the saddle tank towards the front.
17
Remove all the detail from the saddle tank. Components such as the dome may require some leverage with a screwdriver. Wear goggles when you do this. Other components are held by lugs that can be seen from beneath and are best removed by drilling through with a drill of the same diameter.
18
Fill in the holes produced by removing the components using a compass cutter and/or a hollow punch of the appropriate size.
19
The bottom of the saddle tank needs to be made square. Use 1.5mm 'L' angle styrene to form this and use styrene sheet to make the height up on the base of the tank. Ensure that you provide a cut out so that the saddle tank slides back onto the chassis without impediment.
20
Glue another piece of 1.5mm 'L' angle styrene onto the saddle tank to form a level surface when a set square is held in place against the bottom of the saddle tank.
21
Now fill in the gap between the two 'L' angle pieces using gradually smaller and smaller pieces of styrene sheet. Use a set square to ensure that the material doesn't protrude more than it should.
22
The sides of the saddle tank need to be flat and you can use filler to correct slight imperfections.
23
Use sizes of 0.040, 0.030, 0.020 and 0.010in styrene sheet to form the curve of the saddle tank using gradually smaller and smaller pieces to fill in potential gaps. Once the gaps are less than 1mm in size, use filler to make a perfectly rounded surface. Use abrasive paper to get a nice smooth finish.
24
Glue the dome in place you can refit the original. Make a filler vent from 6mm and 7mm discs cut from styrene sheet with a hollow punch.
25
File all the detail off the smokebox and prise the door off by levering and pushing on the tabs from behind. Fill in the space vacated by the smokebox door and make a new door from three pieces of 0.010in styrene sheet. Use hollow punches or a compass cutter to form these. It is useful to use the latter to make at least one of the smokebox pieces as it will give you a centre point that makes fitting the smokebox dart much easier.
26
The buffer beams are too shallow. Make extensions from 0.030in styrene sheet and a 0.010in overlay. You can make rivet detail in the latter by making indents from the reverse side with a blunt tool. Glue in place with cyanoacrylate glue.
27
The sandboxes are made from layers of styrene sheet glued into a box shape. The filler cap is stamped from 0.010in styrene sheet using a hollow punch. Use filler to smooth the sides of the sandboxes.
28
The buffer shanks stick out too far. Correct this by pushing the end spring retaining washer further down the shaft and gluing in place with cyanoacrylate. Build up the buffer bodies with strips of styrene sheet and filler.
29
The safety valve is made from 10 metal parts soldered together. It is rather a fiddly job and time consuming, so you may prefer to buy one off-the-shelf. The whistle is the same Heljan item, reused.
30
New steps were made and glued into place with cyanoacrylate glue. Note the piece of 0.6mm brass rod used to strengthen the joint to the footplate.
31
We used 2.5mm, 6mm and 8mm hollow punches and 0.020in styrene sheet to make cylinder end covers.
32
The brake gear on the Heljan model doesn't give much ground clearance, so we made new hangers, styrene brake blocks and rigging.
33
The handrails are made from 0.45mm brass rod, the smokebox wheel is from 51L (ex-Mainly Trains) and the chimney was left over from a 'Jinty' upgrade kit. The rodding for the cylinder cocks is made the same way as the handrails and employs the knobs from the 1361 incarnation.
34
Mask the wheels and motion using making tape. I also masked the safety valves and buffers, but it is better to leave them off. Since metal has been used in the build, you must use a primer.
35
To cover the gap in the bunker, use kitchen tin foil. The primer will make it more amenable to glue so it can be covered over in the next step.
36
After painting, the spectacle glass is punched from clear material with a 6mm hollow punch and glued in place with PVA adhesive. Add real coal to the bunker and fix in place with PVA adhesive.
Take a read of our step-by-step guide to weathering a locomotive using paint washes and powders here. Or if you’d like more general tips on weathering a locomotive, see our article here.