09 September 2020
|

Tony Wright suggests a few tweaks to make Hornby’s Peppercorn 2-6-0 even more impressive.
As a ‘layout locomotive’ the Hornby K1 is ideal. A couple of evening’s work saw it detailed, renumbered and weathered and it fits perfectly into my layout scheme.
What you need
- Xuron cutters
- A set of fine needle files
- Pacific Models numberplate decals
- Model Scene footplate crew figures
- Real coal, crushed with a toffee hammer
- A selection of paintbrushes
- PVA glue
- Weathering paints
- Hornby valve gear spanner
- Springside Models headlamps
1
A near-perfect RTR locomotive, representing outstanding value for money. Front steps, cylinder drain cocks and bufferbeam detail have to be added by the purchaser. A common problem on RTR locomotives with Walschaerts valve gear is the wrong ‘lean’ to the return crank on one side, in this case the offside. Both return cranks should lean forwards; the nearside is correct (Bachmann’s tend to be the opposite). This angle is absurd, resulting in a weird impression when running.

2
The cure is quite simple; I used Hornby’s own little spanner to undo the bolt in the centre of the crankpin, moving the return crank forward about 90 degrees. Small pliers will do just as well.

3
As designed, the ‘big end’ of the crank should sit over an elongated slot (the same for both sides, hence the incorrect lean on one side). By moving it, there is no self-locking facility. This is not a problem because, by tightening the bolt, the crank is still held securely. Should you wish, a dab of Loctite will make it more secure, but ensure nothing of it penetrates to the moving surfaces.

4
The pony truck has the obese NEM socket for a variety of couplings. I removed this off with Xuron cutters, dressing back the remains with files. An aperture still remains but when this is painted and a proper front coupling fitted, it’s all but invisible. The Hornby pony wheels are a bit clumsy and will be replaced.

5
With 70 locos to choose from, renumbering will give a potential one-off locomotive, different from the hundreds of No. 62015s. To make this easier, I decided to change just the last digit, but still have it as a March-allocated example. A new curved Swann Morton blade proved the easiest method of taking off the last numeral.

6
I used the HMRS transfer sheet No. 14 to effect a change. This is a good match with regard to size, if not exactly the same colour.
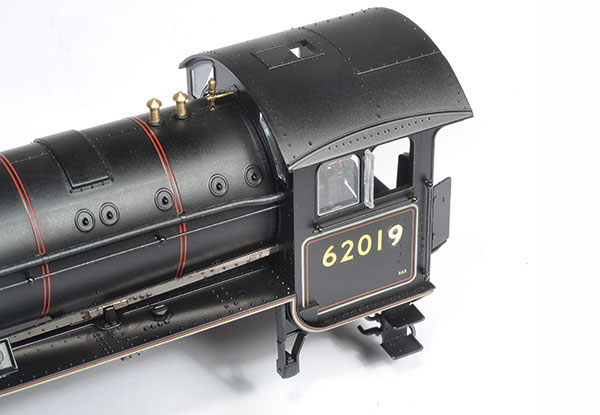
7
Weathering will disguise any slight discrepancy in the matching of the numerals and colours, as illustrated here.

8
A new front numberplate was also required. I use Ian Wilson’s Pacific Models range exclusively; superior to any cobbled-together transfer alternative in my view. Ian provides every number, with both styles of ‘6’ and ‘9’. This was fitted after weathering because the plates were often repainted between works visits (as cabside numbers were often just cleaned as well).

9
Whatever the origin of a locomotive, it must have a crew. For models with ‘deep’ cabs, the cheapest pre-painted ones are suitable, in this case from Model Scene (ex-Merit). These are a bit ‘blobby’ but do the job.

10
Real coal (broken up in a polythene bag with a toffee hammer) looks exactly like 4mm scale real coal. I just dribbled in some PVA and applied the coal, letting some bits spill over into the rear space.

11
Weathering always makes an RTR locomotive look more natural. Using a prototype picture as a guide, I applied the dry-brush technique, using a mixture of matt greys, browns and black. Brush strokes were applied in the direction of gravity, with odd dabs of brown finally applied. Here the locomotive is in service, complete with lamp indicating a part-fitted freight. The screw shackle fitted to the front bufferbeam adds a touch of realism. For the moment, Hornby’s pony wheels are retained.

Need more advice? Some of the below articles may help. Also, take a look at the BRM Techniques page for all our latest guides and advice articles.
Content continues after advertisements
How to make your model trains grubby
Take a read of our step-by-step guide to weathering a locomotive using paint washes and powders here. Or if you’d like more general tips on weathering a locomotive, see our article here.