I was born in the 1950’s, every penny of my parent’s household budget was carefully accounted and the pressure of merchandising on the new ITV channel was not a parental consideration. I would approach my Mother and demand a “Supercar” or “Fireball XL5” toy. Without even considering the grave psychological damage she was doing, she would suggest that I should make one, so at the age of 9 years, that is just what I did.
For materials, I used cereal packets, toilet roll cores and foul-tasting brown gummed tape. From then on, I was on a slippery slope into an obsession with model making, whether by nature or nurture is still open to debate, but it is certainly my Mother’s fault.
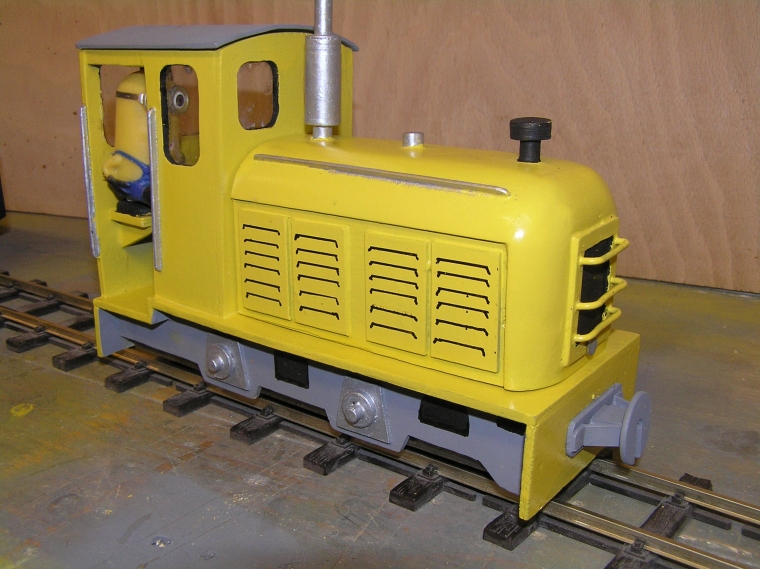
There are of course some very special little people in our lives, our children and grandchildren. During a discussion on a well-known forum, it was agreed that for children to enjoy our railways they need locomotives that can be pushed along and must have access to the interior of both locomotives and carriages. Figures should be robust and preferably recognisable from TV and films. My locomotive has been built to meet this specification. I do hope my particular grandchildren enjoy running it along with the open carriages I have also built.
For materials, a sheet of 3mm plywood will do, a bit of MDF, plus some 1.5mm plywood from the model aeroplane shop adds a bit of luxury. Add a couple of strips of steel, a Como drills motor, bevel gears, screws and washers out of the bits box, some Binnie wheels and axles, two tins of spray paint from the Range and the whole lot will cost about £25.00.
Content continues after advertisements
1
I like to begin with some kind of reference. In this case, I traced over and modified a picture of a Christoph Schöttler Gmbh 72 HP locomotive built in Germany in 1969. The picture was downloaded from the internet and scaled on the printer to be the right size, I work on the door aperture being about 90mm high to fit a driver of approximately 5’8” height. Reference photographs are printed to the same size as the finished loco. From this, I produce a working sketch (it's not grand enough to be called a plan).
2
My stock of offcuts from DIY projects, plus the odd bit of special thin plywood from the model aeroplane shop provide most of the materials. Dolls house shops are often a good supplier if there aren't any aircraft shops nearby, or even the Hobbycraft chain.
3
The essential tools at the Bodgeit and Run Locomotive Works. The electric sander could be replaced with hand tools but overall, the kit isn't exactly extensive or expensive.
4
The Tennon might look on the big side for this sort of job, but it cuts a superbly-straight line. Details such as windows and motor clearances are cut out with a fret saw and sanded carefully with me checking and rechecking the squareness.
5
The ply and MDF parts are cut out and laid out for inspection. All I need to do now is stick it together.
6
The dummy chassis and cab are bonded together with super glue and then PVA adhesive rubbed, and I mean rubbed, into the joints and then the resin allowed to dry overnight on top of the central heating boiler.
7
The engine cover bonded up, two layers of MDF are used for the curved sections and then sanded to shape. Wear a dust mask while doing this as it's dangerous to breathe it in.
8
First hints of the finished locomotive appear on the workbench. It's a good idea to keep coming back to the model with fresh eyes. At this stage, making modifications is easy.
9
The model is painted with model aircraft sanding sealer. This is a cellulose dope mixed with fine talcum power that is absorbed by the wood, raising the grain slightly. Sanded, re-coated and sanded again, a glass-like finish can be achieved.
10
Priming with a rattle can of automotive grey primer. This is followed by the topcoat, I used Hycote Double Acrylic Ford flat golden yellow.
11
The basic chassis is made from two steel strips. The trick is to bolt the two pieces together then drill the axle holes, that way the holes line up. I prefer to make spacers from brass tube and long bolts, but in this case they were made from plywood and some strips of pine, to preserve my stock of long M3 bolts which are hard to come by. The wheels were G Scale wagon wheels given to me by a friend, but alas they needed the profiles modifying to create a narrower tread and lower profile. In retrospect, I should have used Binnie Wheels and axles.
12
My first attempt at making a drive using two Cambrian 40:1 worm wheels fitted to either end of a double-ended motor. The plastic worm is just acting as a joiner for the shafts and isn't in contact with anything.
13
Unhappy with my first attempt, I eventually used a Como drills motor and plastic pinion driving a single axle. Bevel gears will allow the locomotive wheels to rotate when it is pushed along rather than powered.
14
The motor installation looks quite neat and it runs well on 4 or 5 cells. Control is via the toggle switch fitted to the side of the cab.
15
The dashboard is simply printed out and stuck in place with double-sided tape.
16
Detail such as bonnet louvres are drawn on with a black CD marker pen. From normal viewing distances, this subterfuge isn't obvious.
17
The crew ready to haul the special from Cwm Agen to Abbernuffawun.
18
There we have it, a train that children can be pushed along with access to the interior of both locomotives and carriages. The passengers are robust and recognizable. Most importantly, it's all fun!
Need more advice? Some of the below articles may help. Also, take a look at the BRM Techniques page for all our latest guides and advice articles.
Detailing the Dapol Western
How to paint your models
How to make your model trains grubby
Take a read of our step-by-step guide to weathering a locomotive using paint washes and powders here. Or if you’d like more general tips on weathering a locomotive, see our article here.