Everything you see on a model railway (and a real one for that matter) has been painted. Let's face it, painting is a skill all modellers need to acquire. The days of self-colour plastic kits claiming 'no need for paint' are largely behind us, mainly because most modellers realised that the prototype rarely looked like it was made of self-coloured plastic and demanded something more realistic.
My examples make use of a couple of old BRM projects. Firstly, we have a simple garden shed. This one is brass, although the principles are the same for plastic and resin versions. Scenic items are the perfect place to learn your craft because they rarely need to be perfect. In fact, if they are perfectly painted, you'll need to mess them up a bit for realism.
The second is an O gauge conflat wagon. A complicated and detailed vehicle, it's the sort of model people will tend to think you'll need an airbrush for. It's true that this is a useful tool, but I managed without one and could do so again. Spray cans and weathering powders will give acceptable results on a budget.
All this is going to require a selection of paint. I’ve used Humbrol enamels. Only one modelling-specific colour is used here - Railmatch Bauxite. Even then someone is going to tell me that the LMS version isn't quite the same as the BR colour. Paint isn't the only tool, though. Metal can be chemically blackened and I find talcum powder is very useful. Finally, Games Workshop shading inks work just as well on a model railway wagon!
Project 1 - 4mm:1ft scale Garden Shed
1
My first subject is a 4mm:1ft scale etched brass shed built from a Roxey kit, as shown in BRM September 2018. You can't go wrong really, because the paint on real sheds is hardly perfect most of the time.
2
The first stage is to coat it with primer. If you're handling the model you’ll need an etching primer, but for a scenic item, any spray can of car primer will do. Use several thin coats, then let it dry.
3
Holding this model is easier with a lolly stick shoved into a blob of Blu-Tack. Cheap and easy!
4
Start painting under the eaves and difficult to reach areas. That way, you'll see stray paint and can deal with it quickly. Finish with flat areas that are the most visible.
5
Leave the model to dry, then mix a little of the base colour with something to lighten it. I'm using yellow in this green but white also works. Dry brush everywhere to emphasise the details. This is a subtle effect, but helps bring the model alive. You may want to wash some thinned brown paint over it after it has dried to really show the lines between the planks.
6
I treat the roof with a coat of grey paint, then dust it with talcum powder once the paint has dried to a tacky state. As well as adding colour, it gives a bit of texture that you'd expect from roofing felt.
The shed now painted is added to the scene - an attractive addition to any garden. Now it needs some model tools...
![Finished shed]()
Content continues after advertisements
PROJECT 2 - 7mm:1ft scale Conflat wagon
1
Built from a Slater's wagon kit with a Skytrex resin container for the October 2018 issue of BRM, painting this is more of a challenge because of the different materials the model is constructed from. It's much more detailed than a shed too.
2
The more you disassemble a model, the easier its painting becomes. Sensible modellers will paint as they build, but sometimes you just want to make sure everything goes together. Mind you, sensible modellers wouldn't have stuck the container down, so it can't be removed.
3
Only the chassis is sprayed because it's easier to paint this way than poking around all the complicated underframe parts with a brush. A thin coating of oil on the wheels stops paint sticking. I'll still need to clean up later, but it will need nothing more than a quick wipe.
4
With most of the body covered with masking tape and paper packing, the underframe is given a blast of matt black car aerosol. The paint sticks quite well to metal without priming, though a very light coat of etching primer isn't a bad idea if the model will be heavily used. Several thin coats are better than a thick one. Work from lots of different angles to ensure all the nooks and crannies are painted.
5
Smaller metal parts are primed by hand, and Humbrol Acrylic No.1. It is easy to use, doesn't smell and the brushes can be cleaned with water. It's very handy to treat brass handrails and small details when you don't want to mask a model, nor repaint it completely.
6
Everything above the solebar is hand-painted using Humbrol 147 for the container, 64 for the roof and 187 for the wooden floor. Railmatch 612 bauxite does the job for the body. All these have a matt finish, so where the transfers are to be applied, I spray some acrylic gloss varnish. It's a simple job using an airbrush or spray can. I never have much success hand-painting varnish.
7
Transfers are cut and soaked in water until they become loose from the backing paper. They are slid into place on the model. The gloss varnish should avoid 'silvering', which is the effect when tiny amounts of air are trapped underneath a transfer. Once fully dry, everything receives a spray of matt varnish.
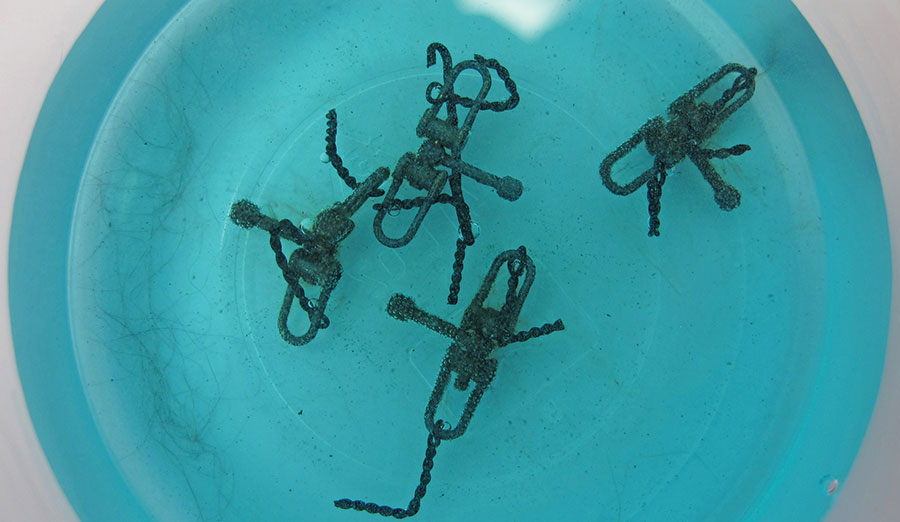
8
The brass turnbuckles are coloured with a 'Metal Black' chemical. They all bathe in this for 30 seconds, followed by a wash in clean water. This stains the metal to a brown/black colour, which withstands handling and retains the crisp details.
9
To simulate the brown dirt that gathers around some details, I give the model a wash with a Games Workshop shading ink – ‘Agrax Earthshade’. Let this gather around the details, then wipe downward with cotton buds, cloths and fingers to simulate rain washing the dirt away.
10
Finally, a light dusting of dirt from the airbrush. Very thinned Humbrol 187 around the underframe, 33 with a dash of 67 on the roof and 173 all over. This brings all the different effects together. The model is placed on a box to make it easier to spray from underneath. If you don't have an airbrush, weathering powers would work as well.
Expert Tip – Why is my brush stiff?
Many paintbrushes are supplied with gum-filled bristles to protect them in transit. A quick wash with warm, soapy water cleans this out and restores the flexibility you'd expect. Every time you clean the brush, re-form the point with damp fingers and then place the protective tube back on.
If you’d like more advice on painting or weathering a wagon, Phil Parker gives you a full demonstration in our latest video. Or if you'd like to learn more about brush painting, watch our video here where you can brush up on your wood effect painting methods with Howard Smith.
Now you’ve painted a wagon, take a read of our step-by-step guide to weathering a locomotive using paint washes and powders here. Or if you’d like more general tips on weathering a locomotive, see our article here.