When asked to build a Metcalfe Models' kit for BRM, I’m presented with a challenge.
The kits are well-designed, all the parts fit well and the instructions are easy to follow. In my experience, the finished models are solid and nicely scaled to fit on the average model railway – ideal for beginners. The problem is, what do I write about?
Looking at the Fire Station kit, you can't go far wrong, as long as you work slowly and methodically. Test fit every part before you put any glue on it, but if something doesn't go where it should, the chances are one of the previous steps is wrong.
There is a difference between just sticking the bits together and making a really good job of this, or any other card kit. I've built many of them and so using this kit as an example, I'll walk you through some of the things you won't find in the instructions, but will help you produce a top-quality model.
Card kits don't demand much in the way of tools – a sharp knife and a steel rule will be enough. Some small scissors are handy and I like a flat-bladed screwdriver to help clean away glue. Talking of this, Deluxe Materials Roket card glue is fantastic, but normal PVA will work perfectly well. You'll also need some clear all-purpose glue for fitting windows.
To touch up exposed corners, brown and grey felt-tipped pens are my choice, but Metcalfe recommends watercolour paints. Either will work, it's up to you to use the one that you are happier with.
Content continues after advertisements
1
Arriving in a fat cardboard packet, the kit includes die-cut printed parts, laser-cut doors, glazing material and a set of instructions.
2
I've always felt that printed windows are too bright, but rubbing a pencil over them, then smudging the graphite with a finger, tones the white down a bit. You could use a pencil crayon in the same way to add colour, too.
3
Windows are fitted behind the relevant card pieces with a clear, all-purpose glue. Take some time to line them up properly in the holes as any mistakes will be obvious later and difficult to correct.
4
Clever colour coding makes identifying which are the right doors for each doorway; a lot easier when there is a pile of pieces on your workbench.
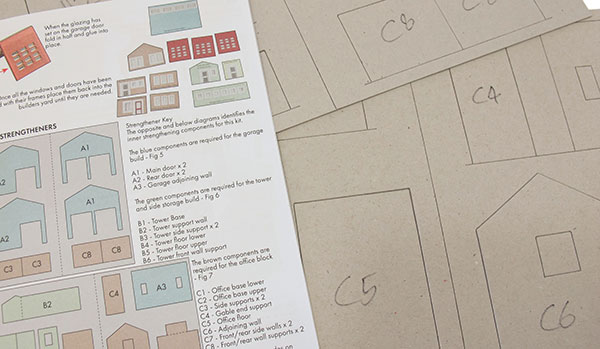
5
The unprinted strengthener cards are identified in the instructions and I like to write the codes on them to speed things up and reduce the chances of mistakes later.
6
To hide the unprinted corners and edges, Metcalfe recommends using watercolour paints. While this would allow perfect colour matching, I prefer felt tip pens – a brick brown colour and grey.
7
For precision application of PVA glue, the Metcalfe ultra-fine-tip bottles are excellent and are useful beyond just card kit building. Using the minimum amount of glue is important, but if it oozes out of a joint, a small screwdriver is often useful to clean it away.
8
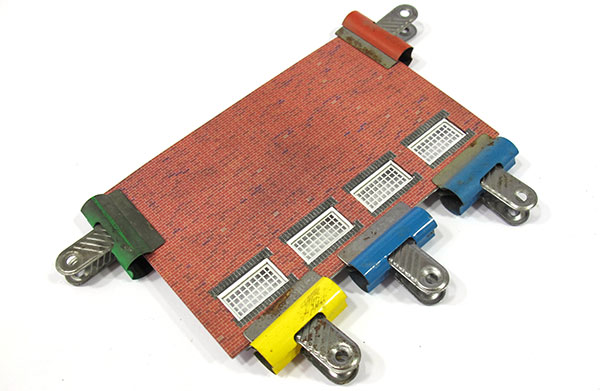
Where several laminations of card are used, a selection of bulldog clips are very handy. One to hold the card while you check everything is lined up, and the rest to make sure all the edges are compressed together.
9
Heavy weights such as these steel offcuts bought for pennies at a model engineering show, are handy for lamination. Even piles of old model railway magazines will work – you knew there was a reason to keep them handy.
10
Metcalfe doesn't make flimsy buildings. The front and back walls are 4.5mm thick, which both looks good and makes the finished model seriously solid.
11
If your alignment of the card layers isn't perfect, it can be adjusted with an abrasive stick. Try to sand the strengthener cards rather than the printed ones as it is possible to de-laminate the coloured surface.
12
The base for the tower is fixed to the sides of the main building by gluing the card around the bottom. It's easy for excess glue to ooze from the bottom and stick to whatever you are building the model on. A cutting mat can usually be peeled away without damage.
13
One area for improvement with the kit is the training tower. With the interior visible, some matching brickpaper from the range would be a good idea to cover the inside of the grey walls. While you are at it, paint the floors as these can be seen as well.
14
There are several clever design touches. Flaps that fold back on themselves form shallow tabs that locate into matching holes for aligning sections of the kit. Here, the strengthener card has one of these, so it's in the right place to line up the office when it's fitted to the side wall.
15
Roofs on models are more obvious than in real life and the printed slates can look a bit flat. Scribing the horizontal lines with a blunt tool adds texture. If you are keen, scribe the verticals between the slates as well - a time-consuming job, but worth it for the finished look.
16
I don't like being able to look through a building, because it's rare that this happens in real life. Adding a wall from scrap card, coloured black solves the problem.
17
Several sets of lockers are provided to be cut out and fitted to the interior walls. Those not used are worth keeping for future projects.
18
If you want open doors, they have to be trimmed to length before fitting. It's wise to make sure your fire engine will fit under partly-visible doors before opening the glue bottle.
19
Both grey and brown slates are supplied to fit along the roof line. The edges and crease for the bend all need treating with the felt-tipped pen or paints after cutting to size, but before gluing in place.
20
Generic signs are included, but I made my own based on photographs of real fire stations. The Avon force badge was downloaded from the web and added to a simple plain sign. Older stations seemed to have more elaborate name boards, so it's worth checking.
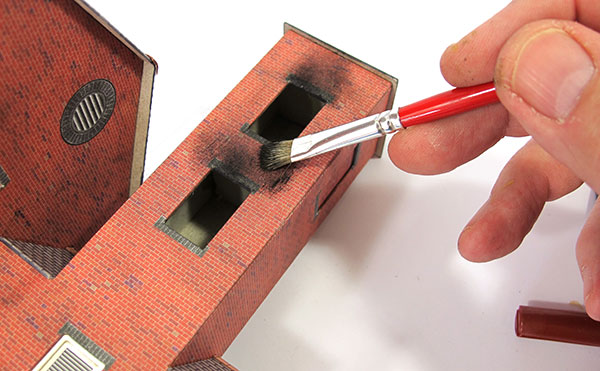
21
I'm not weathering the model, except for the openings on the training tower, which get a dusting of Humbrol smoke colour powder to show the results of some exercises.
Want some further buildings to complete your scene? Our guide on how to build and detail a card kit is worth a read.
For more help and tips for adding grass to your model railway - watch our video on how to create realistic scenery using static grass here.
And what about trees? Our online guide will help you get to grips with ‘planting’ trees on your model railway.
Need more advice? Take a look at the BRM Techniques page for all our latest guides and advice articles.