27 March 2023
|

Scott Rixon adds some battery steam power to his fleet with this gorgeous locomotive.
The PDF selection of locos is very impressive and very affordable, so much so that this is my third kit from the range after a cabless Hunslet followed by a “Leanne” kit. The instructions are provided by a couple of YouTube video links, there are also some updated instructions downloadable from the website. This way you can review the kit before purchase.
Chassis Construction
I like to start with the chassis. There are three large sheet sections that get a quick clean-up with a file, primed and then painted matt black. I try and do as much as I can with standard rattle cans, it’s quick and easy. The frames are held together with nuts and bolts front and back, making getting everything square quite easy.

There are some different views on how best to deal with the 3D printing finish. Initially, I read a few posts where people are wrapping the kits with very thin plastic sheet. I felt this would be as much effort as sanding the kit, as with a wrap you still need to blend in joints. The idea of ABS is that it should be easier using files and sandpaper to get a quality finish.
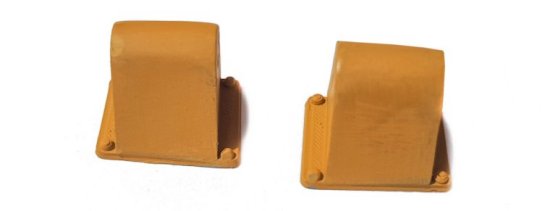
The cylinders are the first part that needs cleaning up. A large file gets the worst off and then I use some small but fairly coarse files that I'd picked up from a local supermarket that likes a cheap deal on a Thursday. Basically, you need to file off the ridges with the file, then use some 80 grit sandpaper followed by 180 sandpaper and finally something like some 1200 grit. The cylinders are small, so it really takes some work to get them smooth, but it’s worth it.
Once cleaned up, I use some grey primer first to see how they look. After another sand, I use filler primer. It won't fix everything, you still need to sand like crazy, but it certainly helped to build up the crevasses a little more. This was so much easier with the ABS printing, but still worth taking your time and getting the parts smooth.
I fully paint and line the two cylinders, including gloss varnish, before bringing the chassis together. Some 3.2mm pipe is pushed into the cylinders for the piston rod to run in. I like to open them up a little with a drill bit and then glue it in place. The first time I built one I tapped it in, bent the end of the tube and then the slide bar wouldn't move freely. The cylinders are attached to the frames with two 2.5mm Allen key bolts.
Open the bearing holes up with a 4mm drill bit and then push the bearings into the frames for the wheels. Pushing them too hard will do two things, it causes a little more friction for the shaft and maybe crack the frames. Guess how I know that one? Get the axles into the bearings and screw it all together, not forgetting the bearings on the rear axle for the gearbox. It’s essential to make sure everything is square and running smoothly. A quick roll along the table and then some track makes sure you are free running. Don't forget to check the back-to-back for the wheels.
Next fit the cranks and the coupling rods. The quartering I find easy, just put the first side cranks on and rotate the wheels through 90 deg, fit the other side. It’s the coupling rods that are a challenge, they need opening up to make sure they don’t stick. Firstly open them up with a 3.2mm drill then after testing on the cranks, ease them out horizontally so there is some play, the chassis should then roll around a table nicely.
Now the chassis is running, we can get the piston rod into the cylinder and attached to the rear crank. I make sure it's moving freely enough to fall out of the cylinder when I hold it up. You can then test with all the cranks in place before attaching the slide bar holders. These tend to have some over printing where the square sections sit, which needs cleaning up until you are happy. Get this right and you are on the road to a free moving chassis. Once it’s all moving free you can glue the slide bar holders in place.
To bring the chassis together you need to fit the gearbox onto the rear axle. I find the printing can make this a little tight. Open the holes for the shaft up, I use a 4mm drill by hand. You may also need to file where the cog sits, we obviously want this to rotate freely, the cog only goes one way around, make sure it’s located correctly and there is no flash in the way.
Then get some power on it and test! I use some thread locker on all the motion nuts once I’m happy that it runs fine, do this before you get too carried away with testing and all your motion falls off.
Power and control
For this model, I'm using LocoRemote. Power comes from a pack of four 3.7v Lipo batteries which I can swap them between the two locos in my fleet that currently use them.

The Lipo batteries are nice and small, but I like to be able to remove them easily. The Hunslet chassis is quite tight, but I managed to build a small tray from plastic section to sit between the front wheels. This makes it easy to slide the battery in and out. Previously I’d tucked the battery in the boiler, but I wanted to try and avoid having to keep taking it on and off.
Main Body
The cab is four nice sections of plastic. It is easy to bring the front three together and work on as one. Taking some time with filler really tidy the joins up. The rest of the 3D printed body parts are worked on in the same way as the cylinders, getting the best finish I can. They are a little easier as they are so much bigger.

The sanding process can be fun! You really see the progress and how amazing it looks once it has all been smoothed out. The other nice thing, the kit goes together in such logical sections that you can be smoothing out the different parts, while painting and building the others, it’s also easy to paint the core parts in one solid colour meaning the painting can be quite easy as you don’t have to mask up too much.
The loco starts to come together nicely at this stage. I cut out a small notch from the boiler, which means this and smokebox come off and locates my LocoRemote. The backhead is also a separate piece from the firebox, so you can paint that flat on the table and stick it on when completed. This means I've got a really nice brass surround on the firebox as this was all done before the back head is attached. It’s all just pushed together, this makes the final stages of painting so much easier.
The smokebox, boiler and cab rivets were a fun job. The Internet is a fantastic resource for this as I could find lots of Hunslet pictures to see the different patterns of different locos in various stages of their life. My rivet process is fairly simple one, I mark out where I want them with a pencil, normally using a small template to get similar spacing between them. Then I have a cocktail stick and pool of superglue, put a small dot onto the loco and then using my finger pick up a rivet and place it on the dot of glue. I went a little crazy with this kit and riveted the whole loco. Looking at pictures I felt I didn’t want the lines to be perfect, so kept it a little random. It took a while, but I think it was worth it. Once completed it all got a spray in grey before moving onto the final painting and finishing.
The painting is pretty standard, I do all the black first and then mark out sections for the blue. Then once I am happy with the blue, I used trimline tape for the white lining. Simple to do, if you’re careful and then a quick spray with gloss varnish will seal it all together.
Final Assembly and Lights
The LocoRemote chip I’d bought came with connections for directional lighting. Both lights are from HGLW and come with small jewels to mimic the lens colour. I removed the jewel and then drilled them out to take a white LED. A couple of coats of filler primer stopped the light bleeding through the plastic, but otherwise it was quite simple. The front one has the wires through a hole in the top of the smoke box, while the rear is through the cab back and up and over in the roof. Both are then mounted on a small scrap of sheet brass to mimic lamp irons. A small blob of filler on the back closed the gap for the wires and stopped further light bleed.
Looking at prototype pictures, I felt the turret in the cab needed a little tweak, so added 2mm plastic tube to the top, extending the safety valves up and into the roof. I then made up the roof and added more rivets to finish it off. I also bought some smokebox tank brackets from Coast Line Models. I’d like to add a little more pipework, but it’s a balancing act between looking good and surviving being used by my young family.

The final touches were handrails and a toolbox. I had handrail knobs in stock from the first Hunset, I’d searched the Internet for some, but in nearly every instance I could find the size of the knob, but not the size of the hole for the rail. In the end I ordered a pack for a Mamod from Dream Steam, they arrived, I measured the hole, 1.6mm and then I could get some brass rod from Eileen's Emporium. Obviously, I ordered a batch last time, so had plenty for this project. The toolbox is from Trenarren Models.
For more pulling power she does benefit from a little more weight, so a little bit of lead wrapped in insulation tape was slid into the boiler, as well as a small piece in the chassis under the smoke box to add to the front end weight balances the loco out nicely.
I’ve really enjoyed this build, I find it easy to make progress on multiple parts at once, which is great, you are not waiting around for paint to dry, and you can crack on sanding something else. This is especially true if you are going to do that many rivets. The kit splits into nice sections for painting and the new ABS for the 3D printing makes the whole process much easier. I can highly recommend PDF if you are looking for an electric loco to add to your fleet. Pete from PDF provides some amazing after-sales support, and there is a lively private Facebook group with tons of help, pictures and people posting the progress of their builds.
If you have enjoyed this article, why not subscribe to Garden Rail magazine, for inspiration and information every month!