An airbrush is unbeatable for a quality paint finish. They involve more effort than a brush but, as with most things in life, you get out what you put in. So, with a bit of extra exertion, and a small amount of your time, you can raise your modelling to a whole new level.
What puts many modellers off is the problems that arise after they pick their new airbrush up for the second or third time, because it doesn’t seem to behave anymore. This can be frustrating and off-putting. Likely, this is down to poor maintenance and a lack of understanding of how an airbrush works. This article will deal with the former.
There are three steps to successful airbrush use - keep it clean, keep it clean, keep it clean! The time to perform the cleaning is straight after a spraying session when you come to pack the airbrush away, because dried paint is much more difficult to remove.
At the end of a spraying session
1
Before you disconnect the airbrush from the air supply, you can flush most of the paint away. First, empty any spare paint out of the cup. Then, remove the cup and give it a wipe clean with a tissue or old cloth.
2
Now reattach the cup and fill with thinners to match the type of paint you were last using. Increase the air pressure to 30psi.
3
Spray the airbrush onto some newspaper until the thinners comes out clean. Ensure that you are wearing your face mask for this operation, as usual.
4
Now place a finger over the end of the nozzle and spray. This will reverse flush your airbrush causing the air to exit via the thinners in the cup. Be careful not to splash yourself with thinners when doing this – you may wish to reduce the air pressure.
5
Now empty the cup of thinners, shut off the air supply by closing the regulator and disconnect the air line.
Content continues after advertisements
Airbrush disassembly
1
Take the airbrush to a table where you can work more easily, preferably over a large tray to catch errant pieces.
2
At the opposite end to the nozzle you will find a rear cover; this should unscrew.
3
You will find a nut that holds the needle in place and allows it to move with the trigger mechanism. Undo this and remove it.
4
Withdraw the needle by pulling on it away from the airbrush body. Be very careful to pull it in a straight line and don’t apply any lateral pressure or you'll bend the needle.
5
At the other end of the airbrush you'll find a needle cap. Unscrew this.
6
This will reveal a nozzle cap. Unscrew this too.
7
You should then be able to see the nozzle. Use the special tool supplied by the airbrush maker to remove this. Take care with this part because it is small and easily lost.
Cleaning the parts
1
You can perform all of the following cleaning steps using a paper towel or cloth (except where indicated otherwise) soaked in thinners to match the paint you last used.
2
The needle should be cleaned by drawing it through your fingers from the thicker end to the tapered end. Be careful when handling this item. The end is sharp and easily bent.
3
The needle cap can be cleaned by drawing it over a corner of the cleaning material as though it were a napkin ring.
4
Brush the nozzle cap with a hog’s hair brush and wipe clean.
5
An ultrasonic cleaner can be used to clean the nozzle, but unless you can afford, or have access to, one of a decent quality, you might find the results disappointing. Alternatively, just swill the nozzle around in a solution of thinners to match the last paint you sprayed. Cellulose thinners can be used for really stubborn deposits.
6
Remove any blanking plug that covers the hole opposite the paint bowl. You can fit the bowl on the right or left based on your preference.
7
Take a pipette and dribble thinners through the airbrush. Do so through each orifice.
8
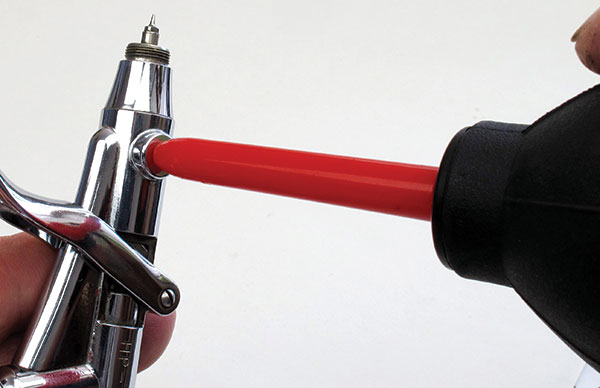
Fit an air trigger to the end of your air-line and blow out any thinners left in the airbrush. Do this at a low pressure (circa 20psi). If you haven’t got this equipment, you can use compressed air in a spray can or an air blower as used to clean the sensors of SLR cameras.
9
Blow out the paint cup feed using the same compressed air source.
Reassembly
Reassembly is a reversal of the disassembly stage. It is important to ensure the needle is fully home against its seating – check this by looking to see that it is poking out of the nozzle. Pull the trigger and ensure that the needle moves back with the action. If you use the airbrush when the needle isn’t fully home, paint can enter the body of the airbrush and lead to major issues.
These instructions are for a double-action Iwata airbrush, but you will find other airbrushes are very similar. Single action airbrushes are even simpler. If you are about to start using your new airbrush, ensure that you implement this preventative maintenance regime from the outset, that way your airbrush will work as well as the first time you used it.
Looking for more airbrush advice? The BRM Guide to Airbrushing here will help to answer any questions you may have.
Need more advice? Take a look at the BRM Techniques page for all our latest guides and advice articles.