It doesn't matter how big your layout is, it'll require track. Ensuring yours is laid to perfection is Phil Parker, with useful guidance.
Can you believe that I've been in this hobby for over three decades and never laid a double-slip?
When the plan for my OO micro layout called for one, I decided it was a great chance to show some track-laying basics. The model might be tiny, but we have two points, the slip and lengths of flexible track so there are all the challenges found in a larger project.
For a task this fundamental to a layout, there are lots of methods and everyone has their favourite. I'll be trying different things on the other models, so we'll keep it basic for the OO gauge project.
We're using Code 75 track, as the rolling stock is likely to be pretty modern RTR. To be honest, anything made this century will probably be OK and apart from old Lima diesels with their 'pizza cutter' flanges, most older models will be fine, too. The techniques are the same for Code 100 though, only the rail profile changes.
To keep things simple, everything is pinned into place. The plywood board takes track pins, so long as the surface is broken by a tiny hole, which is made at the same time as drilling the sleeper. I'm using fine Peco pins that bend easily (buy spares) but if you are worried, Hornby pins are thicker and pretty much indestructible; you just need a bigger hole in the sleeper.
Don't hammer pins in hard. Check each piece of track as you lay it by looking along the rails and running a wagon over the joints. Basically, work at the job slowly and methodically and it's not difficult to achieve good running.
Shopping list
Peco
SL-14 Track pins
SL-100F Flexi-track (two lengths)
SL-110 Fishplates
SL-111 Insulating fishplates
SL-E190 Double-slip
SL-E191 Small radius right hand point
SL-E192 Small radius left hand point
1
Will everything fit? It's not a bad idea to set out a layout full-size before nailing track to the baseboards. You don't even need to buy anything; full-size point plans can be downloaded from the Peco website. Since most of the buildings are handy, I'm trying them at the same time. Mock-ups made from cereal packets are a useful stand-in for this step.
2
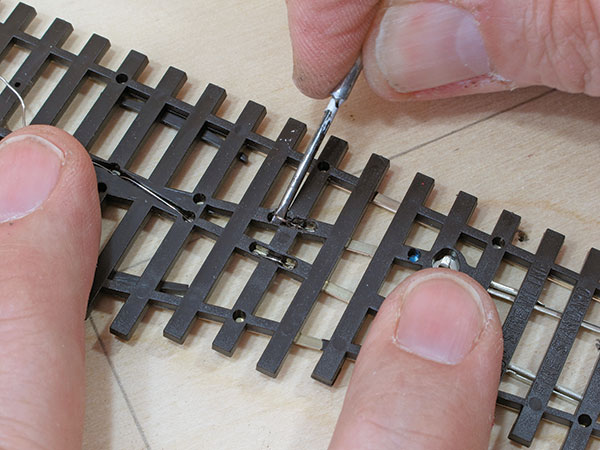
Peco points can be used straight from the packet, but to improve reliability, I've chosen to switch the polarity of the frog rails using the point motor. When doing this, there are a couple of links to be broken underneath. A wire cutter is too large to get in, but sliding a small screwdriver under the wire and waggling it will break the joints.
3
Underneath the frogs is a wire. If you aren't switching the polarity using a motor then ignore it, but as it feeds the power to the rails, I need to be able to connect it up later. Although it's a very thin bit of metal, I drill a 2.5mm diameter hole, so there's no need to be 100% accurate with the location. The frog covers it up when the track is laid, so makes life easier.
4
The point motors will be fitted under the baseboard so slots need to be made under the tiebars for them to poke through. Drill a series of holes around 3mm in diameter and then join them up either with a round file, or a saw drill bit like the one shown. Clean up the wood, both on top and under the baseboard, so the wire won't catch on splinters later.
5
Disaster! One of the holes is right next to the under baseboard bracing – I've marked it with the dotted lines. Careful planning can avoid this sort of problem, but I can't move the double slip on a board this small. I'll need to use a point motor mounted on top of the board and then hide the linkage.
6
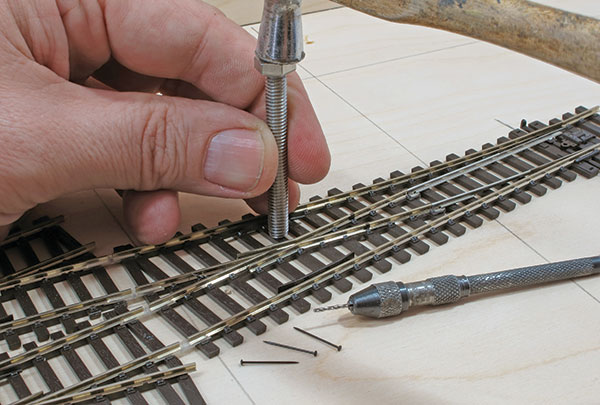
Using Peco pins, the track is fixed to the board. Drill each of the sleepers to be fixed with a 1mm diameter drill, making sure to go part way through the wood. Tap into place with a small hammer using a bolt as a punch held on top. This way if you slip, the hammer doesn't whack any expensive pointwork. Only pin lightly, you don't want to distort the sleepers. Three pins for a point and one every 7cm on plain track is usually enough.
7
Where points face each other, they need to be isolated electrically. Either cut the rails after laying or use insulating fishplates as I'm doing here. Some of the sleeper ends need to be trimmed down to allow them to fit together.
8
Testing is essential once you start laying track, and fun. Wagons should roll through all the formations without bumping or falling off, even at speed. Look along each piece of track as you lay it to make sure there aren't any kinks; even slide a ruler or Tracksetta alongside. Make sure every piece is right as fixing things later is going to be difficult.
9
At the ends of the flexi-track, there isn't a gap for the fishplates. Cut the end rail chairs away by sliding a knife blade under the rail. You can cut the entire sleeper away if you prefer, but this method looks neater.
10
Cutting track to length is best achieved with a pair of Xuron track cutters. These hard-wearing tools leave a neat, flat finish to one side of the cut. You could use a mini drill with a slitting disk or even a small, fine-toothed saw to do this, but hold the rail firmly to stop it waggling around whatever you chose.
Content continues after advertisements
Should I lay track on cork?
A layer of cork under your track is a model railway tradition, and if you are modelling a length of line with a ballast hump then it makes sense. However, in stations and yards, there isn't a hump, so I don't bother.
One reason given is that the cork will quieten the trains down.
Well, for a start, modern RTR is pretty much silent when it runs, and anyway, once you've pinned and ballasted, the cushioning effect of the cork has been removed.