04 September 2024
|

First produced in the 1990s, the Cooper-Craft range of 16mm scale wagons has been re-released by Cambrian Model Rail Ltd, Garden Rail builds the kits to see if they are as good as we remember.
We'll start with the single-plank wagon. All the range assemble in similar ways, so if we look at this in the detail, we only need to cover the differences with the others.
Step 1

The body is supplied as a pair of identical mouldings, containing a side, end and half the floor. Binnie wheels, axleboxes and centre couplings replace the Cooper-Craft originals, due to the mould being worn.
Step 2

Plastic cement (I used Revell Contacta) and solvent (MEK-PAK) is perfect for assembling the wagon. The first step is to make up the to halves, which are then joined together. Ledges provide a positive location for the floor, and the corners are rebated to help the modeller. A little care at this stage, should ensure a square and flat wagon.
Step 3

The Binnie wheels need any leftover lumps of moulding runner nipped off with a sharp knife. The clearance between the flange and the floor is best described as 'gnat's whisker' so any protrusions will stop the wheel from rotating.
Step 4

It's down to the modeller to trim the axles to length. I found 49mm worked well, but it doesn't seem that critical. A junior hacksaw will do the job, and then the ends should be smoothed and domed with a file. Check they revolve smoothly in the axlebox.
Step 5
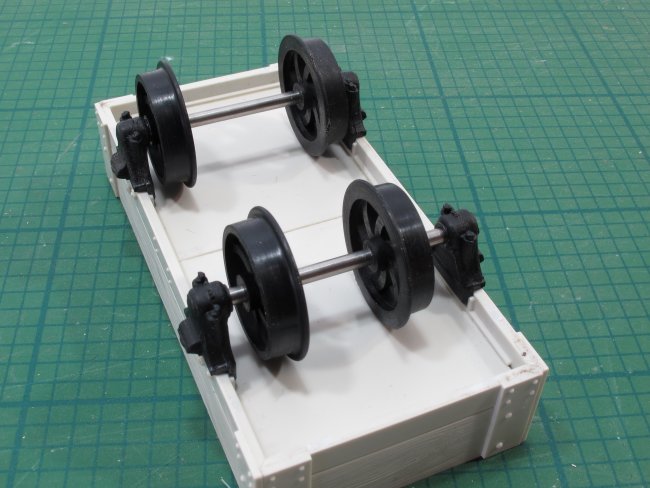
Fix the axleboxes two one side of the wagon, ensuring they are vertical and leave to dry. Do not let these lean in, even slightly, or you remove the clearance between flange and floor. I set the gauge once the wheels were fitted, sliding them along the axle.
Step 6

Couplings fit on the ends, there are several options for the builder to choose from. If you are worried about these pulling off, use a pin through the side holes, although the Contacta glue seems to grab them well enough for normal use. The finishing touch is to cover the hole with decorative bolt heads.
Step 7

Finally, a couple of strips of lead flashing are superglued under the floor to add a bit of weight. How much weight? Well, I've based this on a resin wagon kit, but does anyone have a set of guidelines?
LNWR Coal Wagon

Following the opening of the LNWR standard gauge branch from Betws-y-Coed to Blaenau Ffestiniog in 1881, and exchange yard was built to the north of the station to make connection with Oakley and other quarries in the vicinity. To work the traffic from these quarries over the 2ft gauge line, Euston built a set of special wagons.
This kit is the Editor's favourite in the range, but sadly the mould has suffered a little over the years and there's quite a lot of flash to remove. This isn't a problem though, as it doesn't affect the detail, and can be quickly trimmed with a knife.
Assembly is the same as the single-plank wagon, although you need to check the bottom of the floor, where the orientation is marked so the rivets are lined up correctly.
Croesor Sheet Iron Wagon

The prototype for this wagon comes from the Parc Quarries in the Croesor Valley. Iron wagons of this type were used to convey slate from the quarry face to the mills or cutting sheds, and then transfer the offcuts to the tips, still part of the Welsh landscape. To aid unloading, rings were fitted to the corners so the wagon could be lifted bodily from the track, and tipped. Wagons also found work carrying coal, sand and ballast, making it a useful model for any garden line.
The biggest difference in this build is the corners, which are chamfered to provide a neat appearance. This requires a tiny bit more care than those models with rebated corners to get a tidy joint, but the positive floor location helps make this reasonably easy. One improvement would be to gently scrape the moulded rings away, and replace them with parts bent up from metal, a fiddly job but it would look better.
Ffestiniog Railway Slate Wagon

The North Wales slate wagon was the most numerous narrow gauge piece of rolling stock in Britain. The FR had 1095 of them on the books, and most other quarry systems had something similar. Early wagons were wooden, but these gave way to the iron version modelled. Floors were metal, but prone to rust through and so replaced with wood. Either can be modelled by simply flipping the floor parts over to reveal, or hide the planks.
The open nature of this wagon means there's not a lot of “meat” in the corners to join the parts, but helped by some nice positive location aids, it's not hard to make a joint that looks like it's a single steel angle. A separate angle-iron hoop moulding drops into the top to finish the model. Once complete, this is a surprisingly strong model, despite the thinness of the plastic parts. All it needs is some moulded slate loads to fill it up.
Timber Bolster Wagons

Goods such as telegraph poles, lengths of timber, tree trucks etc. are carried o pairs of bolster wagons. Dave Sketchly took us through the details in the March issue of Garden Rail, suffice to say setting up a pair of bolsters is a little tricker then you might expect, but the space to hide some weight under the floor of these wagons, should make the modellers life a lot easier.
Construction is obviously the same as the standard single-plank, but with an additional moulding to provide the bolster itself. This sits on the wagon, and could be left un-glued so the model can be used in both guises. A little care with the glue is required to make the bolster itself – try not to stick the retaining washer to the plate, or the bolster won't swivel.
Conclusion
So, how do the reissued wagons measure up? Well, I built all six in a few hours one evening. Part fit is excellent, and the chunky components are easy to handle, making them a good choice for younger modellers.
If you remember the originals, you'll notice that no brakes are provided, there is a problem with the mould for that. This isn't really an issue, as most of the prototypes wouldn't have been fitted with brake gear anyway.
The new couplings offer more options than the originals too, and are less fragile. Looks are nice, but on a garden railway, ease of use matters, which is why we couple with bath plug chain and paperclips!
To me, these are wagons whose time has come. Back in the 1990s, outdoor modelling wasn't about hi-fi rolling stock with lots of rivet detail. Now, the trend towards more scale wagons should see these be popular all over again.

