There are many off-the-shelf kits available to help you model the seasons with little effort. This article looks at modelling spring using kits and parts that you can easily obtain and build without spending vast sums or diverting too much attention from what is probably your main interest, the railway itself. It pays to do so, as your effort will stand out from the crowd and you will model in a more holistic fashion with no obvious weak points.
Shopping List - available from Golden Valley Hobbies
- Busch (1318) Grass Mat
- Busch (7046) Brown Scatter
- Busch (9782) Tulips
- Busch (6060) HO bushes
- Busch (6141 and 6142) HO Pine Trees
- Peco (ST-290) Platform System
- Peco (LK-25) Platform Seats
- Ratio Station Fencing (431), Ratio lamps (453)
Content continues after advertisements
The grass slope
1
You can make the underlying support for the grass slope using any one of a variety of techniques. I used extruded foam as it is light and easy to form using a knife. It is also a lot less messy than expanded polystyrene.
2
Using a grass mat is the easiest and cleanest way of getting a grassed area. This one from Busch (1318) is of very good quality. To avoid too uniform a look, the grass has a nice variety of shades and is firmly attached – you won’t get any shed hairs with this product!
3
I cut a piece out of the mat for the station sign. Just use a very sharp knife and a ruler. Print out the station name on paper first to get the size of the space right. See Making Station Sign section.
4
Paint the area where the station sign is to go using an earth or grey emulsion. Dry-brush some contrasting colour to achieve a mottled effect – I used Burnt Umber acrylic paint.
5
Fix the grass mat to the slope using PVA. Don’t forget to remove the backing from the mat first and to weigh it down evenly overnight whilst the glue sets.
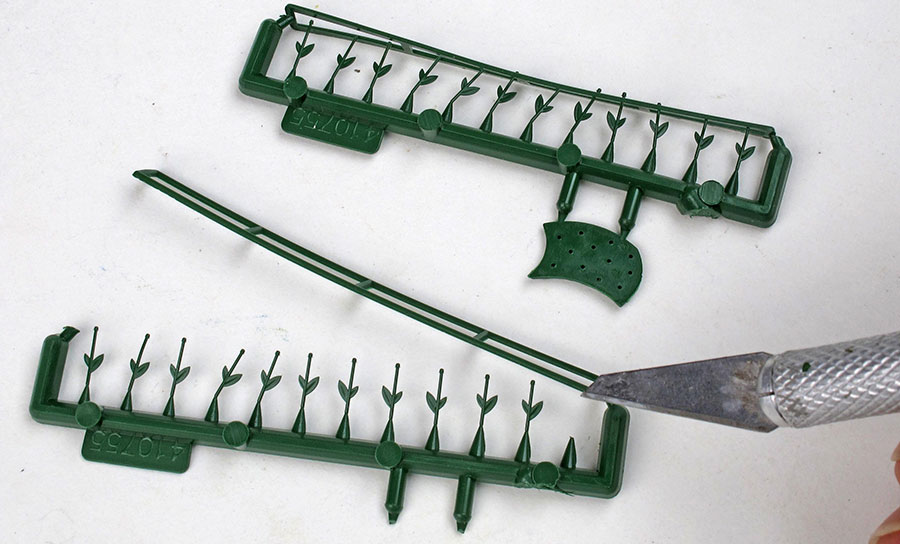
Making the tulips
1
There are 60 tulips supplied in the Busch 9782 kit. Don't make one tulip at a time (except for test purposes) otherwise it will take you much longer than necessary to complete the task of making them all.
2
Cut off the protective lattice from each of the five stalk sprues because these get in the way.
3
Line up the stalk sprues and then go down the length of each with a knife cutting out each stalk as you pass along. You will find it easier if you hold the top of each stalk down as you do so.
4
Put a blob of cyanoacrylate (superglue) on a piece of card.
5
Now take one stalk at a time in your tweezers, dip the end in the glue and then press home into a flower in the flower sprue. Keep the distance between the items small to minimise movement. When you are completing a repetitive task this makes quite a difference.
6
When the glue is dry, take a flower sprue and cut down each flower along one side. Now cut along the other side to free that row of flowers. Rotate the sprue through 90 degrees and do the same again. After four repetitions all the flowers will be released.
7
Mount the flowers on the stands provided or store in a tray, such as these that come with mince pies, so that you don’t lose them before planting.
Making the platform
1
The platform is made from readily available kits: Peco Platform System ST-290, Peco platform seats LK-25, Ratio lamps 453 and Ratio Station Fencing 431. These kits are easy to work with because they're strong, need little cleaning and are flexible.
2
First remove the sprue from the end of each platform surface. Make several light passes with a knife and then bend to break along the score.
3
A few light passes with a file are enough to tidy up the cut ends.
4
The platform surface and width can be any one of four sizes. If you wish to reduce the width, score in the appropriate place and bend to break. Do this for the spacers as well as each platform piece.
5
With the platform face upside down, press the side walls into place and then slot the spacers into place using the grooves at either end. Now add Liquid Poly Cement to hold it all together.
6
Join the platform pieces together using the tabs provided and glue with Liquid Poly cement.
7
Mask off the edge stones using decorating masking tape, and paint with white enamel paint. Do this for any edging stones that will be facing track.
8
Add the self-adhesive facing to the platform sides. Stagger the pieces so that the platform join is less obvious. You can use stone or brick-embossed plastic card for the facing if you want a better finish.
9
Drill holes for the station fence and glue in place using Poly Cement.
10
The Ratio swan-neck lamp kit is simple to make. Attach the collar to the post and make up the light units from the lamp heads and glasses. You will find the swan-neck fit into the post and the head much better if you pre-drill with 0.6mm holes. I omitted the base part.
11
Add platform accessories. Glue the Peco benches in place with cyanoacrylate or Poly Cement. Station lighting is attached using the same glue, but with a pre-drilled hole.
Making the station sign
1
The stones are made from air-drying clay. Roll a piece out to a uniform depth and then cut the stones out using a knife and ruler. If you don’t measure these, and just use your eye, then they will be slightly different sizes. When dry, paint with white acrylic paint.
2
Create and print out the sign using word processor software and a simple font – this will help you with alignment. I used the Calibri font size 72. Cut out the letters with a sharp knife.
3
Stipple PVA through the letter gaps and press the stones into place.
Planting the vegetation
1
The ground cover is Busch brown micro scatter material held in place with PVA glue.
2
Plant the tulips by making a hole with a pin first, then dip the end into PVA and then plant in the hole.
3
Since the trees are mass-produced and come from the same mould, they are pretty much identical. To make this less noticeable, ensure that you rotate them in relation to each other when planting so that the curves in the trunks aren’t repeated. Using trees from more than one kit also helps with this issue.
4
The trees and bushes have pre-formed bases and can be glued in place with PVA or contact adhesive. If you are using a foam base then you might like to add a cocktail stick for extra strength. Ensure the roots lie flat to the contours of the ground by carefully bending them as necessary.
The diorama is complete. Tree roots can be disguised if required with a little static grass, and foliage changed with scenic flocks if desired to change hues. With so many layouts set in the height of summer because of the colours of the grass and trees used, it's a shame that spring is an overlooked season because it's so colourful. I hope this article has been useful and gives you a few ideas to convert your scenery to spring. If your scenery is tired-looking, rather than replace with like-for-like, why not change the season too?
![How to create a Spring scene]()
If you're interested in placing trees on your layout, our online guide will help you get to grips with ‘planting’ trees on your model railway.
Looking to create bushes next? Watch one of the Woodland Scenics experts show you how.
Need more advice? Take a look at the BRM Techniques page for all our latest guides and advice articles.
 How to create a Spring scene