20 September 2021
|

Theatrical consultant, Giles Favell, shares his years of experience in set and layout design to bring you a masterclass in the art of painting with light.
I have spent more than 40 years working in and for theatres, first in Stage Management and then Production Management, before becoming a Stage Engineering Designer and Theatre Consultant – designing the theatres themselves, rather than the shows that perform in them. In my earlier years, I lit a few shows (which involves the drawing-board design, and then the rigging, focusing and plotting of shows) and re-lit many more! However, suffice to say that my career is not based on stage lighting, but on practical theatre production.
Both in theatre and in model railways we strive to create a realistic, plausible world – one full-size, and the other to a much smaller scale, but both intended to draw us in, and free us from the distraction of the ‘real’ world.
One of the most important aids to a good theatre performance is lighting. A wonderful set can look flat, dull and drab if poorly lit, and indeed a fairly average set can be brought to life in an enchanting way by very good lighting. If you can’t see an actor's face clearly, you will find it much more difficult to hear or understand what he/she is saying (odd, but true) – and that means good lighting and a good controlled environment wherever possible.
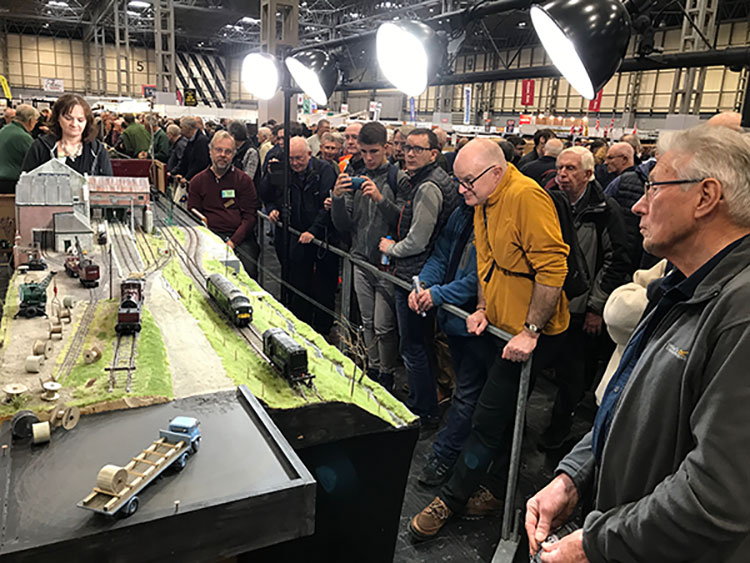
In the same way, a layout can be visually helped by good lighting – especially at an exhibition, but also at home.
With a model railway, we should consider what we are trying to achieve. Most often, we are presenting an ‘out-door scene’ in ‘daylight’ to be viewed from the front and slightly above. Distractions serve to weaken or break the illusions that we are striving to create. In order to have as few distractions as possible, many of us provide a back-scene, (the equivalent of a theatre’s back-cloth or Cyclorama), which provides a sky or distance, but more importantly, hides the view of inappropriate real-life that would otherwise be seen. Similarly, a nice fascia is often provided to smarten the layout front in the same way. I advocate as high a back-scene as is possible. I use at present a separate cloth, about 150cm high, set behind the layout by about 30cm (easy at exhibition – not so easy at home!). This is matt front-projection cloth, printed with a photo image of gloomy cloud cover, and this allows the eyes to concentrate lower on the layout, where I want them.
Directional lighting
Aside from the colour, we have to consider the beam angle and positions of lighting. Generally, if you walk outside, light coverage is even, unless you go into shadow – and that is what we should try to emulate. When lighting in theatre, we have someone ‘walk’ and they have to move everywhere on stage, always facing front, while the Lighting Designer is watching carefully to make sure there isn’t any shadow or change of light as they move around. This is advisable for a layout as well, using a hand close to the track as a substitute ‘walker’.
The textbook position for a light is 45 degrees to the side and 45 degrees in the vertical plane – and one from each direction. This enables the good illumination of the actor, whilst also ‘sculpting’ the face or whatever is being lit.
All too often we see extremely nice layouts that are poorly lit towards the front, because the only available lighting is from above – as a result of rigging difficulties – which does nothing to light the sides or face of the object we are viewing. Although top lighting and side lighting can add dimension to the picture, they are no substitute for a bit of front ‘fill’ lighting. 45 degree front lighting is a good compromise, and gives depth and character, while showing detail.
In theatre practice, all these directions are used together, and carefully mixed to create the vision that one sees on stage. Although one cannot rigidly adhere to this when lighting a model railway, it is as well to be aware of the principles when making your decisions.

My preference for lighting a layout would be individual incandescent lamps, reproducing the 45-degree principle, with some ‘key’ light from one side or behind to fill and tell the story. However, this is not practical at any size because of power, heat and available positions. When deciding on the lighting for 'Denton Brook', I chose to use photographer’s lamps, fitted with 35W 5500K compact fluorescents, and mounted in aluminium dome reflectors from Ebay (at £10 each). This enables each lamp to be focused at roughly 45 degrees in both planes, and the lamps have quite sufficient spread (or beam angle) to ensure there was even coverage without dark patches. This is quite a lot of light to throw at a layout (by traditional standards) but I’ve not had any complaints so far.

Light Rigging
To rig these in front of the layout, I bought a 3m ‘Disco’ lighting truss with stands from Ebay (about £90 at the time). The truss was good and robust, and only needed metal tags welding, to mount the lamps. Without welding, I would have bought and fitted 38mm 'P' Clips, using a longer bolt. Rubber-lined stainless steel types are available from Amazon and Ebay as well as many other suppliers. The only other change to the stands for the truss I made was to remove the three splayed legs, and instead used a socketed base. This was made from steel square hollow section, welded to angle, which in turn was bolted to an 18mm plywood base to create a ‘boom base’ or ‘tank trap’. A boom is a vertical scaff pole used for lighting, and the first type of boom bases looked like WWI tank traps. This rig positions the lights above the heads of the audience, in front of the layout, and gives sufficient distance to even out the spread of light. It is surprisingly compact in the car when de-rigged, but is still significantly larger than some other solutions. Similar bases for a light-weight application such as this could be made using Kee Klamp fitting base flanges with Integrated toe-board C18 Size 7, through-bolted to 18 or 25mm ply.
Portraying daylight
Real daylight is broadcast across a wide spectrum of wavelengths and, although it may look typically white, it is made up of all the colours of the spectrum to a greater or lesser extent, which is why there is so much depth and ‘life’ to daylight. Artificial light sources, however, broadcast on much narrower wavelengths, making objects look flatter and more lifeless than in daylight. Halogen lamps produce a good colour range, albeit on the warm side. Traditional incandescent lamps also broadcast over a wide range, but are warmer than halogens. Both these types produce a great deal of heat, however, and aren't energy-efficient. Fluorescents can be unpleasantly ‘spiky’ in their output, giving ‘flat’ colours as we know so well. LEDs broadcast a little more than their primary colour, but still aren't perfect.

If it is not appropriate to have vertical booms in front of the layout, then one is left with the alternative of a cantilevered system with verticals to the rear. Ideally, these would be welded steel or similar, to give the best strength-to-weight ratio. However, most people do not have this option. A timber alternative, made from 3in x 1in softwood, with 9mm plywood plates would work, allowing the removal of the arm for storage and transport. Although the lights we would put on the end are not excessively heavy, it is very important that the support – and in particular the joint – should be strong enough for there to be no risk of collapse. A joint must be carefully glued with PVA and screwed in construction, noting that screw holes should be pilot-drilled to avoid the timbers splitting.
I recommend the use of pin hinges to mount a fascia or lighting pelmet. These are conventional back-flap or butt hinges made without the pin fitted, and supplied with a slightly smaller, looser pin. One half of the hinge is screwed to one element, and the other half of the hinge is screwed to the second piece. Once put in position, the pin is inserted to temporarily join the elements together. Lots of theatre scenery is held together with these things! These are manufactured by Doughty and Triple E.
The last suggestion of form I shall make is for those layouts which are presented with a proscenium arch, and may be fully boxed-in with a viewing ‘window’ in the front face. These may be able to accommodate a pull-out lighting position, mounted on ball bearing drawer runners (40cm would be a convenient size as a minimum). These would be mounted on the side frames of the layout ‘box’, and carry almost an inverted drawer, to suit the lights and fascia required.

This would push in flush with the box and be secured with a small bolt for storage and transport, and simply pull out for use. These drawer runners (as shown above) are surprisingly strong, available from numerous suppliers and would be quite suitable for the purpose.
Different bulbs
Incandescent bulbs are getting much harder to come by, use a lot of power (relatively) and produce a lot of undesirable heat, but do produce a nice light. Either GU10 halogens would be my choice if going down this route, or PAR38 for a larger layout – but select the suitable beam angle to avoid creating dark spots.
As mentioned, compact fluorescents of the appropriate colouration are viable, if used with shades or masking, and from an appropriate position. They are available in a range of white colours, but can have a tendency to ‘flatten’ a picture – particularly if used straight on. Look for photographic equipment when purchasing. A maximum of 35W per bulb would likely be appropriate.
LED options: LED GU10s are available in 4000k (neutral white), 2700K (warm white – rather yellow) and 6000K (cool daylight). These are very low wattage, producing very little heat, and are infinitely better than the versions sold even five years ago. They are available in 36 degree, and most usefully, in 100 degree. Coupled with a suitable fitting, they can be used for primary lighting, or as key lighting (the sun, for instance) from one side or behind to enhance and complement the primary lighting.
LED battens: A replacement for the old fluorescent tube are now available. These come in many lengths, colours and light outputs. A Ledus LED 4ft weather-proof 4000-4500K Natural White 45W (450W incandescent equivalent) was bought for trial, and compares very favourably in terms of colour rendering (the warm end of daylight) and strength and spread of output (a fairly even 120 degrees). If you're looking at a single light-source for simple lighting, this might be it. I would add a second light source of around 6000k – likely a GU10 – to add depth and contrast. Battens such as these have a wider spectrum than the fluorescent tubes, and I prefer them. They're less delicate, too.
LED panel lights: These are becoming more common and available in many colours including 4800K. LED panel lights are also available in round, square or rectangular up to about 122cm long and some dimmable, they give very even coverage, and would be suitable for home use.
LED strips: These are available in rolls, and in a variety of colours from warm white through to cool white. Also available is RGB (red, green and blue) which of course can be mixed to produce ‘white’. In my view, however, this is rather crude and unsatisfactory, and I never gained a colour I thought remotely useful. As the colour graphs show, the more we can increase the colour range by adding slightly different LEDs, the better it will look – therefore a mix of neutral and cool white strips are likely to produce a nicer visual effect than strips of one colour – even if it is the ‘right’ colour.
LED strips are fitted with a wide variety of different LED ‘chips’, and each have their own characteristics. Select strips that give a high light output per metre in order not to be disappointed. Ideally have about three rows of strips, to give you front light, top light and back light, as shown in the small layout LED rig drawing. Most LED strips have a beam angle of 120 degrees, but check before purchase.
Temperature values of light
6500K - sunlight with blue/white sky
5740K - average noon summer sun
5500K - photographic white
5070K - average noon winter sun
5000K - outdoor light for most of the day
4500K - late afternoon sun
3500K - sun 1hr after sunrise
3200-3400K - photo flood-standard indoor 'white light' studio lights
3000K - 1000W incandescent tungsten halogen lamp
2870K - 100W incandescent light bulb
2000-2500K - dawn or dusk

Top Tips
- Use the same light for your modelling (especially painting!) as you will use to light your layout. Different lights make the same object look different…
- Ensure shadows always come from the same direction.
- Season, time of day and weather will all dictate your lighting – if using different coloured LEDs, have them on dimmers so you can fine-tune or change your lighting.
- Daylight comes at us from all directions – even on a sunny day. Light is reflected from impurities in the atmosphere, the ground, or structures. The sunnier the day, the more uni-directional the light is.
- 'Specials' - lights that are focused to shine through doors and windows - provide shafts of sunlight or moonlight... These add to the mix, enhancing the layout.
- Paint any visible ‘off-stage’ areas black, or a very dark colour – it makes the intended focus much clearer.
Your weekly World of Railways newsletter
Are you subscribed to our weekly email newsletter? Don't miss the latest news, reviews, modelling advice and competitions.