


25 August 2022
|

Important for identification and safety, locomotive lamps once played an important role on the railway. Tony Wright's guide shares how to model them, with information on their correct positions.
Model locomotive lamps are something of a ‘bee in my bonnet’. They are such an easy way of increasing realism.
As the standard of accuracy has improved beyond all recognition in the last few years with regard to all model railway items, modellers have been striving to place these excellent products in as real a railway environment as possible. One of the things that adds realism to both the appearance and operation of a model railway is the placing of lamps on locomotives to describe the trains they’re hauling.
What are locomotive lamps used for on the railway?

From the early days of railways, lamps have been used to describe the status of trains being hauled and, in the case of a red lamp at the rear of a rake, to denote that the train is complete. These lamps were there to assist the signalmen and operators of the railway. They were never bright enough to light the road ahead or warn track workers of an approaching train, unlike the high-intensity headlamps used on locomotives today.
Separate lamps on steam locomotives were oil-lit and had slots at their rears or sides to be fixed to lamp brackets on locomotives. Different companies adopted different styles of lamps, but all carried a white or a red gel behind the lens as appropriate. Lamp bodies varied in colour; the GWR favoured red until the 1930s, the LMS black until well into BR days and the LNER white. The Southern used white discs instead of lamps, as did the ex-Great Eastern section of the LNER/ER, though there was a difference in their meaning. The SR discs denoted a route taken, the GE the status of the train.
The lamps on the locomotives below represent immediate pre-War and Post-War codes. These were standardised by BR, and I’ve used BR’s descriptions. Apart from the SR, these codes were used by all BR’s regions with the exception of the Somerset and Dorset, which kept its unique codes to the end.
The only time when all four brackets carried a lamp was for the royal train, but only if the monarch were on board. Without the monarch, Class A lamps were carried.
Modelling locomotive lamps

Some of the finest and most-accurate lamps are now made in 3D-printed resin by ModelU. Amazingly, these are already slotted to fix on to lamp brackets (which have to be very fine). They just need painting and the tiny jewels fixed in place. Some Springside white metal LNER locomotive lamps are shown for comparison.

I’ve used many Springside lamps (though not the BR versions, which I feel are too big), and the easiest way to fix them in place is to drill a hole in their bases, large enough to fit over a lamp bracket. Beware, some RTR plastic brackets are flimsy and can break, so I use solder to hold the brackets on my kit-built locomotives. A blob of Blak-Tak is then used to secure them. This method of fixing allows locomotive lamps to be changed to signify different duties.
British Railways Headlamp Codes

Examples of lamps

This is a ModelU 7mm tail lamp fixed to a brake van on Graham Clark’s Manchester-Sheffield-Wath electrification depiction.
The same ModelU product, this time in 4mm:1ft scale, fixed to a Tom Foster-weathered RTR brake van. Note the side lamps as well – usually fixed (one each side) to denote an un-fitted train, where the locomotive crew could look out to ensure their train was complete. The side lamps displayed a white light forwards and a red one rearwards.
Springside lamps in use on my 'Little Bytham' layout, depicting a Class A working and Class C working respectively. With a dab of dirty thinners, these lamps are quite acceptable.

Another source of excellent lamps are those produced by Lanarkshire Model Supplies, here just held in place by Blak-Tak on the brackets of a DJH 4mm:1ft scale A1. Despite locomotives of this class being fitted with electric lamps, oil-lit lamps were carried, too. I’ve not painted these.

Lanarkshire Model Supplies’ lamps in use on a brake van running on 'Alloa'. Again, note the side lamps because the train is unfitted.

In early BR diesel days, despite the locomotives having electric lights, unless one had discs, oil-lit lamps still had to be displayed in order to denote the class of train being hauled. Here, an NRM/Bachmann prototype 'Deltic' hums through 'Little Bytham' carrying Lanarkshire lamps.

The Midland Railway painted its locomotive lamps in the same colour as its locomotives, here displayed on the late Bob Essery’s 'Dewsbury' layout in Scale 7. The locomotive on the left is running as a light engine and that on the right an express.

As mentioned, the LMS favoured black as the colour for its locomotive lamps, and this lasted well into BR days. In this shot, an MPD 3F displays the code for a pick-up freight as it runs on the MR/M&GNR section of 'Little Bytham'. This being a very old kit, it has no lamp brackets and I only built its chassis, so this lamp is permanently fixed with superglue. It only ever works a pick-up turn.

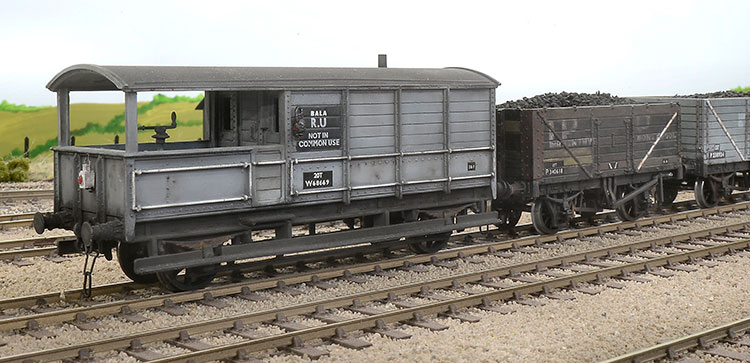
A Springside rear lamp has been permanently fixed to this non-gangwayed carriage with superglue.

A V2 displaying Class B lamps on Gilbert Barnatt’s 'Peterborough North'. Just to the right is an N5 on station pilot duty. It’ll display two lamps at both ends – one red (visible) and one white (hidden by the van).
Up to the 1930s, the GWR used lamps with red-painted bodies. Here, a 47XX has charge of a Class D express freight on 'Sanford and Banwell' in P4.

Also on 'Sanford and Banwell', this shot shows how the GWR locomotives carried spare lamps. Brackets were fixed to the side footplate for this purpose.

BR favoured carrying spare lamps on the tender’s front; just visible here as a DJH 9F speeds along on 'Little Bytham'.

As recorded in my introduction, the Somerset and Dorset had a unique headlamp code for either goods or passenger workings, both of which are displayed on locomotives on 'Bath Green Park', along with single lamps.

Some early BR diesels were equipped with discs as well as lamps for indicating their trains, as seen here as an EE Type 4 heads a Class A Pullman train on 'Stoke Summit'.

The SR favoured discs instead of lamps, but these denoted the routes taken, not the train’s status. This code is for the Waterloo-Exeter road and could be displayed on the most-important trains or the most-humble of goods. In this case, it’s carried by the ‘ACE’ on 'Feniton' in OO.

Where regions overlapped, both discs and lamps could be displayed, as appropriate. Both are shown here on 'St. Merryn' in P4.

One lamp on the top bracket denotes a Class B service; a stopping passenger train, often a local, as depicted here on 'Kendale' in O gauge.

In some circumstances, the ‘top’ bracket was lower, as seen in this shot taken on 'Abingdon' in O gauge. This is an Auto Train (Class B), with the locomotive pushing.

The top lamp here doesn't denote any status of train; it’s 'Big Bertha’s' headlamp, used when buffering up to a train before assisting it up the Lickey at night.
Finally, don’t forget that in earlier BR DMU days, an oil-lit tail lamp had to be carried. Where locomotives or trains don’t alter their workings, I’d advocate fixing lamps permanently in place to prevent their loss.
If you enjoyed this, why not try:
How to weather your first model
UK model railway eras explained
Trackplan inspiration: layouts with water
Your weekly World of Railways newsletter
Are you subscribed to our weekly email newsletter? Don't miss the latest news, reviews, modelling advice and competitions.
