


13 July 2023
|

Jamie Warne's practical tips can help you create realistic stone walls for your layout.
When it comes to boundaries, sometimes the prototype calls for something more substantial than a fence or brick wall – that often means using stone. The problem is that stone walls tend to be more complex to model because of the varying styles, colours, and textures involved.
In this practical, I’ll be focusing on a few methods you can use to construct some of these prototypes. For best results, I’ll be using materials suitable for scribing; a harbour wall made from rigid insulation and plaster (with another using DAS air-drying clay), an ashlar arch and various rubble walls made from styrofoam, and finally, a dry stone wall made out of more air-drying clay. Please note; as the painting technique I’ll be using will be similar for every practical, I shall share this at the very end.
WHAT YOU NEED
4D Modelshop
(RF30051) 5mm Styrofoam
DAS
Air drying clay (500g/1kg packs)
Pebeo
(526110) Gesso (250ml)
Vallejo
(70.862) Black Grey, (70.951) White, (70.976) Buff, (70.837) Pale Sand, (70.876) Brown Sand, (70.847) Dark Sand, (70.882) Middlestone
Woodlands Scenics
(ST1452) Smooth-It™
Rigid insulation board and/or leftover polystyrene packaging
Using rigid insulation and plaster
STEP 1
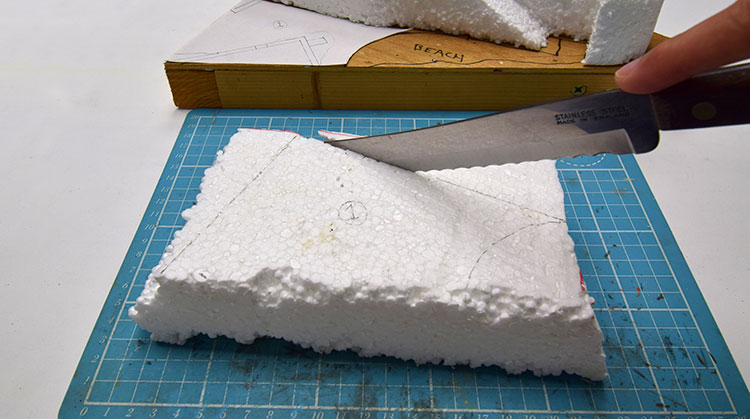
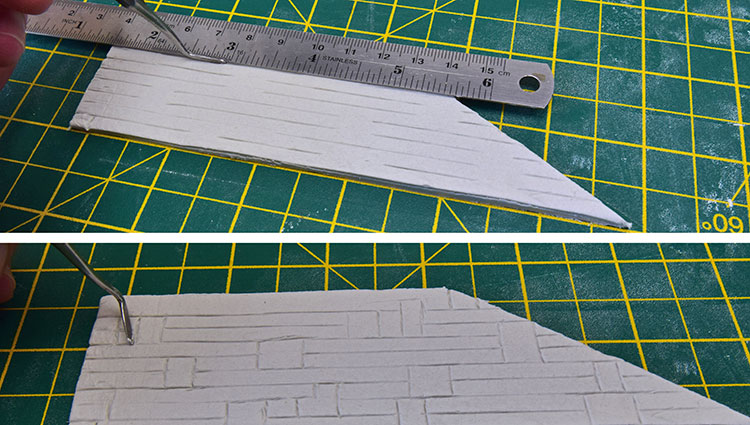
First, we’ll produce a harbour wall; it’s inspired by the Old Stone Quay at Swanage – a rubble structure with an ashlar parapet. To start, the basic shape (excluding the parapet) is formed by cutting a block of polystyrene packaging with a bread knife. Note one of the tracing paper templates on the board behind used as a cutting guide for the polystyrene blocks.
STEP 2
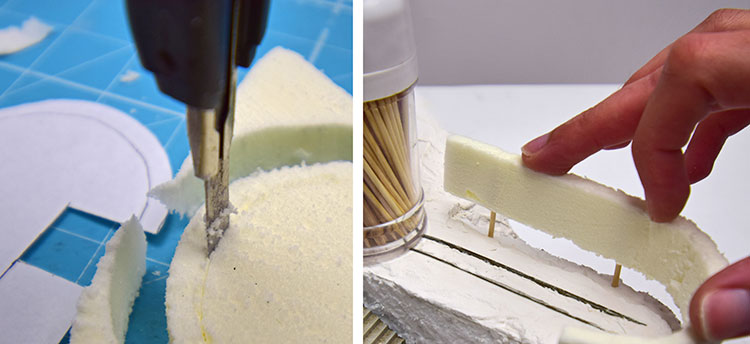
For a neater finish, denser rigid insulation board is used for the ashlar parapet. As the curve is quite tight, an extendable craft knife or hot wire cutter is recommended. You can mark both the top and bottom surfaces to help you guide the tool more accurately and ensure the cut is vertical. Attach it to the polystyrene base with PVA, inserting short cocktail sticks for extra strength.
STEP 3
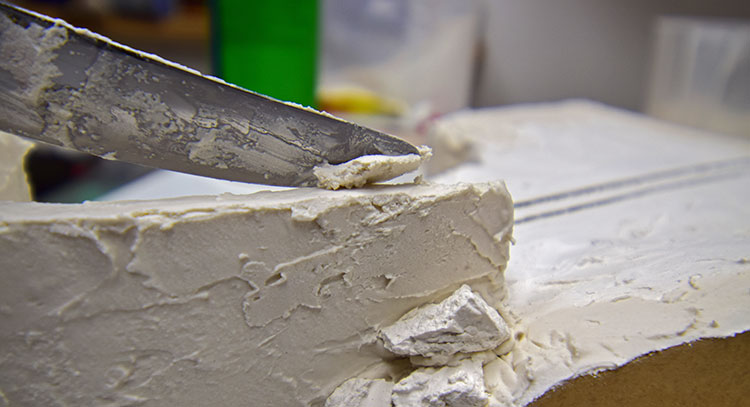
To cover the entire quay, I use household filler/plaster as it’s cheap, available in large quantities, and you can make it to the viscosity desired by varying the amount of water in the mix. Apply a thin layer of PVA to the quay walls, followed by a generous coating of plaster. Once left to harden (which can be up to 48 hours), sand the plaster until the required smoothness is achieved.
STEP 4
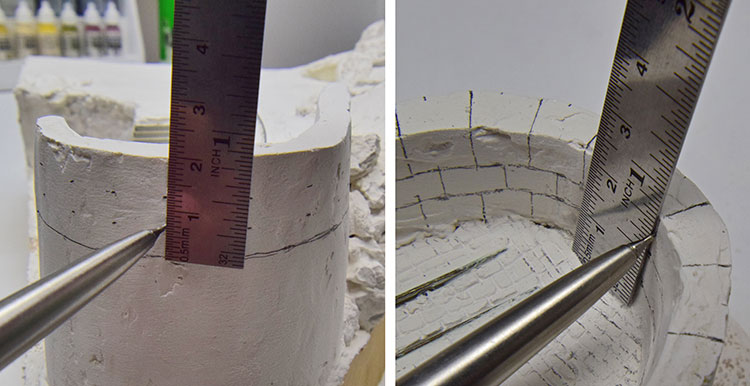
Starting on the ashlar parapet, measure the height and divide into three rows; with regular marks drawn. Join these to form three rows of stone blocks, then use prototype photographs to work out the stone length(s). Note though, that because of the curve, the inside faces will be shorter. Try to ensure the blocks match on all sides; including the two parapet ends and the top.
STEP 5
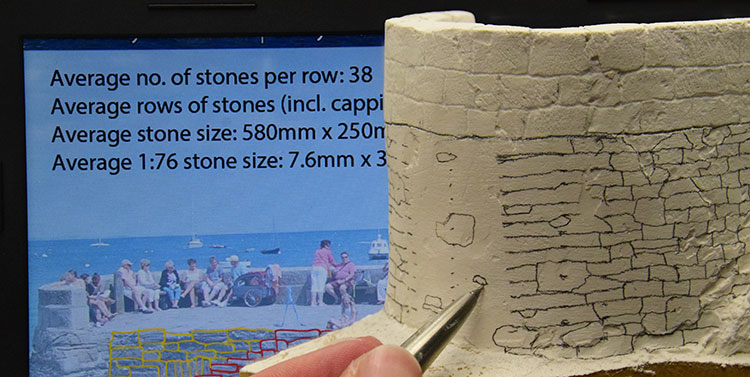
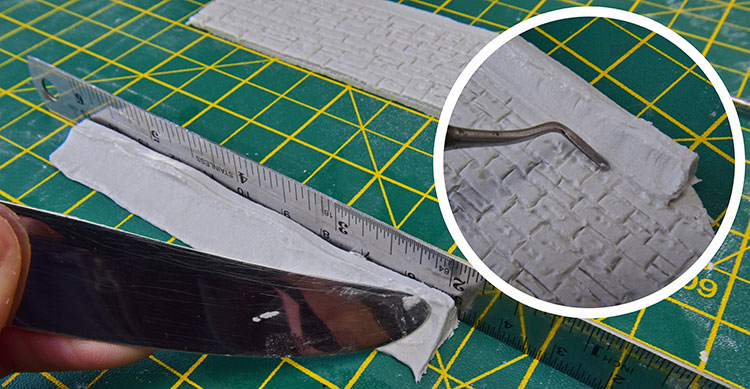
The random rubble walls beneath need to be tackled slightly differently. Using a prototype photo, we can estimate the number and size of stones by comparing them to a known dimension. Quoins and cap stones are drawn on first, followed by dots marking the average stone course heights. Before connecting these up by hand (for a more natural look), any large stones that span multiple courses are drawn first.
STEP 6
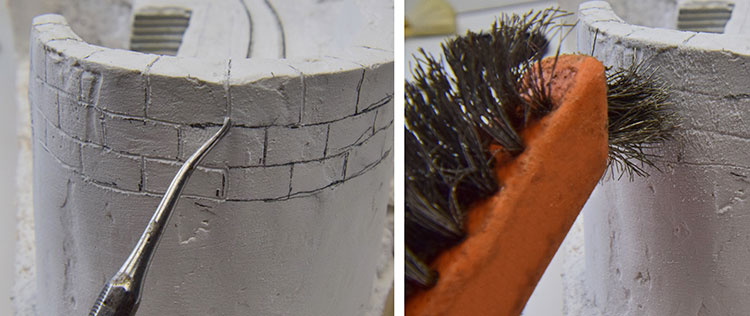
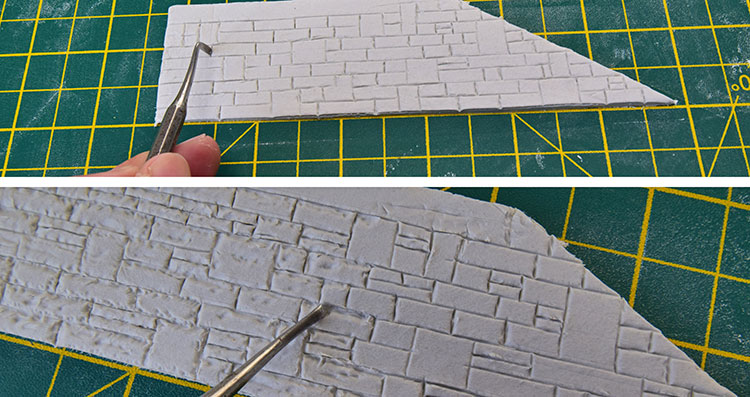
With the stonework drawn, we can scribe it using a dentist’s pick – tedious, but satisfying work! For neat ashlar blocks, use a straight edge to guide the tool. For rubble walls, scribe it freehand. Be aware that some areas of plaster may be softer than others! To add more texture, gouge out bits with the pick, or create furrowed effects (as found on rusticated ashlar walls) with a wire brush.
TOP TIP
Pay close attention to the prototype stonework, and try to match what you see. In particular, watch out for variations from the norm; things like a change in size or shape of stone, a variation in coursing (including orientation of stones) or any repaired, or infilled sections. Note also that corners and top stones are often much larger in order to form a stronger and/or neater wall.
Using styrofoam and gesso
STEP 1
The process of making stone walls using styrofoam is very similar, but there is no need for plaster, nor to scribe any joints; the pressure from the mechanical pencil on the soft foam while marking the courses will achieve the same result. As such, the Styrofoam rubble walls on the diorama (the ruined barn shown here, and the retaining walls) don't require further explanation, but the construction of the ashlar arch certainly does…
STEP 2
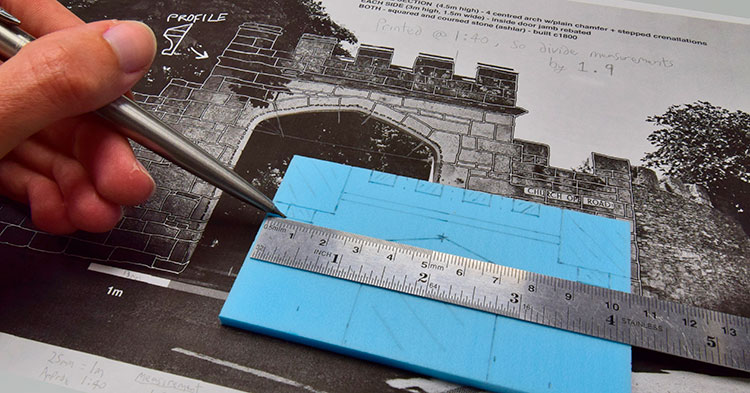
…the prototype arch is a listed structure at Pennsylvania Castle on the Isle of Portland, and will be closely matched stone-by-stone! A printout of a photograph taken square-on helps gauge the size of the stonework, as well as general dimensions and information obtained from the Historic England listing. Note how I’ve emphasised the mortar joints on the printout to aid visibility, and written notes to help speed up the process.
STEP 3
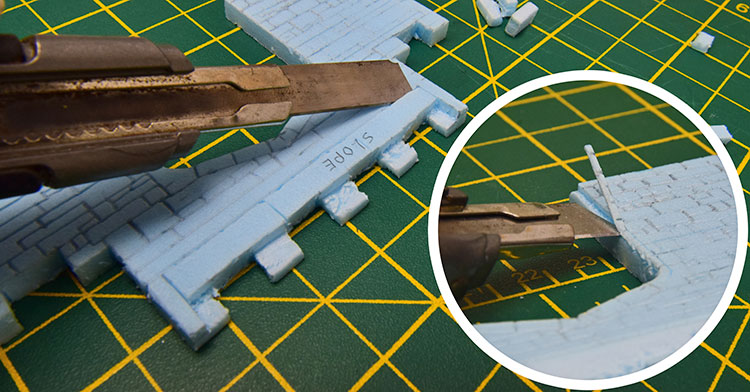
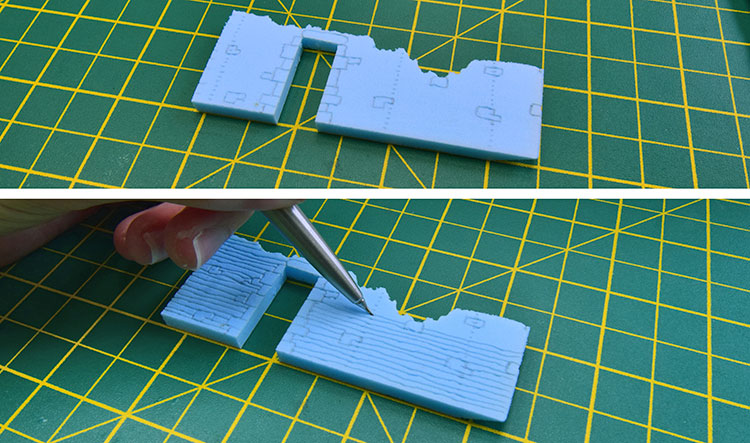
The rear of the arch differs in three ways. Firstly, the crenellations are only half-depth except at the outer ends; which wrap around the sides. Secondly, a slope joins the bottom of the crenellations to roughly the same level as the top of the cornice on the front. Thirdly, the entire archway has a rebate where the gates once sat. These all require careful trimming with a sharp blade.
STEP 4
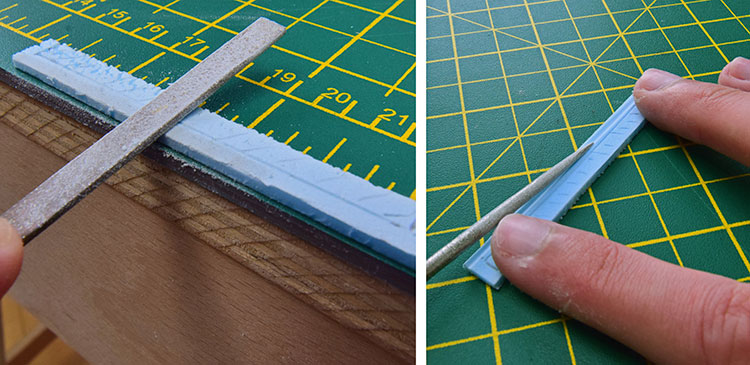
The cornice wraps around the crenellated parapet and is formed from a separate styrofoam block. Mark out the basic shape, but don’t cut it out yet. To form the complex profile, a variety of needle files are used. First, place the block on the edge of your bench, and use a flat file to create the upper slope. Then use a round file to form the rebated curve underneath.
STEP 5

To complete the profile, use a larger radius file to form a transitional curve between this sharp curve and the front edge. Using gentle passes of a sharp craft knife, you can now cut it out. Carry out a dry run to check it fits around the parapet as it should (remove material where necessary), then apply a thin film of PVA to the parapet and carefully glue the cornice into position.
STEP 6
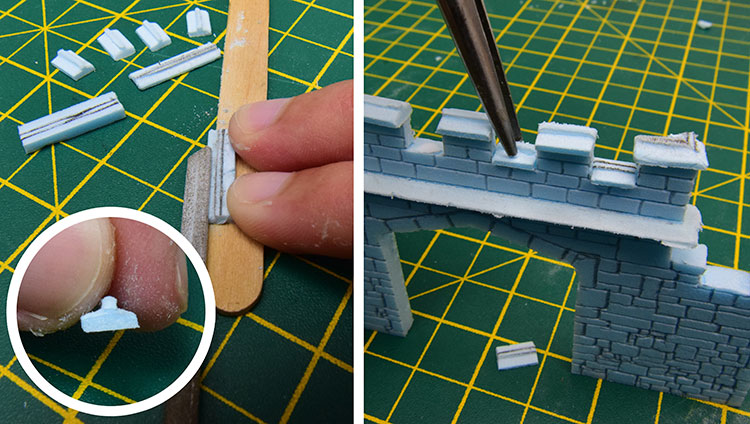
The capping stones feature a slope either side of a raised and rounded middle point. On a length of styrofoam 7mm wide, mark two parallel lines in the centre 1mm apart. Using a flat file, form slopes on either side. The raised section that’s left can be rounded off with more light filing. Cut to the lengths required, then glue them onto the parapet using PVA.
STEP 7
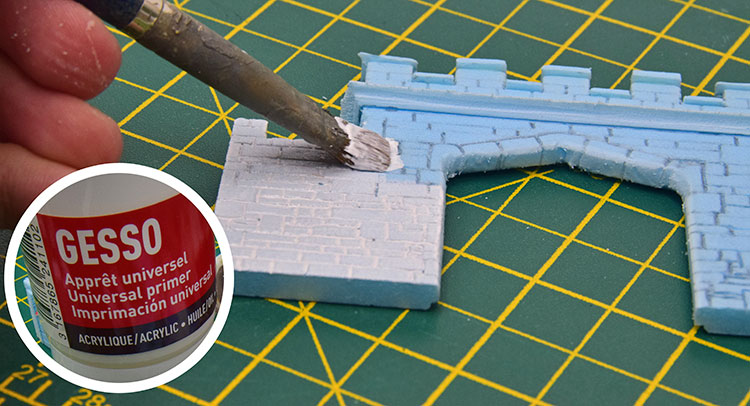
Now use a flat needle file to create chamfered edges along the archway. With the styrofoam walls complete, apply a layer of gesso to everything. Gesso is an acrylic paste made from chalk, binder, and white pigment. It’s used as a primer to prepare surfaces for painting, but it also provides a little more strength and texture. Simply apply it with a brush, and leave it overnight to dry.
Using DAS air-drying clay
STEP 1
We’ll be making two very different walls from DAS clay. The first is an ashlar harbour wall with a curved concrete wave reflector on top; inspired by one adjacent to the Mowlem Theatre, Swanage. A lump of clay is rolled to a thickness of approximately 4mm, and trimmed to the shape required. The courses are lightly marked with the dentist’s pick, with large stones interspersed as per the prototype.
STEP 2
Vertical joints are then marked, again, copying the prototype where possible. Note that some of the courses have sections where multiple flatter stones sit atop each other – something that could easily be missed. To create chamfered edges on each stone, the blunt end of the pick is pushed into each side. This is typical of the rustication found on ashlar walls, and is particularly easy to achieve with clay.
STEP 3
The wave reflector is formed from an additional length of rolled clay about 6mm thick. To form the curved profile, scrape the end of a butter knife across all but the furthest 2mm. Don’t attempt to do this in one go; it is more controllable in shallow passes. Note the steel rule used to keep the top straight. Once happy, trim any excess, apply it to the wall with PVA, and smooth the joint.
STEP 4
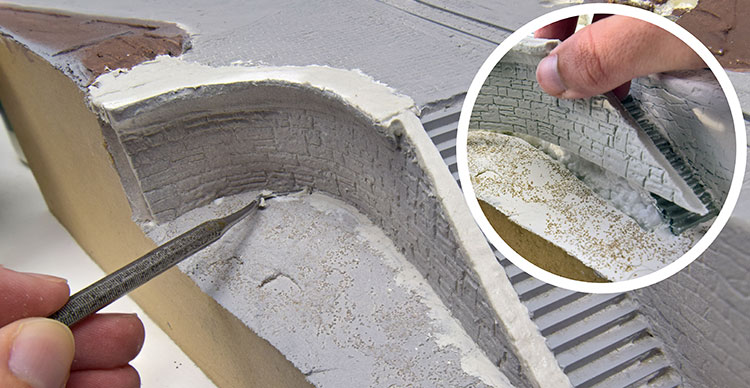
Press the whole wall into place against the polystyrene landform, and leave to cure overnight; ensuring it stays vertical. The clay will shrink as it dries, so the following day you can glue it into place and fill any gaps by applying clay with the dentist’s pick. Note that the sloped edge by the stairs has gained a flat slab of clay to represent concrete coping.
STEP 5
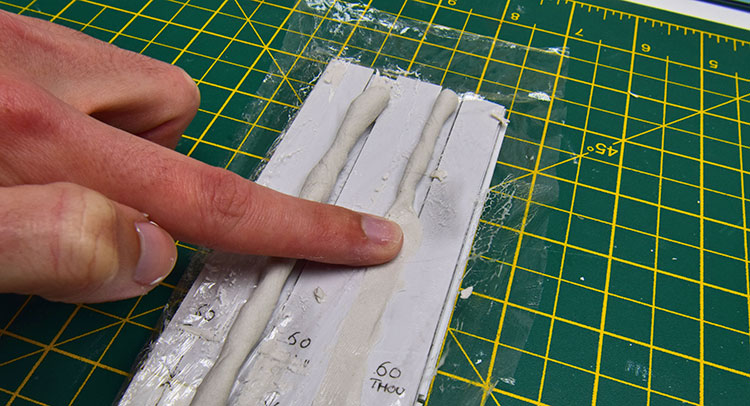
The final wall is a dry stone wall. For this, jigs from 0.060in, 0.080in, 0.120in and 0.160in Plastikard lengths are needed, with gaps of 8mm between each thickness to create scale 2ft wide ‘stone’ strips. Push thin flexible plastic into the jigs, and tuck it underneath. Sausages of clay are then pressed into the gaps, and any excess carefully removed using a wet knife.
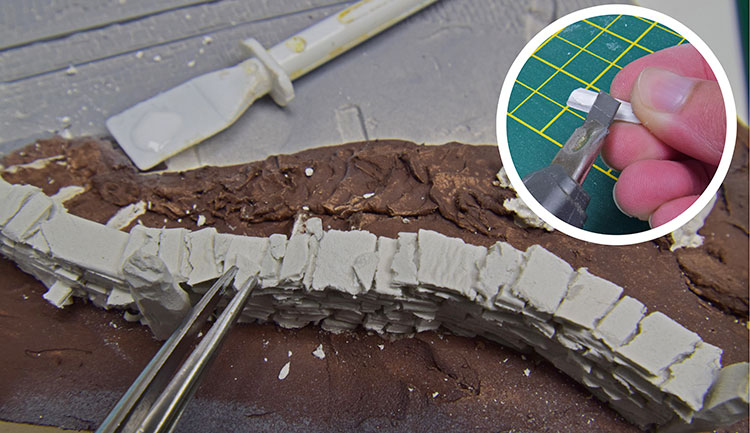
STEP 6
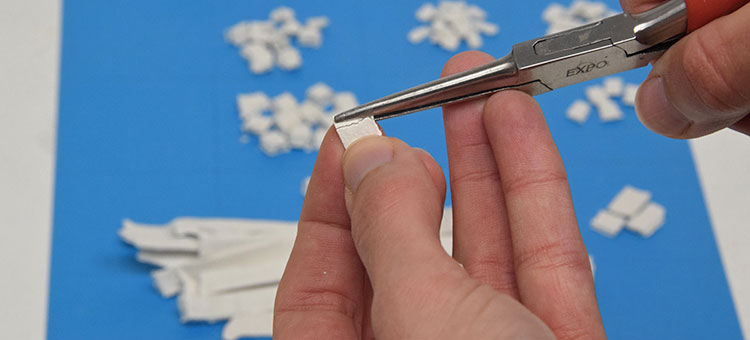
Carefully lift out the clay strips and lay them on a flat surface to harden for at least 12 hours. In the meantime, draw a grid on a piece of paper; ready to sort stones into categories depending on size and thickness. Once the clay has hardened, use fine-nosed pliers to roughly break off individual stones into random sizes – the larger the stone, the less you need.
STEP 7
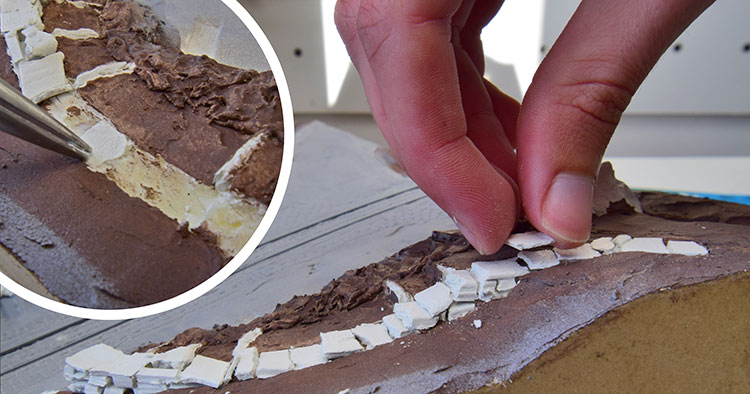
To keep the stones in our wall as horizontal as possible, multiple level trenches are dug on the steep sections of the hill. The first layer of stones can then be laid flat, working your way up the hill. Slowly build up the layers, but do try to copy the prototype where stone size and placement are concerned; larger stones are less common than smaller stones.
STEP 8
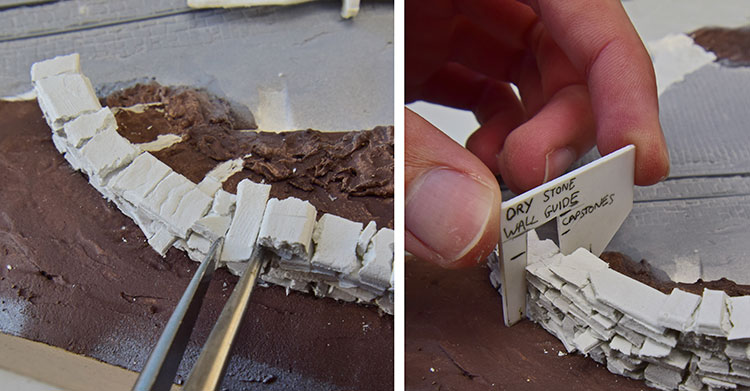
A stone stile is built by adding two long stone steps that stick out both sides; one 1/3 of the wall height, and the other slightly further along at about 2/3 of the wall height. A long thin slab is then placed on top where people would climb over. Note the Plastikard guide in the second photograph used to check the wall height as the stone laying continues!
STEP 9
Tiny stones are glued along the top to reduce its ‘stepped’ nature; ahead of adding the capstones. The inset photograph shows one of three large clay ‘stones’ being roughened with a craft knife. Two of these are end stones (one visible on the bottom right of the main photograph), and the one left of the pliers would be used by people to hold onto while climbing over the stile.
STEP 10
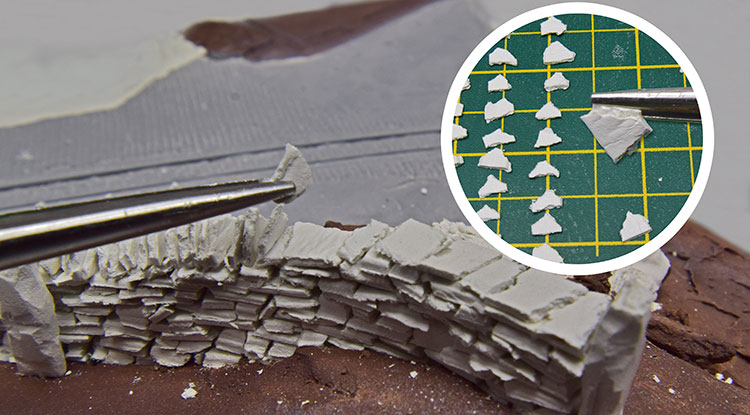
The last step is to produce and add the capstones. My prototype on the Isle of Purbeck has pointy stones, so 0.060in clay rectangular stones have two corners snapped off with pliers to make them roughly triangular. Starting from the lowest point on the wall, these can be glued along the top. The stile doesn’t need them, but you will need a large retaining stone on each side.
Painting techniques

The painting technique for the dry stone wall is slightly different from the rest. To ensure the paint reaches the crevices, spray a fine mist of water, then apply a very weak dark grey wash. Next, apply a slightly watery colour that matches the prototype stone in its un-weathered freshly-cut state. Finally, add additional dark grey washes as necessary, along with dry-brushed yellowy-green ‘lichen’ spots.
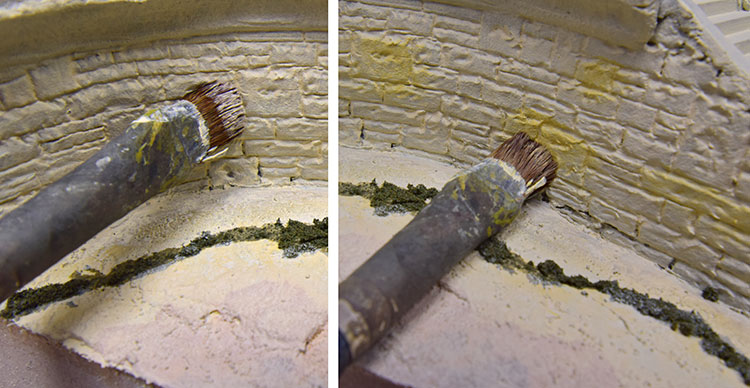
The other walls start off with the same base colour as used for the dry stone wall (in this case Vallejo ‘Pale Sand’ to represent Purbeck Marble). This is followed up by dry-brushing a myriad of other subtle shades, using prototype photographs to guide the colour choice and placement. To start, I used Vallejo ‘Buff’ randomly as a darker variation of the base colour.
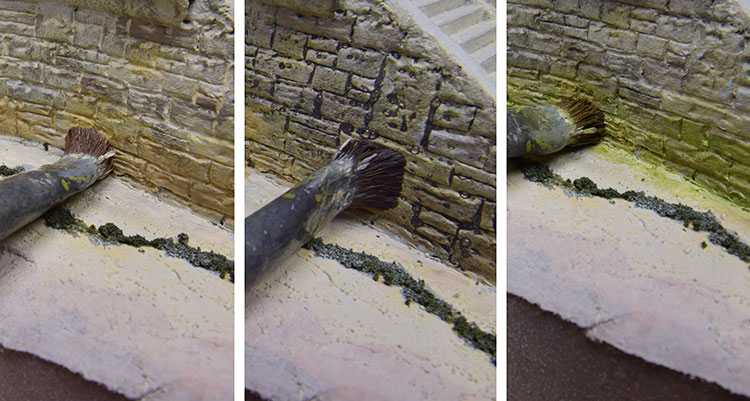
More colours are dry-brushed on, including Vallejo ‘Brown Sand’, and a generic brown. A wash of ‘Black Grey’ is used to emphasise cracks and is followed by a wash of ‘Pale Sand’ to tie it all together. Use a paper towel to mop off excess – it’s better to remove too much than not enough! Finally, Vallejo ‘Middlestone’ is used along the harbour walls to create the seaweed-strewn high watermark.
Conclusion
The world of stone walling is diverse, but the techniques outlined in this article should go some way to help you model the prototype that you wish to recreate. Some types are more involved in terms of construction time and patience than simpler walls built from dressed stone blocks. That said, the final result is more satisfying, and arguably can lead to more interesting results if you’re willing to put the time and effort into it.
Want more advice?
Push your modelling skills with this brass kit
10 things you should know about DCC
Locomotive lamps: a beginners guide
Model railway baseboards: all you need to know
UK model railway eras explained
Your weekly World of Railways newsletter
Are you subscribed to our weekly email newsletter? Don't miss the latest news, reviews, modelling advice and competitions.
