


03 March 2020
|

Our latest practical feature demonstrates how to make cost-effective, yet reliable wagons from plastic sheet that stand out from the crowd.
Usual initial forays into wagon creation in N gauge starts with repainting and weathering ready-to-run models. But sometimes modellers decide to produce their own scratch-built bodies that could fit on proprietary chassis produced by Peco or Graham Farish. If you see a picture of an interesting wagon or train in a magazine or book and search for further photographs to provide greater detail and an appropriate scale, the exercise can be a challenging but rewarding one.
To make the wagons fairly simple, the majority shown here are of a box-type construction.
The hardest part of producing a ‘box’ is to get it square. To aid this we used full widths of A4 sheets of Plastikard, cut into strips to produce wagon sides. Measure and mark at one side of the Plastikard, then the other. You are less likely to notice an error of 0.5mm over an 8in distance rather than 1in.
Transfers might not be the correct code or number, but they look correct from a general viewing distance. Here we demonstrate how a few wagons can be recreated.
MCV/MSV/MSO Iron Ore Tippler

These are the simplest wagons to produce and well within the capability of anyone starting out in scratch-building. The inspiration came from a photograph in 'Working Wagons Volume 2' by David Larkin. We saw the ‘stone wagon’ markings and remembered the same symbol on a Woodhead WT228 transfer sheet. The prototypes were built during the 1950s. Our model is based on a Peco 10ft (NR-121) steel chassis.
- The removable loads are Plastikard tops, mounted on ‘H’ sections of the same material. Filler is added, followed by ballast, which is painted with acrylics, next is a ‘wash’ of watered-down black to highlight stone detail.
- Details such as corner supports and lamp brackets are produced from small pieces of the smaller strip, then filed to shape.
- Bodies are constructed from 0.020in Plastikard with ribbing from similar size square Microstrip.
- Painting was undertaken using various bauxite, browns and black, mixed together to create a weathered appearance. Lighter shades can be used adjacent to the transfer positions to give a patch-painted look.
- The corners are straight butt joints with the sides fitting over the ends. This hides unsightly joints.
- The floor is a rectangle of 0.040in sheet to add rigidity. We assembled the sides, then fitted the floor, remembering to raise it to fit over the weight supplied with the chassis kit.
- We found that 0.020in sheet is the easiest to use, but it has its limitations and is prone to warping. This can be used to your advantage to create heavily ‘distressed’ wagons.
- A technique trialled on these wagons was to add slivers/chunks of Plastikard to the sides, then ‘flood’ them with Humbrol Liquid Poly to create loading grab scratches.
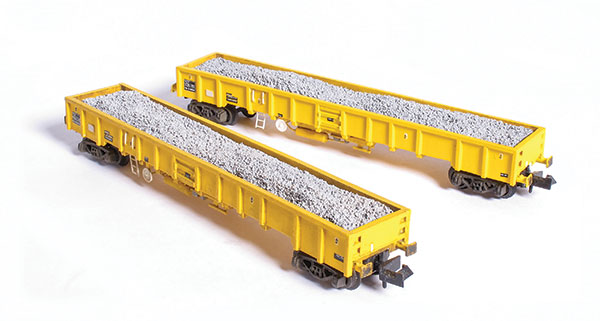
MKA Open Wagon

These models were produced using the same techniques employed on the Iron Ore Tipplers, but care has to be taken not to use too much Liquid Poly because it can distort the sides. This is a common occurrence and can be a restriction to building higher-sided box type vehicles. One way of combating this is to use 0.030in sheet instead of 0.020in, but this can give thick sides. The original bodies were fitted to redundant tank chassis. By introducing body side cutouts and a little additional ribbing, the Engineers' Departmental ZKA ‘Limpet’ can be produced.
- The bodies were sprayed with white primer to get good coverage for the orange paint. Masking tape was used to get the divide between colours. Picking out additional details such as axle boxes, ladders and buffer shanks brings the model to life.
- Apply transfers, a liberal weathering session adds realism and hides the lack of fine detail.
- The ribbing is Microstrip, in this case 0.030in square. After adding these, let them set overnight, then file top, bottom, ends and outside to get everything flush.
- The bodies are glued to the chassis using superglue. Remember to trial fit everything many times, including the couplings to make sure everything fits.
- The ladders are Ratio signal ladders, cut and fitted in pre-drilled holes in the wagon side/chassis.
- The chassis is a Peco 15ft wheelbase steel chassis (NR-122). Don’t forget to raise the wagon floor when assembling, to fit over the weight.
- You may need to cut off the top flange of the coupling pocket cap to get a flush fit. A touch of superglue on top will hold it in place.
MTA box wagon

This pair are further variations on the same theme, this time to produce the EWS-liveried MTA wagon. The prototypes were either converted from ZKA ‘Limpets’ or were new bodies on redundant TTA tank wagon chassis. The sides are the same height, but the top rail uses 0.040in triangular Plastruct strip. The chassis is the same NR-122 from Peco. Wire handrails have been added, with etched ladders from Ratio. The EWS ‘gold' transfers are from the Modelmaster range, but don’t look too closely because they have the wrong codes and numbers. They are the right colour though, and from a distance you won’t notice.
MTA/ZKA ‘Doorand’ wagons

Another variation on the same theme can produce the MTA or Engineers' Dept. equivalent ZKA ‘Doorand’ wagons. The same techniques were used as previously, but this time with varying body side and end heights. The side top rails are again triangular instead of square strip. All you need are a few photographs from the internet to get the base. Again, a Peco NR-122 15ft chassis was used. It isn’t the exact chassis type, but in N gauge do you really notice the difference?
ZCA ‘Sea Urchin’
The same techniques can be used with the Graham Farish 20ft 9in chassis. Varying rib positions allow you to create a multitude of designs. With livery variations, you can create a prolific range of wagons. The top rails are triangular. This is a particular instance where the wagon sides need to be low, because for this length of body, if high sides are required, they might warp inwards when the ribbing is glued. For this height though, it is no worry.
POA/SSA scrap wagons
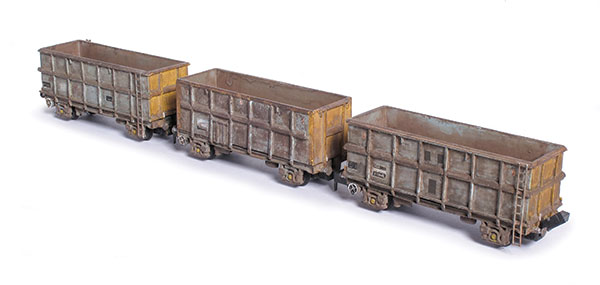
These wagons take things to a different level and complexity. The prototype wagons utilised a redundant PGA hopper wagon chassis and the fitting of a new box body. You could buy scrap wagon body kits in N gauge, but not of this particular type. The body is again a simple box structure, but this time with over 80 additional pieces of Microstrip added to produce the distinctive ribbing.
- The chassis are those used under the old Graham Farish PCA powder tanks.
- Some of the underframe pipework has been removed as per the original and the Farish coupling mounts cut off and replaced with Peco Elsie coupling pockets.
- A shortage of Farish springs and couplings at the time led to use of the Peco Elsie type. These permit a closer coupling, and work with some uncoupling ramps better.
- With heavy weathering as per the prototype, you can't see any gaps in the ribbing due to cutting variations.
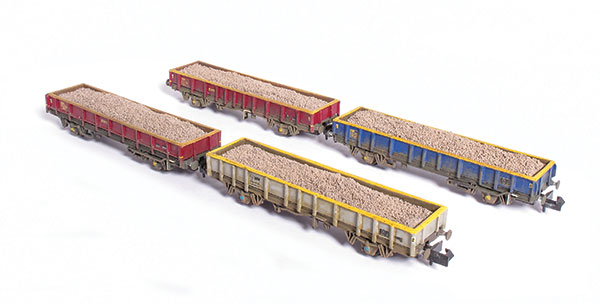
JNA box wagons
Similar in nature to the previous wagons and employing the same production techniques, these JNA Network Rail bogie ballast wagons were created. Bogies are again from US-outline stock with an approximation of underframe detail. Handrails are from 0.3mm diameter wire and ladders from Ratio. Network Rail logos of the correct size weren’t available at the time, so they had to go without. These can now be sourced from Railtec.
MCO/MDA/MOA box wagons

These wagons were produced before this wagon type was released by Graham Farish along with its MBA box wagon. This is an example where we produced a sheet of sides and ends complete with vertical ribbing, then cut these out afterwards. This form of batch production speeds up the assembly process. You do not have to attach individual ribs, just trim a small section at the top of the vertical ribs and fit the horizontal top rail.
- Underframe detail, piping and air tanks are fitted, but this is only an approximation taken from photographs.
- Varying the brake wheel, handrails/ladders and buffer positions allow for different variants to be created.
- Buffers are from the N Gauge Society range.
- Thicker ribbing (0.020in x 0.040in) was used, as per the prototype on these modern wagons.
With so much second-hand stock on the market, upcycling a wagon is an economical way of improving your stock as well as being great fun too. Find out more in our guide here.
If you'd like more general weathering advice, our article 'How to rust your wagons' is a must-read!
If you’d like some more advice, take a look at the BRM Techniques page for all our latest guides and advice articles.
