


10 August 2022
|

It seems like strikes are in the national news almost daily at the moment, with the railways, NHS and postal workers all threatening further action. But how do you model a scene for your layout? We show you how...

We'll need some figures. ModelU has 3D scanned a suitable group of people, who are supplied as a single 3D-printed group, complete with the supports required by the process. These break away easily with finger pressure, although we find a pair of tweezers helpful too. If any tiny stubs are left, trim them away carefully with a sharp knife.

One of the figures is holding a placard, and the stick is very fine. If you are unlucky (like us), it will break. Replacing it with a piece of 0.5mm brass wire superglued into a hole drilled in his hand provides a stronger alternative. We're leaving the figures partially attached to their bases to make holding them for painting easier.

Modern pickets tend to wear hi-vis clothing, for which we used Precision Paints Dull Signal Yellow - mainly because it was handy as pretty much any yellow, or orange will do just as well. If you are modelling the 1970s, then replace this with black donkey jackets. Protest fashion changes of the years!

For the placards, we downloaded some photos from the news online, and printed them on to white inkjet decal sheet. A couple of coats of matt varnish and they were ready to be applied to the models. High-quality graphics like this are a relatively modern innovation. Older placards would be hand-painted - in model form, use a fine pen to keep things readable.

The base is a piece of MDF. At one end, two layers of Daler Board card are glued together and scribed with kerbstones and a manhole cover. The road is grey card, which gives a little texture to the tarmac. We've scribed a drain cover, but there are both laser-cut and etched versions available to the modeller.
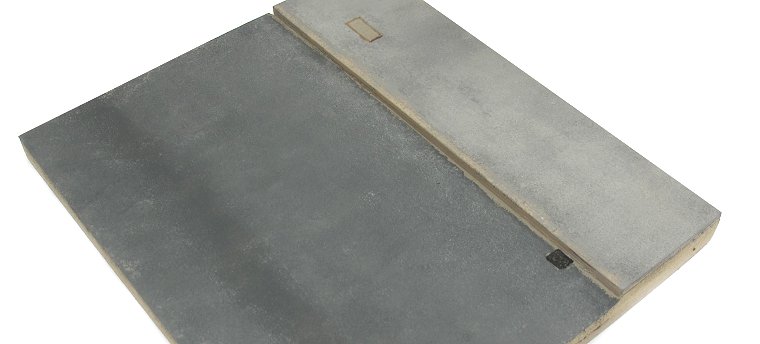
For speed, all painting is carried out with grey and beige emulsion matchpots, the paint being dabbed on using a sponge so it has a slight texture. Working quickly, the colours blend for a natural appearance.

Road lines are from ScaleModelScenery self-adhesive road markings sets. These simply peel from the backing sheet and stick in place. The ruler helps with the dotted centre line's spacing, keeping it reasonably straight.

Road marking paint is very thick, but the model lines are a bit too smooth, and very slightly shiny. Spraying them with matt varnish helps, but to take the edge off the colours, a dusting with pale grey weathering powders makes a real difference.

Security fencing is from Peco, sprayed with grey primer and finished with a wash of thinned brown paint. Each post has an extension at the bottom to go through a hole drilled in the base. A finishing touch is to puff some static grass into PVA glue brushed in from the back, under the fence.

Last, but not least, a banner is printed on paper, screwed up and then smooth to give it a bit of shape. Pieces of thread glued to the back allowed us to tie it to the fence.
