Parks and playgrounds remain at the heart of many communities, as they have been for many decades. When I was growing up in the 1970s, the latter tended to be rather rough, with rusty equipment and merely bare earth and grass on the floor. Today, facilities are larger, in good condition and care is taken to prevent injury from falls by using chippings or rubber mats on the ground. Parks still tend to be well cared for, with the grass cut, but often stretched council budgets have resulted in limited floral displays. Areas around war memorials are given greater attention.
For those of us who are not so keen on the scenic side, parks and playgrounds are relatively simple and fast to model and can take up a large or small area of the baseboard. Many kits are available to model such facilities, whatever era you model. Parks are a great place to add figures, and playgrounds look quite sad without children in these.
Where I have assembled kits, you should follow the manufacturer’s instructions. The steps I add make the process easier, protect you from omissions, or lead to better results.
Shopping List
Langley Models
War Memorial (F42)
www.langleymodels.co.uk
Scale Model Scenery
Park Benches (LX013-OO), Red Brick Wall (KX006-OO), Laser Cut Litter Bins (LX014-OO)
www.scalemodelscenery.co.uk
Hornby
Birch Tree with Bench (R7218), Oak Tree (R7209), Pine Tree (R7228) and Birch Trees (R7205), Scatter Grass Spring Meadow (R7177)
www.hornby.com
Gaugemaster
Brown Scatter (GM108), Light Green Hedgerow (GM160), Fordhampton Playground (GM246), Garden Flowers (GM175), Wild Flowers (GM178), Static Grass Glue (GM169), Busch Foam Flock Flowers (7356), Noch Playing Children (15810), Preiser Children (10556)
www.gaugemasterretail.com
Deluxe Materials
Aqua Magic, Tacky Wax
www.deluxematerials.com
The Army Painter
Quickshade Soft Tone
www.thearmypainter.com or Expo suppliers
Terra Scenic
Styrogoo glue
www.terrascenic.co.uk
Golden Valley Hobbies
Auhagen (76937) Spring Flowers
www.goldenvalleyhobbies.com
Humbrol
Humbrol sand weathering powder (AV0013), acrylics (33), (67), (34), (62), (63), (52), (38), (99), (19) and enamels (55), (33), (27002)
www.humbrol.com
Graphicair
Lifecolor Tensocrom Oil (TSC207)
www.graphicair.co.uk
Content continues after advertisements
Making benches
1
Make the end pieces by laminating the two parts together, taking care that you make left and right-hand ends – it's easy to miss if you make them in one batch.
2
Add the back and seat, then glue with PVA. Wash your hands after making these models because they will be black with soot from the laser cutting process used in manufacture and you can contaminate other parts.
3
Strengthening pieces are supplied to glue underneath the seat. I would always take the opportunity to strengthen models where possible at the construction stage as it saves time and frustration in the long run.
Building the walls
1
The wall kits are easy to build and are realistic. Cut slightly into the wraps to avoid white showing on the end result. Use felt-tipped pens to disguise the paper ends.
2
Ensure that you get the wraps the correct way up for part B as the openings aren't equidistant. Glue in place with PVA and use a seam roller to flatten. Once dry, cut out the white centres.
3
Turn part B over and cut a line from each corner to the edge. Spread glue on the tabs, fold over and stick down. If the knife tears the paper, replace or sharpen the blade.
4
To get sharp edges on the stone/brick work, such as the coping stones shown here, use a blunt edge to flatten the sides after folding, while the glue is still wet. It will create a more realistic look.
Building the war memorial
1
Use a rough file to remove burrs and seam lines from the whitemetal castings. Drill a hole to allow the peg on the soldier’s foot to fit. Glue in place with cyanoacrylate glue.
2
You must prime the whitemetal using a primer before adding a topcoat of either acrylic or enamel. Use bronze with a little added black for the figure. When dry, add a coat of Quickshade to bring out the relief detail.
3
The poppy wreaths are made by stamping circles from 0.020in plastic sheet using 4mm and 5mm hollow punches. 2mm circles of red painted paper are then attached using PVA glue and a centre added with black paint.
Building the Playground Equipment
1
Cut the parts carefully from the sprue using a sharp knife. Cut away excess moulding and clean up seam lines with a file. Glue with Poly Cement.
2
Parts, like the pipes, need a little filler adding to hide the long joints. Sand when dry and, after priming, you will notice blemishes if you missed areas. Repeat the filling process for a perfect finish.
3
The playground employs suitably-coloured plastic, but I always think paint looks better. Use a range of lurid colours to suit the subject. Humbrol (52), (38), (99) and (19) are nice bright shades.
4
Use Humbrol Metalcote Aluminium to portray the stainless steel of the slide and for paint worn away by little hands on other equipment. Thin this paint well and polish when dry to activate the metal particles.
5
For extra realism, use Lifecolor Oil Tensocrom to depict oil stains on the bearing surfaces of the swing.
6
Use Humbrol (62) to paint the sand of the sand pit. When dry, use Humbrol Sand weathering powder to dust the sand pit to give a nice matt textured finish.
7
Use extruded insulation foam for the base as it is easy to cut and shape. Arrange your items on the board to ascertain the layout and mark the place of paths and other key features. Take photographs for reference.
8
I made a paved stone area for the war memorial by reusing the inserts from the wall kit as paving slabs. Glue these to cereal packet cardboard with PVA and cut out.
9
The paths are made from cereal packet card. Cut a narrow former to fit under the path so that you can make a realistic camber. I glued the edges of the path using Styrogoo glue for a strong bond.
10
Asphalt paths often sink at the edges when laid, lacking a thick layer of substrate. You can replicate this by cutting lines in the cardboard using a knife, focusing mainly on the path edges.
11
Cut indentations in the foam at this point. I cut one to hide the base of the oak tree and where children would disturb the surface with their activity, e.g. around the swings. Cut out the pond.
12
Paint the base with a coat of emulsion. Any dark, earthy colour will suffice. I chose grey so I could undercoat the paths at the same time. Paint around the paved area, though.
13
Make up different shades of grey from acrylic paint and flick these at the path surface using a toothbrush to simulate asphalt. I used grey (67) and black and white to modify it to a darker or lighter shade.
14
Use PVA to stick down a ground covering of your choice. I used tile grout of a chocolate shade because of its small particle size. This will be the base colour for the soil of the flowerbeds.
15
I decided to recolour the paved area using a variety of acrylic paints to get an overall warm golden shade to mimic the appearance of stone. Use the dry-brush technique, or sponge, to get the typical stone patterns.
16
Use scenic glue and a static grass applicator to add grass. Think carefully beforehand as to where you want the grass to go. I added some green acrylic paint to the glue to add depth to the finish.
17
The flowers are made by gluing foam to areas purposely left uncovered for flowerbeds. Use Styrogoo and ensure that the foam is pushed well into it to get a good bond. Use a formal layout for bedding plants.
18
Use PVA glue to add the protective chippings to the children’s play area. I used Gaugemaster Brown Scatter. Don’t fill in the indentations completely and allow some of the ground to show through to portray disturbance.
19
When fixing the walls in place with Styrogoo, note that they only go one way up. The base has a depiction of moss and the upper edge streaks from water runs.
20
Use part C of the walls to cover gaps and also as wraps for wall ends by cutting part C in half. Fix the coping stones in place with Styrogoo and stagger the joints so they don’t coincide with wall joints.
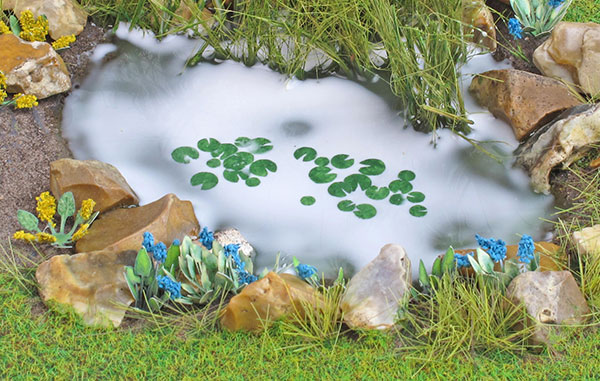
Making the pond
1
Cut the pond out of the foam with a sharp knife. This is easy material to cut, but have a vacuum cleaner on standby to clean up afterwards. Keep it shallow and dye the water if you want depth.
2
To protect the foam from heat when adding the resin water, use a household filler to line the pond. You won’t need to do this if you use Aqua Magic, however.
3
Use Styrogoo to glue small rocks around the pond area. Since these arrangements are contrived, and are placed in an artificial manner in real life, don’t get too hung up on placement.
4
I applied longer grass around the pond, artificial flowers and weeds from the Gaugemaster (Noch) range for marginal plants and Yellow Flag in the water, all fixed with Styrogoo. The latter is made by painting straw/hay with green acrylic paint.
5
Level the board and pour in Aqua Magic. I added some green and brown acrylic paint to add depth. Use a spatula to draw the water to the edges. I used three thin layers allowing each to dry in-between.
6
The water lilies are made from very thin paper supplied in shoe boxes, painted green with acrylic paint. When dry, punch out various sizes using a hollow punch and cut a slot to the centre.
7
For sticking the lilies in place, make a PVA/water mix in a 50:50 ratio. Paint it onto some cardboard and check that it is diluted enough for the brush marks to disappear after application.
8
Paint a thin layer of PVA glue mix over the entire surface of the pond and add the lilies using tweezers. Most PVA dries gloss, which you want, but again, test this on a piece of cardboard first.
9
I modified the playground apparatus to make a safety life ring. Cut down the post of the tyre swing and glue the tyre to the post. The orange of the ring was made by mixing red and yellow acrylics together.
10
You can use a permanent glue or, if you’re like me and like to move your figures around, use Tacky Wax. Just smear some on the contact surfaces and press into place. It forms a surprisingly durable bond.
![]()
More information
If you enjoyed this practical feature, you'll find a whole host of great practical advice and step-by-step guides in our Techniques section here.
Related articles
How to make a fence for a model railway
How to create a farm scene
How to model different trees
How to model graffiti on your model railway
Your weekly World of Railways newsletter
Are you subscribed to our weekly email newsletter? Don't miss the latest news, reviews, modelling advice and competitions.