What's the hardest part of creating a model building? To my mind, it's designing something convincing. We all know what a house looks like, but when you start to draw one up for a model, getting the proportions right and achieving the right look, well, that's more challenging than the process of building it.
Don't think you can swamp a model in detail to make it look right. It doesn't really matter what you are making – a building, locomotive or even a figure – if the proportions aren't right, the model will look wrong, even if you have counted the correct number of rivets.
To make things harder, imagine a relatively modern building, not a Victorian red-brick house, but the sort of suburban architecture that many of us know from our local area. Maybe you'll find examples of architectural prize-winning buildings, but those mundane dwellings that appear in their thousands? That's tougher.
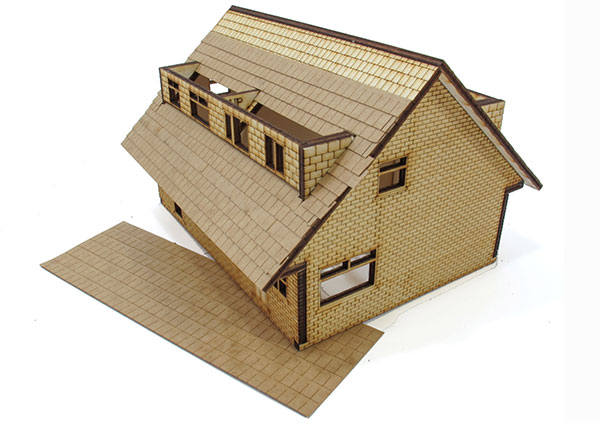
Looking through In The Greenwood's range, I was struck by the semi-detached bungalow. I know this building. As a child, one of my friends lived in a cul-de-sac where half of the houses were just like it. If I take a bus from Leamington to Warwick, we drive through the middle of an estate with many similar looking buildings.
Common as they are, I've never seen them modelled. It's odd, because those buildings are still there. Over the years, their owners have modified them with new windows and extensions, but you can still recognise the basics.
The solution is supplied flat-packed and cut in high-quality plywood for the price of a cheap model railway wagon.
The designer has a good eye. The bungalow looks right, and we get a variety of window and door styles built in to show they aren't brand new, but have undergone personalisation over the years thanks to the efforts of double-glazing salespersons.
If you've never built a building kit before, this is perfect. Strictly speaking, the only thing a modeller needs to supply is glue (PVA) and paint. I chose to upgrade my model a little with new slates, but even then, the only tools required was a sharp knife and a coarse abrasive stick.
Assembly in its most-basic form could easily be completed in an evening. I added a couple of hours' worth of detailing and spent a few more on the paintwork, but none of this was rushed or difficult.
The finished model looks attractive and takes me back to the days of going round to my friend David's to race our toy cars in his back garden.
Shopping List
In the Greenwood Laser
(HS004) Semi-detached Dormer Bungalow OO gauge laser-cut kit
W www.inthegreenwoodlaser.co.uk
Scale Model Scenery
(LX228-OO) Roof Slates/Tiles
W www.scalemodelscenery.co.uk
Ten Commandments
Etched Satellite Dishes
W www.tencommandmentsmodels.co.uk
1
Open the box and say hello to a large pile of parts cut in 3mm thick plywood. Some of the smaller components are sensibly contained in a plastic bag so they aren't lost.
2
For the first step, I'm diverting from the instructions. Putting the overhang onto the front walls before fitting them to the sides means they are a nice snug fit. This is the only significant deviation in the entire build, but being the first thing I do, is a little scary.
3
It's essential to keep the model square and flat. To achieve this, I'm building it on an old bathroom mirror using squares to keep checking everything is where it should be. Using PVA, the process is really quick, especially as the part fit is excellent.
4
The roof halves aren't identical, one is slightly longer than the other so should overlap at the top. With no positive location pegs – understandable as there's no way to include them invisibly – it's down to the modeller to check the roof is centred over the sides and the shorter side lines up with the top of the walls.
5
Dormer ends are made up and fit into the holes in the roof. A diagram in the instructions shows how to do this, but pay attention to make sure you get the bits the right way up. The front window panes slot into the rebates.
6
We tend to look down at our models and a roof of 2D-cut tiles looks too flat to me, so I cover it with laser-cut card slates from the Scale Model Scenery range on the sloping surfaces. Vertical tiles, such as those seen on the dormer front, seem to exhibit less texture in real life, so I leave the etched versions alone.
7
The dormer flat roof should be fitted and the trim piece added to cover the gap at the back. I prefer to chamfer this with an abrasive stick so it sits against the slates properly.
8
Modifying the flat roof means the bargeboards now stick out too far and need to be thinned with the abrasive. You could replace them with thin cardboard just as easily.
9
Wooden disks are included for the chimney pots, but stacking them neatly was fiddly and there were a couple of pots left from a Wills spares pack in my collection. I'm assuming one has been replaced in the past to explain why they are different sizes – not just because I only had one of each.
10
The standalone garage is built up in the same way as the house. The trim boards seem to overlap the door, so I replace them with strips of 2mm thick cardboard.
11
An optional porch is included. Don't glue this in place before painting, or you won't be able to get the brush inside.
12
For yellow bricks, I dry-brush some cream (Humbrol 103) and follow this with Pale Stone (121), dabbed with a sponge. The garage is the perfect place to test paint effects before moving on the main building. The corners take a couple of coats to cover the burnt edges from the cutting process, but it doesn't seem like much of a problem.
13
Windows and doors are pale grey (Humbrol 147) and again, a couple of coats are needed on the inside edges. Working along the etched lines makes working neat and easy, but keeping a brush damp with thinners handy to wipe away excess paint is a good idea.
14
Clear plastic glazing has to be supplied by the modeller – your plastic recycling bin is a surprisingly good source for it. Fix in place with Deluxe Materials Glue'n'Glaze adhesive which dries clear.
15
I don't like to see through a building, so simple internal walls are cut from foamboard. Making these slightly oversize ensures they stay put, the material compresses slightly between the strong plywood walls, although a little glue is belt and braces.
16
Curtains are strips of coloured paper, cut from a Sunday supplement, glued with Deluxe Materials Glue'n'Glaze.
17
The finishing touch is an etched satellite dish from Ten Commandments held to the chimney with a track pin. If you fit more than one, remember that, in the UK, they should all point southeast.
![]()
Content continues after advertisements
More information
If you enjoyed this practical feature, you'll find a whole host of great practical advice and step-by-step guides in our Techniques section here.
Related articles
How to build your first Metcalfe card kit
How to make realistic shop windows
How to build a laser-cut signal box kit
Model Railways: Building Card Kits – Top Tips
Your weekly World of Railways newsletter
Are you subscribed to our weekly email newsletter? Don't miss the latest news, reviews, modelling advice and competitions.