12 March 2020
|

Network Rail signaller, Mick Nicholson introduces key signalling practice to help you better understand their positioning and workings on your layout.
Signalling principles
Traditionally in Britain, trains were signaled by the Absolute Block system, and though now rapidly diminishing, around 11% of Network Rail retains this method. An Absolute Block Section is the portion of line between the last stop signal of the rear signal box, and the first stop signal of the advance (next) signal box. Under normal working, only one train is permitted to occupy a block section. At a signal box with more than one stop signal (for example a ‘Home’ and a ‘Starter’), the portion of line between the first and last stop signals is known as ‘Station Limits’.
Trains don’t simply appear at a signal box, they are first ‘offered’ by the rear signal box and only when the various regulations permit are they ‘accepted’ by the advance signal box. Put briefly, before a signalman accepts a train from the rear signal box, a previous train must have proceeded 440 yards beyond his first stop signal.
Communication is key
Signalmen communicate ‘box to ‘box using single stroke bells, known as ‘Block Bells’. For example, when asking “Is Line Clear for an Express Passenger train?” the ‘asking’ signalman sends four consecutive beats to his colleague in the advance signal box. Providing the above-mentioned conditions have been met, the advance signalman will repeat back these four beats. The rear ‘box signalman now knows the line is clear, and safe for the passage of a train.
When only one Stop signal is provided it’s known as a 'Home Signal', and almost without exception, will be sited a few yards rear of the signal box. Once points and crossings are brought into use the siting of this signal becomes more critical. This is because apart from protecting the advance block section it must also protect the siding or crossover connections. In theory, no matter how many points are in advance of the Home Signal, this one signal will suffice.
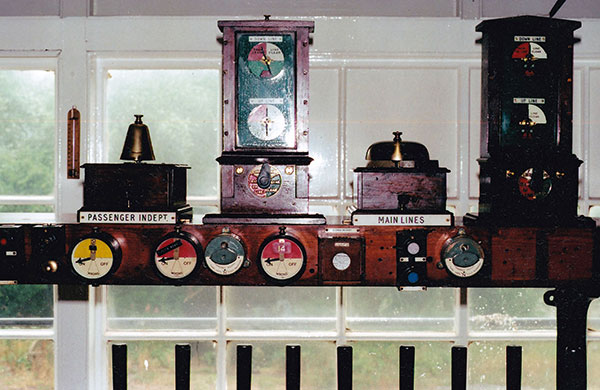
An example of block instruments at Gylberdyke signal box, Yorkshire, with visual indicators and bells.
There is also a visual indicator, and this by means of a pivoted needle shows the state of the block section. When stood vertical, there is no train in the section and the needle will point to ‘Line Blocked’ – it’s always assumed the line is blocked. On accepting a train, the advance signalman will deflect the needle to indicate ‘Line Clear’, the rear signalman now knows he can clear his signals and allow the train to proceed. With the signals cleared and as the train is about to enter the advance section the rear signalman sends the bell signal ‘Train Entering Section’. The advance signalman acknowledges this and deflects the needle the opposite way to show ‘Train on Line’. The needle will remain in this position until the train has passed through the section, complete with tail light. The tail light is the advance signalman’s confirmation that the train is complete and is not divided. On seeing this, the advance signalman sends the ‘Train Out of Section’ bell signal to the rear ‘box and restores the block needle to ‘Line Blocked’. The rear signalman, is now free to offer another train.


Signals can be loosely divided as follows:
Running Signals. These have full-size arms and can be further sub-divided into ‘Stop’ and ‘Distant’. The former is painted red with a white stripe with a squared end, the latter is painted Yellow with a Black chevron and a ‘V’ end. Depending on its location, a Stop signal can be a Home or Starting signal, and visually, both are identical.

As an introduction, I’ve chosen Weedley which consists of no more than a home and distant signal in each direction, these being the bare necessity of a signalling system. There are no points to complicate matters, and the farm crossing can be ignored. Its sole purpose was to divide what would otherwise have been a long block section of 4m 22c between South Cave and Little Weighton.

Having grasped the basic principles, we can now move on to something more complex and akin to a typical model railway. Drain Bridge has a mains crossover and siding connections. Travelling along the Down Main, the first signal an approaching driver sees is No. 17 down distant, this immediately tells him the state of the line ahead. If it is at ‘Caution’ he must be prepared to stop at No. 16 down home the next signal. Conversely, if it is ‘Off’ he knows that both No. 16 and No. 15 Down Starters are also ‘Off’ and he can proceed at line speed. The signal box interlocking ensures that before pulling the distant signal lever, both the Home and Starter signals must have first been cleared.
The next signal encountered is No. 16 Down Home, this is where the rear Block Section, Paul Road to Drain Bridge ends. This same signal protects the crossover, and the interlocking would prevent the signalman from clearing it with No. 9 Crossover reversed that would be set for a shunt move Down Main to Up Main or vice versa. A few hundred yards ahead is No. 15 Down Starter. This signal controls entrance to the advance block section and would only be cleared with ‘Line Clear’ and the train accepted by Dock Junction. The portion of line between the above two stop signals is called Station Limits and within these, the signalman can split a train or shunt vehicles as needed.
A similar situation exists on the Up Main, but here the rear block section from Dock Junction ends at No. 2 Up Home signal, and the advance block section to Paul Road commences at No. 3 Up Starter. The Station Limits extend from the Home to the Starting signal, but in this case the Home signal additionally protects the trailing points No. 6 Up Main and Up Sidings.
Operating on Drain Bridge
Scenario 1
Imagine an Up Goods Train from Dock Junction is to shunt the sidings at Drain Bridge. The train will be offered and accepted in the same manner as any other train, but in this case the signalman will not clear No. 2 signal until the approaching train as come almost to a stand. With the signal cleared the driver will draw the train forward and bring it to a stand with the guard’s van just clear of the trailing points No. 6 Up Main and Up Siding. Let’s presume the train is of such a length, that when brought to a stand the locomotive is beyond No. 10 shunting signal. Once the train is at a stand the signalman will reverse No. 6 points, then clear No. 7 signal shunting Up Main to Up Sidings. The clearing of No. 7 signal then permits him to clear No. 10 shunting signal, which for this move reads ‘Shunting along Up Main to No. 6 Signal. With No. 10 signal now cleared, the driver will set his entire train back into the Up Sidings. When the complete train is clear of the Up Main and safely in the Up Sidings the signalman will send ‘Train out of Section’ to Dock Junction and restore the block instrument to ‘Line Blocked’. As the train never passed No. 3 Up Starter, Paul Road signal box had no involvement.
After completing its shunting duties, the above-mentioned train is ready to depart to Paul Road. The signalman will first offer the train, and when accepted he will reverse No. 6 points and clear No. 5 signal ‘Shunting Up Sidings to Up Main’ and No. 3 Up Main Starter.
Scenario 2
Alternately, the train might have been left in the sidings with the locomotive left to return to Dock Junction. If so, it would shunt out from the Up Sidings as above but would only draw forward as far as No. 10 shunt signal. With it not passing No. 3 Up Starter, Paul Road will not be involved. With the locomotive at a stand, the signalman will reverse No. 9 Main Crossover and clear No. 10 shunt signal which now reads ‘Shunting Up Main to Down Main’. The locomotive will pass through the crossover towards No. 15 Down Starter, and when accepted the signal will be cleared and it’ll proceed to Dock Junction.
Scenario 3
If a locomotive came on the Down Main from Paul Road to shunt the sidings it would be accepted in the normal manner, and on arrival it would be brought almost to a stand at No. 16 Down Home signal. With the signal cleared it would draw forward and stop just beyond No. 8 signal Shunting Down Main to Up Main. After restoring No. 16 signal to danger, the signalman will reverse No. 9 crossover and clear No. 8 signal. This is the driver’s authority to shunt across to the Up Main and stand at No. 10 signal. With the locomotive on the Up Main, No. 9 crossover will be put normal. This permits No. 6 points to be reversed and No. 7 and No. 10 shunt signals to be cleared for the move to the Up Sidings.
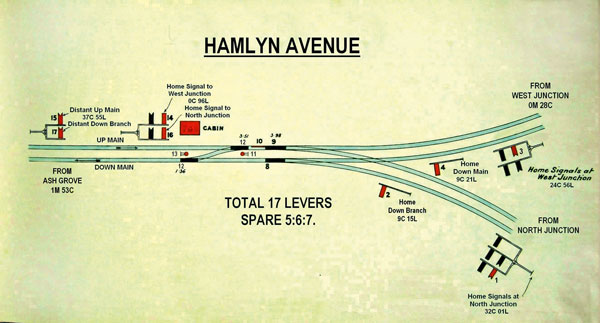
Hamlyn Avenue represents a typical double line junction and like elsewhere, Absolute Block Regulations apply. It was the southern tip of a triangular junction and with the three junctions being approximately 600 yards apart, Up Main and Up Branch Starting signals weren’t provided. Similarly, on the Down Main, and despite the longer block section to Ash Grove, again a Starting signal was not provided. Owing to the short block sections to and from West and North Junction signal boxes, the Distant signals are placed below the relevant stop signals.
An Up Main train from Ash Grove to West Junction is dealt with much the same as previously described. Though before No. 14 Up Main Home and No. 15 Up Main Distant can be cleared, No. 9 Up Main and Up Branch facing points have to be ‘Normal’, that is laid for the main line to West Junction. Additionally, these points are Facing and must be locked by No. 10 Facing Point Lock. The trailing mains crossover No. 11 must also be normal.
With the above train long gone, Ash Grove now offers another train, this time destined for North Junction. Before any signals can be cleared, junction points No. 8 and 9 need to be reversed, in that order. No. 9 points must also be locked before No. 16 Up Main to Up Branch Home and No. 17 Up Main to Up Branch Distant can be cleared. Additionally, the crossover must also be normal.
Until the train has passed over and is completely clear of the junction, a train can’t be accepted from West Junction on the Down Main. This is because the 440y ‘Block Overlap’ in advance of No. 4 Down Main Home signal is obstructed. Similarly, and for the same reason, Hamlyn Avenue can’t accept simultaneously from North and West Junctions.
Still searching for trackplan inspiration? Our guide gives you simple trackplan suggestions to help you get started.
If you’d like some more advice, take a look at the BRM Techniques page for all our latest guides and advice articles.