It’s no secret that railway modelling has become a costlier hobby of late. Rising prices haven’t gone unnoticed on our forum RMweb, with regular postings on the subject, further evidenced by emails and letters I’ve received. It’s mostly new RTR models and rolling stock that’s subject to this change however, and great bargains can still be had if you’re penny-wise and seeking further afield.
The second-hand market offers a wealth of wallet-friendly opportunities. We’ve tackled the subject of second-hand wagons and locomotives many a time – a few improvements on a budget and you have some layout-ready models, worthy of today’s standards. But a second-hand layout?
A while ago, I thought it was time we put an end to this and began the search for a suitable candidate. With the aim of proving that anyone can have an exhibition-worthy layout, I began looking on auction websites and forums. Many were basic trainsets, overpriced by optimistic sellers hoping to make a return on their investment - not something we were looking to get involved with, especially the amount of work required on some.
Content continues after advertisements
This led to us acquiring a layout based on a trackplan by Roy Link dating from 1978. You’ll see how we transformed the layout scenically on this month’s DVD, but I’ve kept the filming of the trackwork improvements brief for the purpose of this article. The trackplan on ‘The Art of Compromise’ as it’s known is deliberately simple, keeping our workload very reasonable for a quick turnaround. Like most layouts of its time, track is Peco Code 100 with rails a little clunky-looking, not quite as good as the modern-day Code 75, so it needs some careful disguising. The track is carefully laid, an important factor when buying a layout – if it wasn’t it would beg the question ‘why bother second-hand?’ in the first place.
Ballasting of the tracks wasn’t bad either, much to our relief, requiring only a few improvements. All told, this layout has been a boon scenically. There’s nothing we’ve done to the ‘Art of Compromise’ that couldn’t be done by the average modeller over a weekend. Let's get started...
1
Fairly typical of many layouts, the track on ‘The Art of Compromise’ is too clean for my liking, but it has been laid well. Ballast doesn’t extend beyond the edge of sleepers enough and those clunky point switches must go.
2
The existing ballast has been laid well but can be further improved with chinchilla sand for the sidings and DCC Concepts Legacy Ballast (a mixture of colours used) to fill gaps between sleepers.
3
A spray bottle with water dampens down the surface of the ballast before a dilute mixture of PVA and water is applied with a pipette. Allow to dry overnight.
4
Weathering track is a messy task, so mask the rest of your layout. We’ve used tinfoil, but cling film, masking tape, paper or newspaper would work equally well if you’re careful.
5
The station surface is kept clean because it’s likely to get swept on a regular basis. This too is masked with tinfoil.
6
This is part of Lifecolor’s Rail Weathering set – a few other colours thrown in for the mix too. I can’t find fault with these ready-to-use fast-drying acrylic paints. They remove the hassle of mixing your own colours if you don’t feel confident.
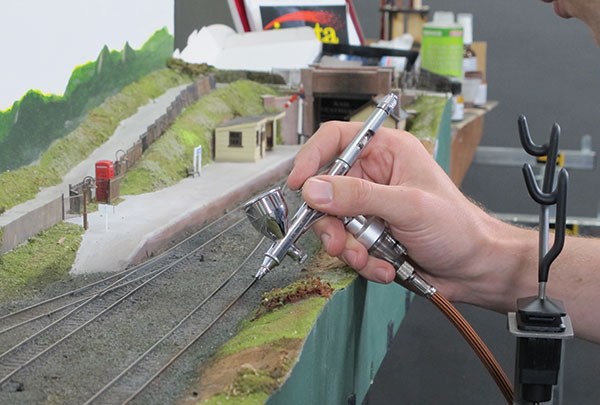
7
I’m airbrushing the track for uniformity of colour, so I’m diluting the paints at a ratio of 50% with Lifecolor Acrylic thinners. Water would be a good substitute if you don’t have a bottle of this to hand.
8
The airbrush I’m using is a CM-C from Iwata, not the cheapest, but for this sort of job any airbrush will do – remember to practice on scrap paper before you let loose and avoid overfilling the cup.
9
Starting with Lifecolor (UA723) Weathered Black, the bridge is the first to be treated to a smoky residue effect.
10
Wearing a twin filter spray mask, work starts in the middle of the layout, working outwards. Using the same Lifecolor (UA723) Weathered Black, it’s the colour of the Chinchilla sand that I’m looking to change.
11
No sooner has the Weathered Black been applied and I’m swapping to spray rails and chairs with UA720 Track Dirt. This colour if used subtly and carefully along rails with a steady hand gives a good rusty appearance. The airbrush trigger is adjusted to produce a fine spray pattern.
12
The centre of the tracks is treated to a faint application of Lifecolor (UA719) Frame Dirt. This is a good representation of an accumulation of track dirt, though on such a quiet branch line its application must be limited.
13
Don’t forget the bufferstops. Painted the same colour as the rails, there are three on our little layout which are easily improved, rapidly and with very little effort.
14
Avoid over-weathering the track because it’ll dry to a different colour. If you’re unsure, come back to it the next day with fresh eyes. The rail tops are cleaned, before the track is vacuumed.
15
Phil static grassed the layout, adding a little to the sidings at the same time for variety. It’s unlikely these would see much traffic, either way, we felt the grass and weeds would add to its scenic charm.
16
Buildings are lightly weathered at the same time, but that aside, the track has now adopted a more harmonious colour, helping disguise the taller height of the rails.
Your weekly World of Railways newsletter
Are you subscribed to our weekly email newsletter? Don't miss the latest news, reviews, modelling advice and competitions.