Tired of your trees looking similar, or worse, like lollipops? Make your layout's foliage spectacular with these transformational tree techniques, as demonstrated by Michael Russell.
There are very good books available to modellers that show how to model trees, but the methods shown tend to be laborious. Most of us don’t have time to fill a landscape with trees of high-quality and many lack the desire to do so, having other modelling tasks that are of a greater priority and interest.
Most modelled trees appear too ‘rigid’. They need to be modelled in a looser, freer way. Natural materials can help us achieve this. Although there is a certain amount of chance involved with the natural materials we find, it is what we do with them that's important. We don’t need to use exotic materials, either – there's plenty of material in our ‘green and pleasant land’.
I'll share how you can work with natural materials to shorten the time to build realistic trees, and I'll give more information on how they look depending upon placement and season. After all, trees grow in a variety of locations and are affected by their environment.
Shopping List
Gaugemaster foliage (GM150, GM151 or GM152) Noch Laub sets (07167 and 07168), Noch (07101) Wildgrass beige, Noch (23102) Embankment Vegetation
W www.gaugemasterretail.com
Milliput
W www.hattons.co.uk
Expo Superglue Accelerator Spray, Layering Spray or tree and bush foliage spray
W www.wwscenics.com
Hornby Lichen (R7194), Humbrol acrylics (26, 27, 86, 90, 33, 110 and 30)
W www.hornby.com
1
Obtain some roots from around a tree or hardwood bush or shrub. A neighbour had dug this bush up, which provided me with material. You are looking for the small fibrous roots. Cut them off with secateurs.
2
Break off as much dirt as you can from the roots, then clean them in water gently with a brush. For really small pieces, agitate the roots in the water and swill the water around.
3
When dry, place the roots in a hot oven for 10 minutes, or in a microwave for 30 seconds. This will kill any wildlife or spores in the material. Leave it to cool and sort into sizes.
Content continues after advertisements
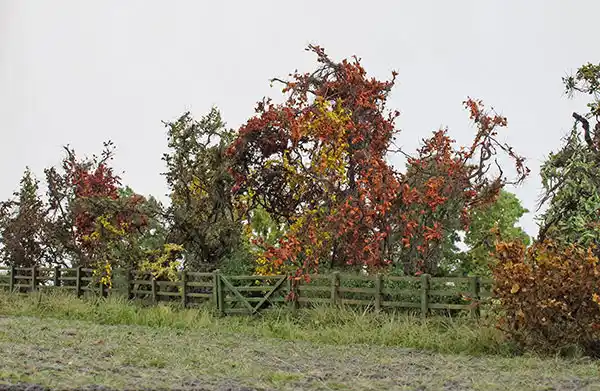
Mixed trees in a copse
1
Sort out lanky and leggy pieces of root. Cut to the approximate height for the scale you're modelling. Trim branches to shape and save the trimmings. Multi- stemmed pieces are great for variety.
2
Chop small pieces of left-over root to use as branches. Add PVA glue to the tree pieces and sprinkle the root pieces on. Allow to dry.
3
To bulk out the branches and form twigs, brush on PVA glue, then sprinkle with static grass. Any colour will do, though I tend to use the straw-coloured shades. 6mm long grass works well.
4
Spray new branches and twigs with paint to blend them into the main body of the tree. It doesn’t have to be a perfect match, so long as it is close. Acrylic paint is ideal for this task.
5
To model leaves, brush on PVA glue and sprinkle coarse or fine turf of your desired colour across the top. For variety, and to differentiate between species and individual trees, use a few shades of scatter.
6
I chose to model autumn at the point where some of the leaves have fallen, but not all, using a variety of colours. Some leaves turn brown, others bright colours. I used the Noch leaf foliage autumn set.
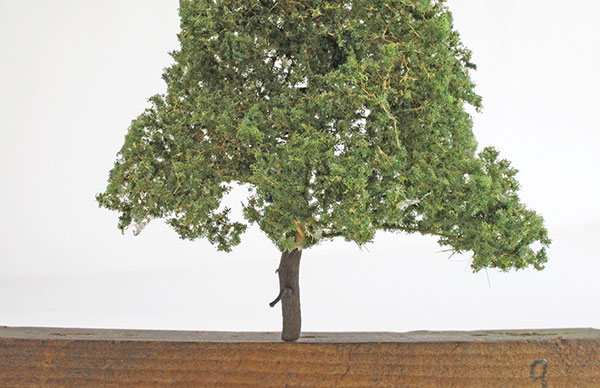
Free-standing centrepiece tree
1
Find a piece of material that is a good starting point for a large tree. You want a good-sized bole and main limbs. Also, ensure you find a piece where the main branches taper to fine points, like the real thing.
2
Add branches by dipping the end in cyanoacrylate glue and, while holding them in place, spraying with an activator for a quick bond. Wear a face mask and ensure good ventilation.
3
It can take a while to build up a good canopy. Use an ‘extra hand’ tool to help you hold the tree still as you work. Place branches into empty gaps where the tree has grown to maximise light.
4
Larger spots of glue can show up against the dark of the branches. By viewing the tree from all angles you can correct this by mixing acrylic to the same colour and blending it in carefully using a small paintbrush.
5
The glue will dry to a gloss finish. You can correct this with a spray of matt varnish.
Making an old tree
1
Find a large root with some character. The piece that I chose had a large portion damaged during extraction. A limb was partially attached, so I tore the piece off and used it as a feature.
2
I drilled a hole in the bole and used a cocktail stick as a mounting point in the scenery. This also makes trees easier to work on because it gives you something to grip.
3
I needed to add another branch to fill out the volume of the tree. I chose another root piece, drilled a hole and used a cocktail stick as a dowel to attach the new branch.
4
Planted in the scenery, I glued further roots to the ground to represent fallen branches. This tree was simple to model, yet is full of character and charm.
Evergreens
1
Trees like holly and conifers are dense and so are best portrayed using lichen. First, glue your lichen to a piece of 0.5 to 1mm thick wire with contact adhesive. Use several pieces to get a good shape.
2
Spray with scenic glue and sprinkle with green ground foam turf or flock. Holly should be the darkest green you can find, whereas some conifers are light in tone. Leylandii hedges, popular in the 1970s, are still quite common in gardens.
3
Evergreens provide welcome relief and body to autumn and winter scenes. Holly, in particular, is native and a common species in woods and copses. However, don’t make holly trees too tall as they don’t attain a great height.
Young trees
1
Select small pieces of raw seamoss. Pick off any plant leaves that remain as these detract from the finish.
2
I sprayed my trees with a brown for the trunk and main branches and green for the foliage. The seamoss branch ends look like newly-emerged leaves, giving a realistic portrayal of young trees in the spring.
3
Planted in the environment they look the part, but are very delicate. Note how I've planted two pieces back-to-back to form a more rounded tree. Don't be afraid of modelling multi-trunk trees.
Trees among cattle
1
Find a piece of seamoss with a good crown to represent a mature tree. Snip off the lower stalk and trim the lower foliage to a flat plane to mimic the grazing of deer and horses.
2
Add a new trunk from a piece of tree root. Find something that is suitably proportioned in relation to the size of the canopy. Glue with PVA or an impact adhesive.
3
Grazers often scuff the soil around the base of the tree where they seek shade in sunny conditions. Use real roots to model the tree roots by gluing them to the ground, then partially cover them with scatter.
4
Many animals take shade under trees in summer weather – the season in which most of us choose to set our layouts. Tree roots are often exposed on slopes, especially if the soil isn’t held in place by vegetation.
5
From afar, you can’t make out the trunks or much detail of trees. Model these by cutting the stalk off a piece of ready-flocked seamoss. Simply glue to the scenery with PVA or impact adhesive.
Custom trees
1
This root had a nice trunk, but little in the way of branches. Drill holes to receive branches made of wire. Existing branches are retained if they add to the tree’s character, and some are lengthened.
2
Twist together iron wire used for tying plants, which is pliable, to make branches. Ensure your twists are either clockwise or anti-clockwise and use pliers. Use loops of twisted wire or cyanoacrylate to hold the wire bundles together.
3
Mix Milliput and use this to cover the twisted sections of the wire. Glue the branches into place with cyanoacrylate and ensure that the branch diameter matches the trunk.
4
Paint the Milliput to match the rest of the tree and weather it all remembering to use some green for moss. I flicked various shares of cream and green at the tree using a toothbrush.
5
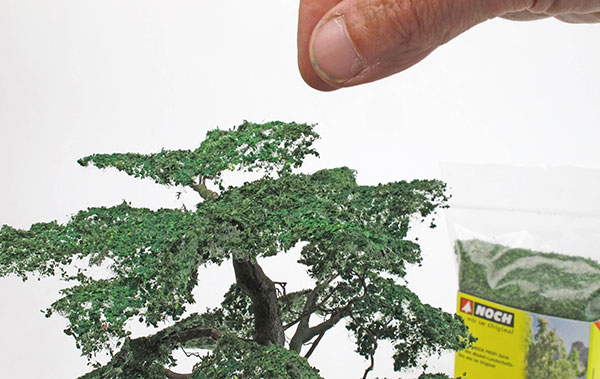
Coat the branches in PVA glue. Tear off strips of teased out Noch foliage sheets and add to the branches, ensuring that you cover all of the wire skeleton. Leave to dry.
6
There will be places where the process of tearing and handling the foliage has caused gaps to appear. Add move PVA adhesive and sprinkle over loose Noch leaves to cover these.
7
Use a pair of scissors to trim the tree; the type used by hairdressers are best suited for this. Hold the tree up to the light so that you can see all the stray fibres and cut these.
8
Spray the underside of the foliage pads with a green darker than the foliage on top of the pads. This mimics foliage in shade. I mixed mine by adding some black to a green acrylic.
9
When planted, the trunk has character, a natural curve and the retained branches look like dead material. The new branches blend, too. It's easier to make a tree this way than using just wire. With a little grass added to disguise the trunk, it's the perfect addition to a park.