It doesn’t require much experience in the hobby before we forget how daunting those first steps were. If you’re new to model railways, you’ll be wondering where to start. There can be no easier first step than a card kit. For decades, card kits have lined layouts around the world. Today, their realism is greater than ever, through improved printing technology and laser-cutting of components for precision fit. They’re cost-effective, too – great news for non-confident builders. And, let’s face it, whenever we’re completely new to something, confidence isn’t in full swing.
One of the bastions in the British model card kit industry is Metcalfe Models of Skipton. Widely-distributed through its network of retailers around the country, its range continues to expand, each kit updated as technology permits. Card kits are reasonably simple to construct and require few tools, again, ideal for beginners, though choose your first wisely – some of its larger kits require patience, not always in plentiful supply for some!
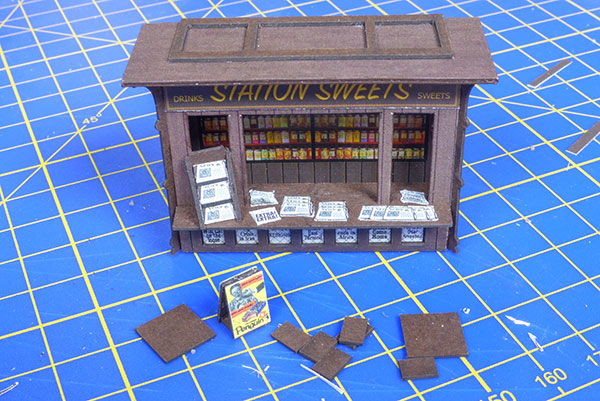
For this small build, I’ve selected one of its ‘mini kits’ depicting a platform kiosk of the 1960s. Containing fewer components than many of its larger buildings, it can be constructed in an afternoon or evening and won’t take up much space – useful if you haven’t planned a layout yet.
Content continues after advertisements
Shopping list
Metcalfe Models
Metcalfe Models (PO517) Platform Kiosk
W www.metcalfemodels.com
Airbrush Company
Lifecolor (UA914) Red Mud
W www.airbrushes.com
1
Components are die-cut from printed card sheets, with strengthening pieces laser-cut from thicker card. Two instruction sheets are provided. I rate these highly – they’re well-written, and provide top tips, too. Don’t discard the clear acetate sheet of the packaging, it can be used as glazing in buildings.
2
Areas to cut are highlighted with blue arrows, which frees the partially-cut components from the surrounding paper. I’m using a hobby knife that holds a retractable blade – recommended if you’ve children who’ve access to your work space.
3
The second – and last – tool required is a steel rule. Invest in one over a plastic one because they are more accurate for measuring and provide a safer edge to cut against. Their edges also serve as useful guides to bend components to crisp angles.
4
The instructions recommend UHU glue. Though widely-distributed and readily available from model shops and stores, I’m using a faster-drying adhesive from Noch (61104). The 30g tube is designed for laser-cut kits, of which this kit features many such parts, but is equally useful on the die-cut card and paper parts, too.
5
The under-counter area requires four pieces of strengthening card, laminated to create a strong structure. Aligning as many components together by eye can be challenging, but applying the adhesive and pressing them together on a flat surface is easier.
6
It’s important that edges are crisp and corners, where components have been removed, are free of small fibrous ‘fluff’. The back edge of a scalpel blade can be run into corners to clean these, without the risk of cutting into the surrounding printed surfaces.
7
A choice of rear wall displays is provided with the kit. These are glued to the rear wall, but in doing so, a little material hangs over. This is trimmed flush with the rear wall using the steel rule as a guide for the blade. Apply sufficient pressure to the rule to prevent it slipping.
8
The white from the exposed edges around the window reveals, roof edges and rear are coloured with Lifecolor (UA914) Red Mud. It matches the colour of the kit closely. Rather than paint with the brush, rub its edge the length of components to prevent spillage onto the surrounding printed card.
9
Detailing this kit is really where the fun begins. I made a custom ‘A’ board from scraps of card from the kit, applying two of the spare posters. A choice of signs, posters, newspapers and sweets or magazines is provided, too. These are era-specific, so choose wisely to prevent clashing. Alternatively, source posters from suppliers such as Sankey Scenics, Tinysigns, Right Track Signs, Trackside Signs and more. An enjoyable build!
Your weekly World of Railways newsletter
Are you subscribed to our weekly email newsletter? Don't miss the latest news, reviews, modelling advice and competitions.