Everyone wants a train set don't they? When I saw Hornby's Family Fun Project at its launch in Margate, it struck me as a great product. Simon Kohler explained that the idea was to provide something for every member of the average family to get involved in, with a model at the end of it they could be proud of. The project is squarely aimed at beginners and comes complete with a step-by-step guidebook to lead newcomers through the build, plus a supporting video on YouTube.
Now, I'm not a beginner, so when I was handed the box, it was clear I'd better do something different or my place at BRM might not be so secure!
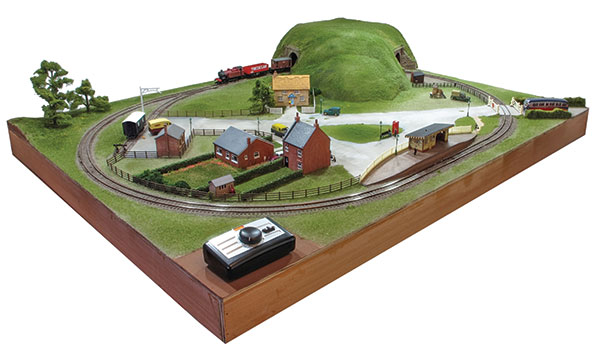
The result is a Family Fun Project I've dubbed as 'Mk. 2' – I've taken everything in the box, added a few small accessories, plus a selection of scenic materials, to produce something recognisable, but different.
The biggest transformation comes by adding a few ground contours (lumps and bumps) to get away from the flat baseboard. You don't need to build mountains to change the look of a layout and have it appear far more natural. Real life is rarely flat.
Add to this a coat of electrostatic grass and the model looks very impressive. OK, it's still a train set, but it's a very nice looking train set and just the place to give your smaller locomotives a bit of a run. A rake of four-wheeled coaches would look lovely on here for a start.
1
We'll deviate from the instructions. Instead of a 12mm thick slab, our baseboard is built from 9mm thick plywood – although I've kept to the suggested 132cm x 102cm size. A 7.5cm deep strip around the edge provides bracing to keep the board stiff and allows space for wiring and even point motors if we fit them in future.
2
The parts are all cut to size by a local hardware store (some DIY stores offer this service) so construction is simply gluing and pinning them together. I'm taking care to keep everything square and as tidy as possible.
3
If you only edge the board it can still twist. A couple of diagonals stop this, although some careful cutting is required where they cross. The ends are angled to provide a reasonable fit and then covered with lashings of glue to fill small gaps. The result is strong, but still reasonably light.
4
Time to open the Family Fun Project box and have a proper look at the contents. It's jammed full of stuff and I plan to use as much of it as possible.
5
Each piece of track has a sticker underneath explaining what it is and offering safety advice. These should peel off, but the glue seems rather stubborn. To avoid damaging the track, and since they won't be seen once it's ballasted, I left them in place.
6
Everything clips together nicely and after a few minutes, I'm confident that my measurements for the wood were correct. Hornby realised that a gap between the track and the baseboard edge was a wise move to catch derailed stock, so allow for this in the plan.
7
Happy with the layout, I draw around the track with a permanent marker then take it apart and put it back in the box for safety.
8
Since this line is running through the country, a ballast hump is appropriate. Strips of 2mm thick cork are the traditional method to achieve this. Glued in place with PVA, some weights are a sensible idea to make sure it dries flat. Steel offcuts work for me, but piles of magazines are just as good. You knew there was a reason for keeping them...
9
The first change I'm making is to replace the easy-to-use, but ugly, power connection track with a spare length of Code 100 track. Nickel silver rail means I'll be able to solder wires to it later.
10
Carefully pin the track in position. Hornby pins have domed heads, so I'm using the Gaugemaster version with a less obvious flat head. If you aren't confident with a small hammer, hold a punch over the pin head and tap the top of this. That way if you miss, you might get a bruise, but the rail won't be damaged.
11
Track down, run a train to check everything works. Rather than wire at this stage, I'm holding a 9V battery on the rails and the locomotive gallops around most satisfactorily.
12
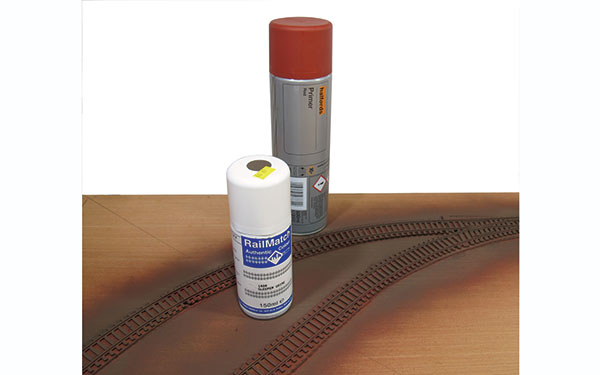
Painting track makes it look more realistic. Using a brush is fine but time-consuming, so I prefer a spray of rust colour primer followed by Railmatch Track Colour. Spray at different angles to make sure you don't leave the edges of the sleepers untouched.
13
Before spraying, mask the point tiebar or you'll get paint on the electrical connections. Unpainted sleepers can be touched up with a brush later, but where the moving rails touch must be clean metal or trains won't run.
14
Before the paint has a chance to harden, clean the rail top. A piece of wood rubbed along it should do most of the work, followed by a track rubber. Never use an abrasive paper or metal scraper for this job as you'll leave scratches on the surface that will attract dirt.
15
All good train sets should have a tunnel and this one starts with a pair of Peco stone mouths. Painted with Precision Paints Cotswold Stone colours and washed with dark brown paint, they look the part. On these tight curves, allow enough space for a bogie coach to pass through.
16
The hill is built from lumps of expanded polystyrene fixed together with PVA glue. Basic shaping is carried out with a hot wire cutter, but work in a well-ventilated room with this tool. Alternatively, a bread knife or saw will work just as well, but will be a lot messier.
17
Polystyrene is light but doesn't take knocks very well, so I back the edges of the board with the thinnest MDF sheet I can find. It's glued to the hill with PVA, then trimmed with a small saw to roughly match the contours.
18
Time to get really messy! A surform is ideal for final shaping, but keep a vacuum cleaner handy as you work or the place will fill up with little polystyrene balls. I found that static electricity stuck them to me, so I also needed vacuuming at the end of the job.
19
Two layers of plaster bandage, often sold as Modroc, cover the hill top. This protects the polystyrene from knocks or any glues containing solvents that might eat it away. Using the stuff is messy, so protect the track with masking tape while you work. Once the plaster is dry, paint it with an earth-coloured emulsion.
20
The goods yard needs a nice smooth road surface and the quickest way to model this is a couple of 2mm thick cardboard layers. I've trimmed the ballast away from the edge so the card can butt up to the end of the sleepers.
21
Oddly, the project box doesn't include a level crossing, so to bring the road inside the track oval, I modify a second-hand Hornby one. Designed to fit on a straight section, the base is cut away using a flexible curve from a stationery store as a guide. Between the rails, a piece of Plastikard fits, allowing space for the flanges on rolling stock.
22
Streets need pavements, so I'm using laser-cut ones from ScaleModelScenery. To stop the buildings toppling backwards, I use off-cuts underneath the rear of each which will be hidden in the scenery later.
23
Roads are made using DIY store wall filler. For a smooth finish, the trick is to apply it with a wet palette knife and then once dry, sand any lumps and bumps away. You could leave a few potholes, but don't overdo these.
24
I'm painting the roads with Precision Paints Tarmac colours, dabbing each one on with a sponge to mix the colours. Once painted, but not dry, I dab on talcum powder to lighten the colours a bit.
25
With the roads done, it's time to move on to adding some shape to the landscape. Larger hillocks start with a polystyrene base covered in filler, others just have filler. I'm trying to avoid the baseboard looking like a flat piece of wood.
26
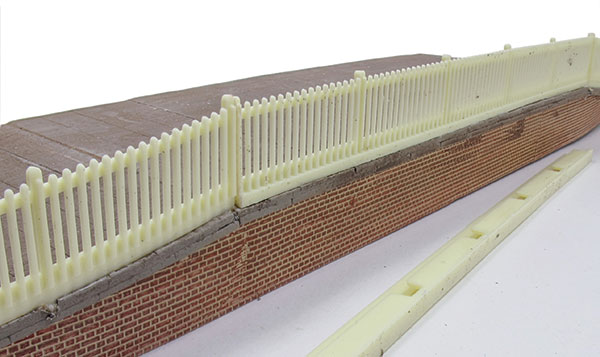
From the packet, Hornby's fence is finely moulded but looks plastic-like. A coat of track colour paint sorts this out. There's not enough in the box for my plans, so I'm adding a couple of lengths of Ratio fence, but the two types can sit happily alongside each other.
27
Since I'm not using the trackside clips, some of the Hornby fence posts are drilled to take 0.5mm brass wire, which then fits through holes in the baseboard. Ratio fencing has longer posts so doesn't need this step.
28
Tidy hedges beside the houses come from Gaugemaster, but the rougher ones beside the road are homemade by chopping up some foam, dipping it in PVA and then into different flock powders.
29
For a well-tended lawn, static grass is too long. Even 1mm strands would be 3in tall in real life. A smooth coat of PVA followed by a light scattering of flock powder is ideal. I'll add some daisies later using yellow scatter material.
30
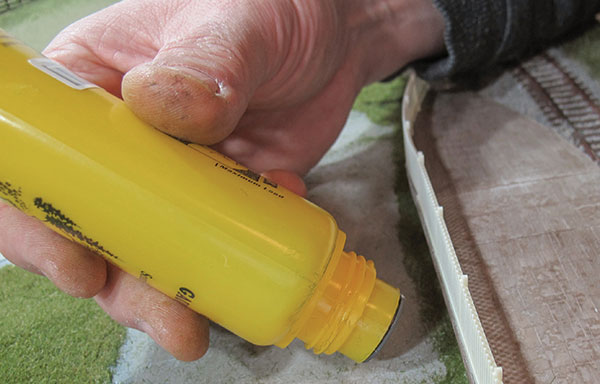
On rougher ground, I'm starting with a base coat of 4mm long grass fibres from Woodland Scenics, mixing medium-green with beige. Once dry, I'll apply more colours. A static grass applicator is handy, but you could do this with a puffer bottle. Vacuum excess fibres away.
31
Hornby's (R590) Station Halt has been in the range for several decades. It's one of my favourite items because it offers so much potential, despite looking toy-like straight from the box.
32
The plastic-like platform is improved with a top surface of laser-cut paving stones from ScaleModelScenery. The blockwork on the front is covered with Slater's embossed Plastikard.
33
With the thicker top surface, you can't clip the fencing on, so I cut away the base, drilled holes for the posts and glued it in place. This is a bit of work, but looks a lot more realistic.
34
Finally, a coat of paint weathered with a thin brown wash and the building comes alive. Glazing is Deluxe Materials Glue'n'Glaze, as is the light bulb under the shade. A few posters complete the look.
35
Once the base coat of grass fibres is dry, leaving it overnight is a good idea. Extra layers are built up using extra-hold hair lacquer as a glue. Simply spray it on and then apply more fibres or sprinkle on flock powder, mixing the colours and lengths up as you go. Step back occasionally and see if everything looks right. There's no science to this, if you like the look, it's usually right.
36
Buildings are bedded-in using 2mm long fibres, blasted into corners using a puffer bottle applicator – you can't do this easily using an electronic tool.
37
Bushes are lichen from the Hornby box sprinkled with some pretty coloured flock powders to look like flowers.
Scenery now complete, a selection of die-cast vehicles are added for good measure. The transformational Hornby Family Fun Project upgrade is accomplished.