


12 May 2020
|

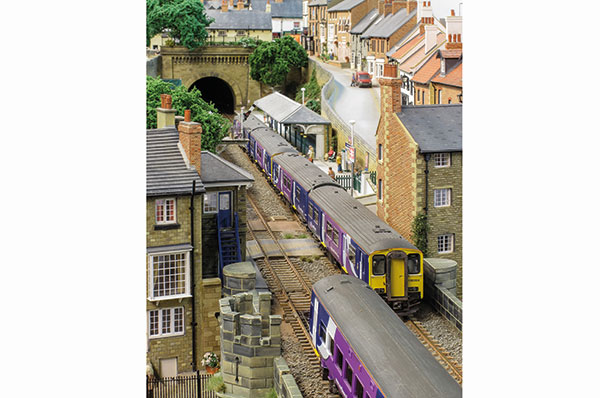
With its impressive viaduct centrepiece, realistic buildings, raging civil war cameo and contemporary setting, Peter Goss' layout is packed full of amazing details.
Factfile
Layout name: The Worlds End
Scale/gauge: 4mm/OO
Size: 19ft x 11ft operating area
Era/region: Modern, North Yorkshire
Layout type: Continuous run
I believe most railway modellers would not entertain Knaresborough as a viable modelling subject, as it has limited operating potential, particularly for the shunting and goods train enthusiast. The terrain, if built to scale, could possibly be too demanding and time-consuming to construct, and the viaduct could be a model by itself at five feet long.
These negatives were completely opposite to my positive thoughts, and only reinforced my idea for a comprehensively detailed architectural model of a market townscape with a railway running through it.
My model of the Knaresborough viaduct to scale could extend over one complete specially extended and dropped baseboard. A quick estimation based on street maps showed the viaduct and station to be around nine feet long (684 real feet in length). Ground level differentials could be anywhere up to at least a scale 2 feet high which represents 152 real feet height. The viaduct is 90 odd feet high to start with.
The egg shape of the layout came about by default. I let the building arrangement design dictate the layout shape, rather than fitting to a prescriptive regular arrangement. The narrow town scene on the left, the deep river gorge and viaduct centered and the wide wooded countryside and castle to the right making a balanced visual contrast.

Several buildings were drawn up on the computer, with street scenes assembled and layout plans developed. Train sets were listed, time-lined and discussed with my railway enthusiast friend Stephen before construction commenced.
The model buildings included a row taken from Finkle Street, which were mirrored to fit behind the station. Other buildings were chosen from further into the town, including the Blind Jack pub cluster of three large buildings and a corner building from Market Place, the single storey small shop over the tunnel mouth and buildings from High Street, the Raw Gap building cluster, the small timber-framed rented building at the base of viaduct and Mother Shipton’s office building.

I believe in copying real-life wherever possible, so steps can be taken to enhance detailing just by looking. Brickwork can be carefully painted and detailed following colour photographs. An illusion I use is to paint false shadows at door and window reveals, using Humbrol 67 tank grey before fitting any windows. I got this idea after looking at photographs and realising that colour is not always what it seems – for instance, dirt is not black unless it is coal. As such, I dry brush dirt or wash as darker shades of grey very subtly. For The Worlds End and the previous ‘Rowlands Castle’ and ‘Etton’ layouts I kept to lighter tones on purpose. Comments have often been made at shows on how light my modelling is.
Buildings
Keeping the Plastikard and card-based building structures crisp is very important – keep those corners tight and at right angles with no gaps please. After constructing a building corner solidly from inside, lightly scrape the external corner carefully with a sharp knife or fine emery paper held on a little wood block. This technique blends the corner into one sharp edge before maybe applying a little plastic weld with a paint brush to seal the corner externally ready
for painting.
Gaps at the bottom of a building is also a big one for me. After gluing a building into place, fill any remaining gaps with a little PVA and apply some litter or ground cover. Alternatively, I sometimes bury the building into a small ground recess. This helps hide any gaps in the first place.
Take close-up pictures of your model and look at the details on screen. It needs to be clean. No matter how well it is painted, if the modelling is not square and tidy it will never look right as untidy right angles and corners tend to jump out. Taking time to carefully construct and detail items before painting pays dividends. This applies to rolling stock as well as buildings. In these days of high resolution, cameras make pictures three or four times larger than life, which doesn’t help. Using magnifiers to construct and paint means that when viewed normally the models can look much tidier.

Take a look at the clothes someone nearby is wearing. The shirt or jacket will have a base colour, but look again. The crevices are darker and the parts facing the sun are much lighter. Re-creating this effect is a huge factor and, once grasped, can be applied to buildings, wagons and anything with raised details. The viaduct parapet wall stonework, for example. Painted in various stone shades from light stone to dark grey, the parapet coping stone is then edged with a small brush using a light cream colour. This is not noticed initially but when pointed out becomes obvious.
The viaduct
The viaduct took around 18 months to construct. It has solid wood uprights with a chipboard track deck that was then clad in double thickness mount board with plain Plastikard ‘stones’ constructed as complete sub-models that fitted together around the solid timber. The underside of the arches was the last thing to build. Painting was carried out at sub-assembly stage before filling gaps and paint blending on completion.

I used acrylic water effect paste from Green Scenes, which is brushed on to an acetate sheet, then swept into ripples with a wooden coffee stir stick. The paste itself dries clear and glossy. The underside of the acetate was painted a green/blue colour to start with before being stuck down with acrylic grab adhesive. The boats and other details were glued down with before the water ripples arrived.
Figures
I couldn’t find suitable modern-style figures for the layout, so I consulted with a wargames equipment designer and we decided to start our own range. The figures used are from our own range of ‘Pete Goss Figures’. All were cleaned up of any flash and casting pegs. The bottoms of the feet were filed flat so that the figures would almost stand up on their own. I drilled and superglued short lengths of 0.5mm brass wire to one foot, or if legs were too fine, to the bottom of a coat flush with a leg. This is used for locating the figure in a wood block while the paint is drying and acts as a dowel to help keep the figure in position on the layout.

All the figures were sprayed with Halfords white etch primer, and painting was carried out using Humbrol acrylic colours. Faces were detailed with eye and mouth lines, and all were given slightly rosy cheeks. Games Workshop thin acrylic washes were applied using brown for creams, fawns, browns, reds; and black wash. Once dry, all colours were highlighted or dry-brushed with lighter shades before enamel matt varnishing. The figures are then glued into position.

The model battle scene was created using plastic wargames figures. All figures had their weapons removed, as they would be liable for paint falling off, then they were fitted with new pikes and muskets. The pikes are brass wire with one end bashed flat and filed to a point. Muskets are scratch-built out of plastic card. The hands of all figures were re-made out of Milliput so that they grip the weapons. Photographs were used to obtain authentic figure clustering.
Northern Belle
The ‘Northern Belle’ train was made up entirely out of second-hand stock, apart from the lead locomotive which was new but in a different livery. The coaches were all completely stripped down and Shawplan details and flush glazing added together with a good re-spray in 50/50 mix GW wagon brown/BR Maroon to give the distinctive plum colour. Hundreds of transfers were added before applying a few sprays of gloss/satin mixed Humbrol varnish.
Couplings were all removed and replaced with a horizontal swinging hook brass wire from one bogie fitting down into a hole on towards the outer end of the next bogie. Nothing more was required. This gives a solid movement to the train with no play in couplings whatsoever.
All my trains are full of passengers and locomotives all have drivers. Model humans bring life to any scene, without a doubt, but also bring perspective and reality into view. People hanging out of open carriage windows is another trait I use to great effect. Huge amounts of comments relate to this at shows making it all worth-while.

The proprietary Bachmann and Hornby stock SSE coaches are re-sprayed in a 10/90 mix of BR maroon/signal red to get the WCR maroon colour. Only 10% maroon is required as it quickly kills the 90% signal red dead. This maintains the brightness of the red colour quite nicely. Couplings are similar to Northern Belle stock but used to a greater advantage as the Bachmann coaches have telescoping couplings which can still be used with a brass wire hook and hole arrangement. On a straight run the coaches are visually very tightly coupled.
Would I like to build it all again?
It took a lot of time and effort but I think it was definitely worth it. The effect is exactly how I imagined it would turn out. We are now at the limit of stock capacity and running sequencing at shows, so there is no more to do on the model other than to just enjoy and maintain it. It is too big to erect at home, so I just rely on invitations to shows to put it up. I don’t think I could build another large project like this just on my own, though, and I will need more hired help for the next project!
