04 February 2020
|

Many of us are often sceptical about new technology. In this article, we take a closer look at a budget 3D printer to find out if it has a place in the modeller’s arsenal of tools.
I have bought a few printed items over the years and seen many that don't seem to warrant the excitement their sellers seem to think they should. At the TCT 3D Print show, I spent some time on the Monoprice stand, which seemed to be selling the cheapest printers in the large NEC hall. The representative was happy for me to prod and poke the machines, then offered to lend BRM one to have a play with for a month. Could a 3D printer in the workshop convince me of the value of them?
The printer that arrived in a big box from the USA is the IIIP, and first impressions are very good. This is a well-made piece of kit. The main parts are made from a decent thickness of metal. I'd taken the precaution of ordering some 50g sample packs of filament from www.ooznest.co.uk after chatting on their helpline to make sure I bought the right ones for the printer specification. The main thing to check was the nozzle diameter – 1.75mm rather than 3mm – other than that, choice of colours and materials was mine.
I realise that a budget Fused Deposition Modelling printer, where layers of plastic are built up one at a time, wouldn't give me the same results as the resin-based machines used by figurine manufacturers such as Modelu. However, at the same price as the average larger OO gauge locomotive, does it have a place amongst my tools?
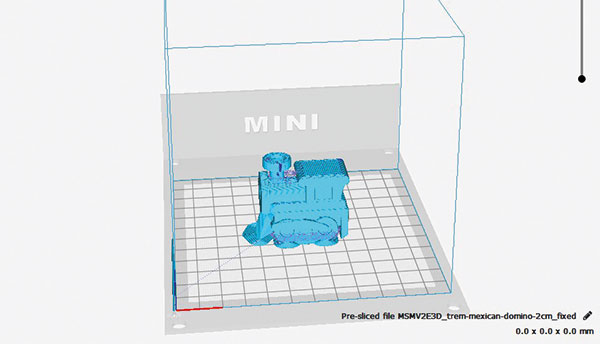
Part of the setup process involves printing a 6cm-tall Chinese Good Luck Cat. It shows the limitation of the process. All the curves are made from steps and if you rub your fingers over it, you can feel lots of ridges. My next stop was the internet where I could download something more train-shaped. The printer required gcode files and a quick search took me to www.thingiverse.com where you find hundreds available for free download. Downloading designs is a sensible early step. I'm not looking to get into 3D design at the moment. That's a hobby in itself - and one I suspect many people won't be worried about. The chances are you can download a design to suit your needs without much effort.
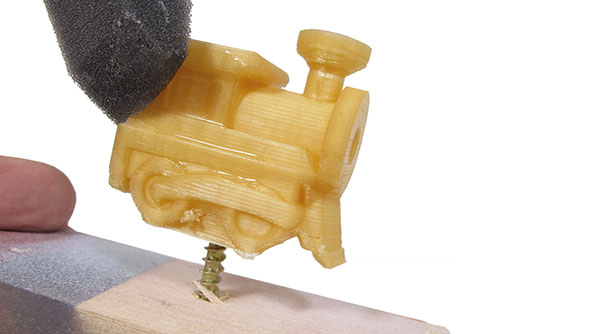
Printing a toy locomotive provided me with a subject for the biggest challenge I expected to face – smoothing all the print lines. Part of the learning process involves understanding the materials involved. Printing using PLA is easy, non-smelly and provides a model that can be sanded if required. Although the specification says it will work, I struggled to persuade the printer to feed ABS. One problem was working out how much filament will be required. If the design includes lots of supporting materials or infill, you can find the stuff disappearing at quite a rate.
Time is another problem. A small locomotive takes 2.5 hours to print, a cat just over 3 hours and a larger (10cm long) toy, over 6 hours. Fortunately, once the first few layers have been laid down, the machine can be left to get on with the job.
1

2

3

4

5

6

7

8

9

10
11

To see the use of CAD by a railway modeller, click here to read about Les Green’s Liverpool Lime Street.
Did you know
All filaments can be mixed with other materials such as wood or metal if desired, giving the resulting items some of the properties of wood or metal. I tried a wood-infused PLA but had great difficulty feeding it through the printer. If your machine will print infused filament, the results can be very impressive.
There are three main materials used for 3D printing:
PLA – Poly Llactic Acid is a biodegradable polyester derived from corn starch or sugar cane. When heated for printing, the fumes (if you can smell them) are sweet. They may be harmful for youngsters, so printing in a well-ventilated room is a sensible precaution. The resulting models can be sanded smooth with normal abrasives. As the material is bio-degradable, it can be disposed of in a compost bin, apparently taking 6 months to dissolve. Nozzle temperatures of around 200ºC are required but while a heated print bed is desirable, it isn't essential.
ABS - Acrylonitrile Butadiene Styrene is a plastic that will be familiar to many modellers, or children - it's what Lego bricks are made from. A much harder material than PLA, it requires higher nozzle temperatures, around 240ºC and a heated print bed is essential. Fumes given off during printing can be unpleasant and many choose an encased printer for this reason.
PET - PolyEthylene Terephthalate is the most popular plastic in the world. Water bottles are made from it. More flexible than PLA and requiring slightly lower nozzle temperatures than ABS, it's also available in semi-transparent forms. Very sticky white printing, adhesion between layers is excellent, although peeling the model from the print bed can be more of a challenge.
Improve the surface of 3D printed items
1

2

3

4
5

6

7

8

The Verdict
Overall, I am impressed with the printer. It’s simple to use, well-made and reliable. If you want to dip a toe into the world of 3D printing, it's a good machine, but don’t expect injection moulding quality. I want to try to do more and make something useful. I don't care what, just something that isn't ‘plastic tat’.
I'd also like to persuade the ABS to print as there are some useful techniques for smoothing this which avoid the slightly melted appearance of the ones made from PLA and allow for greater detail printing. There needs to be more experimenting with sticking the material to the printer bed for that to work.
I'm a long way from a convert to 3D printing everything, but it’s more fascinating than I expected. Making printing work seems to be a matter of understanding the limitations of the technology rather than pretending they don't exist. I can see how printing could become a hobby in itself and that's not what I want, but at the price, I may see how this printer could justify a place on the workbench.
Looking for some advice on painting 3D model figures? Phil Parker shows how it’s done in this step-by-step video.