


16 August 2022
|

Modelling snow effects on your model railway is easier than you think – as we explain in this comprehensive guide on how to create a model railway snow scene.
Summer is our warmest season of the year, bringing with it the feel-good factor of more time spent outdoors, days out and holidays. Unsurprisingly, it’s also the most popular season for modellers to recreate, where the grass is always green, the sky always blue, allowing many to relive the sun-soaked days of yesteryear.
The benefits of modelling a snow scene
Contrary to what might be expected, modelling a snow-covered landscape is relatively simple, particularly one which depicts a thick covering of snow. Beneath snow, ground detail is largely obscured – hiding low-level plant species – solving the problem of which shade of green or colour of flower is correct for the time of year and reducing the level of detail required. A heavy dusting of snow is a simple way of upgrading an older layout, too.
Where track is concerned, most of it – rails excepted – will be hidden from view. This can be used to advantage with older layouts using poorer rail standards, helping to disguise the rail depth and sleepers that lack detail, without compromising on running qualities if using older locomotives.
A scenic renovation of foliage for a dusty and tired-looking layout is often difficult without compromise, but an application of snow can hide a multitude of problem areas, from tired-looking building roofs that lack detail, to flat-looking vegetation. It’s the perfect way to breathe new life into a model railway, without discarding it.

'Hudson Road' in 4mm:1ft scale featured in our January 2013 issue. Clever use of snow sees a partial melt on roofs, with wheel marks across the bridge.
Modelling snow – what products are available?
There are a number of products available to create model snow from different manufacturers. Fresh snow doesn’t appear the same as snow that has seen a heavy frost or partial melt. Some products look slightly different from others, but for a fine snowfall, Precision Ice and Snow’s bundle set is a quick solution containing everything required.

Precision Ice and snow is a very fine powder that has to be sifted onto the model using the sieve provided in the kit.
Also, Scenic Snowflakes from Deluxe Materials is a slightly thicker product, and can be applied directly from the bottle over a layer of adhesive, such as Deluxe Materials Scenic Spray, or PVA glue, diluted 50:50 with water.
Five steps to create a model railway snow scene

Step 1: If you want the snow to be a permanent feature, spray the model with hair spray first, and let this get a little tacky, or you can use PVA glue, diluted with water in a 50:50 ratio if you want to encourage a deeper build-up, ideal for around the top of post boxes, or around the base of walls.
Step 2: Make sure you cover anywhere the snow isn’t needed, like on track, point blades, or rail tops, for instance. Whether applying snow or ice effects, keeping the running rails free of product is important.
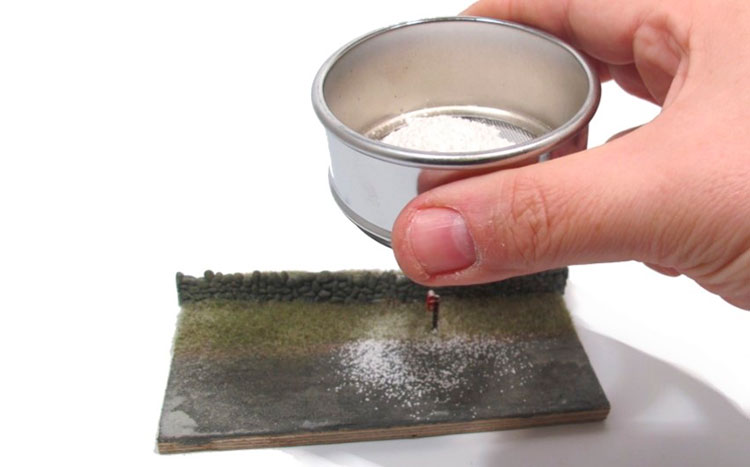
Step 3: Here we’re using Precision Ice and Snow’s Krycell Extra and Krycell Fine snow (although other products are similar), and you dust over the PVA/hairspray in several layers with the sieve provided at a height of around 1ft above the model - refilling the sieve from the bag is the messiest part and is best carried out away from the layout to avoid spillages.
Step 4: A dusting of hairspray is then applied over the dusting of snow to secure in place, plus allow for further layers to stick until you have reached the desired effect. Make sure you stand a few feet away when applying this, you just want a light mist to fall over the snow effect.

Step 5: Don’t forget to apply model snow to road vehicles and rolling stock, too. A light dusting of the snow product can be secured with hairspray from a distance of a few feet. Repeat the process a few times until you achieve the desired finish. The amount you apply will depend on the amount of snowfall, but also depending on if the vehicles are in use.
Adding snow effects to your model railway – top tips

- Remember that snow doesn’t land everywhere – canopies, bridges and flowing rivers should be kept bare
- Locomotives and rolling stock should make sense in the environment, so consider the impact of weather. A rake of heated passenger coaches might feature less snow or frost covering than an exposed freight
- Don't forget - winter isn't just about snow. All your people should be in nice, warm clothing. Many trees won't have leaves, that's why the seafoam looks perfect, and the rest of the undergrowth will be flatter
- If your layout isn't huge, it's worth putting something under the feet so the model is tilted. This encourages drifts as though the snow has blown around, it rarely falls straight down.
- It's wise to see if you’re satisfied with your project when it's covered in a frost or snow product, before applying more. Judging effects applied to a small area may lead to disappointing results when more widespread. Take your time and have fun.

What about modelling frost on your model railway?
Unlike snow, for the more adventurous modeller, frost can add complexity to the modelling scene. For best results, a layout or diorama must be modelled in its entirety before applying a frost effect. For this reason, it's seldom seen on layouts.
For best appearances when adding an ice effect, ensure that the diorama is to a good standard. Adding an ice effect won’t hide dust on an old model, nor will it remove cobwebs or flat scenery. If a scenic refresh of foliage is required, this should be applied beforehand.

Icy Sparkles from Deluxe Materials is supplied in small containers. These are ideal for small to medium-sized dioramas. The slightly off-white granules shimmer under light and must be secured with a bit more PVA or hairspray.
Icy sparkles can look effective when applied correctly. Consider objects like steel and wood, which attract frost more than others, or areas of shade, yet to see the morning sun. Applying further layers of Icy Sparkles to these areas will create a more convincing effect.
For smaller detail areas that appear really white, a more concentrated application of white is required. Applying more of the Icy Sparkles product won’t look right, accumulating without looking like frost. A small application of white weathering powder with a brush works well to highlight concentrated areas.
What about an icy lake?

There are a few solutions here, but possibly the easiest solution is to use a resin A4 sheet of frozen water, ours is from Precision Ice and Snow, which is carefully snapped to size with a pair of snipe-nosed pliers.
Use a fair amount of glue to fix onto place on your baseboard and weigh down the resin overnight with something heavy so it stays in place.
Don’t forget to cover up the edges of the Krycell Ice and immediately wipe off any stray material that sits on top of the ice. Aim to finish with an irregular, natural shape to the ice and add scenic materials to the edges.

How to create a miniature snowman
Now for the fun part! Populating the scene with fun wintery additions is not always essential, depending on where you are modelling, but can really bring an urban scene to life. You can buy many things ready-to-plant, however, if you fancy a challenge, here’s an easy illustration on how to create your own snowman in miniature.

More information...
For more information on how to model a winter scene, including the trees you need - check out our step-by-step guide here.
Model trees: all you need to know
Model Railway Static Grass: All you need to know
Model Railway Buildings: A Beginners Guide
Need more advice? Take a look at the BRM Techniques page for all our latest guides and advice articles.
Your weekly World of Railways newsletter
Are you subscribed to our weekly email newsletter? Don't miss the latest news, reviews, modelling advice and competitions.