Model Railways: How to cosmetically improve track points


17 February 2020
|
In our latest practical feature, we turn our attention to enhancing the appearance of this most standard element of model railway infrastructure.

The main objective is to improve the points appearance by removing the spring block, thus making the sleepers look more prototypical, and to enhance the point changing operation. The strength of spring was causing the actuator rod to bend slightly, mainly due to the thickness of my baseboards.

This will only work on points that have the motor fitted to the underside of the base board, not clipped to the point sleepers. Surface mounted applications or the wire and tube method of control wouldn’t be suitable either.

First and foremost, this operation is best performed before your points are installed and not retrospectively.

1

This medium Peco point was the one we decided to use as the subject. The spring fitting attachment can clearly be seen.
How to cosmetically improve points

2

Open the metal lugs using a scalpel or small screwdriver.
How to cosmetically improve points

3

Prise the spring fitment away and the fitting with spring just pops out.
How to cosmetically improve points

4

Now for the point of no return. Start cutting along the line of the sleeper/spring housing base that holds the fixing lugs in place. Use a steady hand and a sharp knife. Many fine cuts are better than trying to cut through in one go.
How to cosmetically improve points

5

Once cut through, pull away with tweezers.
How to cosmetically improve points

6

With the tie bar trimmed, the cork sub base was cleared of glue and old ballast.
How to cosmetically improve points

7

Some black card is fitted as a supporting base for the new card sleeper and the ballast. It was easier to cut into two and slide under the track before gluing.
How to cosmetically improve points

8

The replacement sleeper was made from two pieces of card – a Polyfilla box in this case, as the card had a nice rough texture. The first sleeper is in place with a bead of glue ready. Make sure you don’t get any on the switch blades. With the sleeper moved into position, check for clearance.
How to cosmetically improve points

9

Insert a small piece of card in the recess of the adjoining sleeper. Ensure that it’s level and leave it ready for painting.
How to cosmetically improve points

10

Paint all new work to match the remainder.
How to cosmetically improve points

11

Lay your ballast and leave it to dry.
How to cosmetically improve points

Process

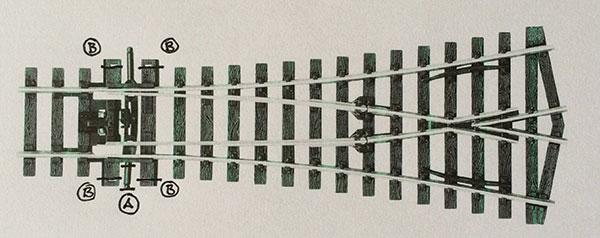
Prior to fixing, trim the tie bar to remove the point fixing lugs, as shown in A, ensure that the tie is finished no less than shown here. If it is cut too short it can get caught under the point moulding. Carry out the same to the other side of the tie bar, with the switch blades moved across.

Trim the four sleepers to remove the fixing holes for point motor legs, as shown in B, and tidy up the end. You can also reduce the width because they're too wide.

Content continues after advertisements

How to cosmetically improve points

Need some trackplan inspiration? Our article here offers a variety of trackplan ideas for different levels of difficulty. 

Looking for some tips in laying track? Our useful guide provides the basics to help you get started. 

Need more advice? Take a look at the BRM Techniques page for all our latest guides and advice articles.