When you see a layout with a turntable at a show, the crowd often gathers. It doesn't matter how impressive the running or the length of the trains, the big kid in all of us loves to see a locomotive rotate. We'll pretend it's so we can get a proper look from all angles, but really, it's just fun to watch.
Real railways didn't turn locomotives for fun, but because a locomotive with tender runs better with the locomotive ahead of its water cart. From the crew's perspective, running 'tender first' had another disadvantage – poor visibility and coal dust in the driver's eyes. Furthermore, unless the line had locomotives with tender cabs like the S&DJR, they were relying on a piece of tarpaulin stretched over the gap to keep the weather out of the cab.
Diesels and tank locomotives didn't require this so much, but it wasn't unknown for them to be turned to even-out wheel wear on opposite sides of a locomotive, or rotate a diesel if it had a cracked windscreen at one end. Even turning coaches was known, especially on coastal routes where they'd even out the heavy weathering from the sea. Better to let both sides weather evenly and postpone a repaint.
Turntables make roundhouses possible, where you can group a large number of locomotives in a small space, shuffling each one in and out in turn using a table in the centre with sidings radiating out, as our plan based on Old Oak Common on page 62 of this issue shows.
There are many different designs, but the most common involves a rotating piece of track – the bridge. The girder supports are under this in a hole called a well. At the end of the bridge are carrying wheels running on a circular rail.
The turntable is be balanced so the wheels aren't always touching the rail – you can see them stationary when the bridge is moving. Ideally, the crew will park the locomotive so it balances the 'bridge' because it makes turning it much easier. On turntables rotated by the crew pushing, that made a big difference!
In model form, we can push a turntable easily enough with our hands, but adding a mechanism to do this remotely looks far better and isn't difficult.
Starting with the common Peco kit, I'm adding a manual, then an electrical drive unit from FMR. Parts are largely Meccano, an excellent source of mechanical parts for modellers.
One limitation of both kits is that the tracks have to be aligned by eye. Devices to do this automatically are available but add considerably to the cost. Having operated a layout with eyeball track alignment years ago, it's not too difficult and most people soon get the knack of it, so don't worry too much. Fortunately, OO gauge is a little forgiving, too.
If your layout has locomotives with tenders, and you have space, a turntable adds another dimension to the operation. Just ensure your crew aren't dizzy!
Shopping list
Frizinghall Models & Railways
Peco (LK-55 OO/HO) Turntable Kit
Manual Drive Kit For Peco 00/N Gauge Turntable Kit
Electric Drive for Peco 00 Turntable
W www.modelrailshop.co.uk
Content continues after advertisements
Building the turntable
1
Our Peco model is supplied as a comprehensive plastic kit and represents the Cowans Sheldon 70ft preserved turntable at Yeovil Junction. The detail has been simplified a little, but all the essential parts are there, and well moulded with no flash to clean.
2
How do you fit a 12in wide turntable in a 9in wide box? By supplying the well in three pieces. These interlock, and it's a frustrating job unless you have a spare pair of hands. I fixed two parts together with solvent, then eased them apart a little to add the third segment.
3
All the bridge components slot together nicely and are fixed with plastic cement followed by a wash of liquid solvent. There aren't many location guides, so it's up to the modeller to make sure the girders don't stick out beyond the end of the deck.
4
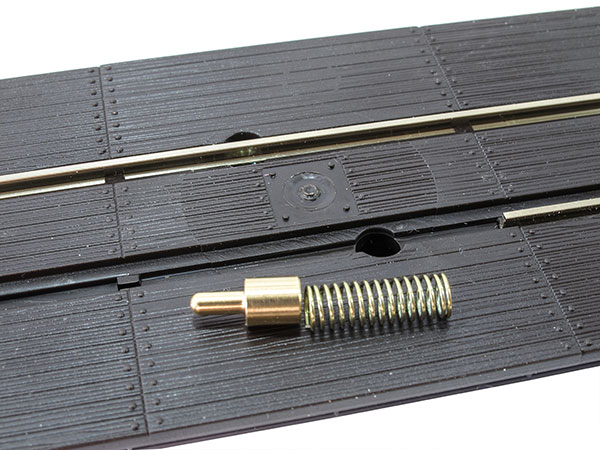
Code 100 rails slide into the chairs moulded into the deck, but before fully fitting, electrical pick-ups and springs are dropped into the holes. These transfer power to the track and are trapped in place by the rail. Don't let any glue near them, or the springing won't work.
5
Underneath, a pair of phosphor-bronze contacts are bent using pliers, then slotted into a bearing plate. Once installed, track power is fed into them from your controller to allow locomotives to move on the turntable.
6
The end carriers are made with care, to keep glue away from the wheels and the steel axles they run on. I don't find these need help staying in the supports, but if yours aren't as tight, a dot of superglue on one end will be enough.
7
I don't own a compass large enough to draw a 300mm diameter circle so drew around the well moulding, then flipped it over and drew around the rim. The correct size for the hole will be somewhere between these two.
8
Using a jigsaw, I cut the baseboard, trying to stay close to the inner line. A little wobble won't matter as the rim is about 5mm wider than the well and will cover any less-than-perfect woodwork.
9
Dropped in the hole, the turntable looks great. My board is a flat 9mm thick piece of plywood but if yours isn't spot on, ensure the deck is level in all directions by using slips of card under the rim of the pit.
Manual mechanism
1
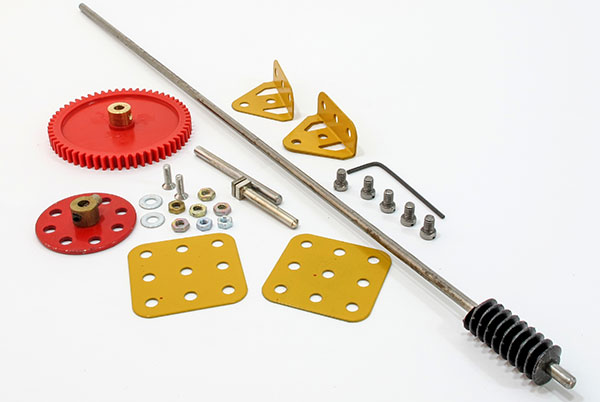
Peco mentions the turntable can be made to work using Meccano, but doesn't add more detail. Fortunately, Frizinghall Model Railways can supply the parts as complete kits. First, we look at the manual version, which allows the turntable to be operated up to 12in from the edge of the baseboard. If your board is wider, an extension kit is available to help.
2
Reading the instructions, my first question was, “What is a trunion?” It's the angled plate with a triangular side. These bolt to a flat plate, supporting the worm drive end of the shaft.
3
A steel rod has to be fitted to the turntable bridge – a job that would have been easier before assembly. It can be pushed into place without glue, but check the table still rotates freely afterwards. I had to ease the hole in the bearing a fraction to achieve this.
4
A satisfyingly large plastic gear is fitted and a grub screw – the Allen key to do this is helpfully included in the kit.
5
The mechanism is attached to the turntable well with a few small bolts. 3mm diameter holes are drilled, then countersunk so the bolt heads are flush with the surface. Once you're happy, fill these with Plasticine and paint over them. That way, you can still remove them if required in the future using a screwdriver.
6
Looking underneath, you see the simple mechanism. The coarse gears aren't likely to need much maintenance other then a thin smear of suitable plastic-safe oil.
7
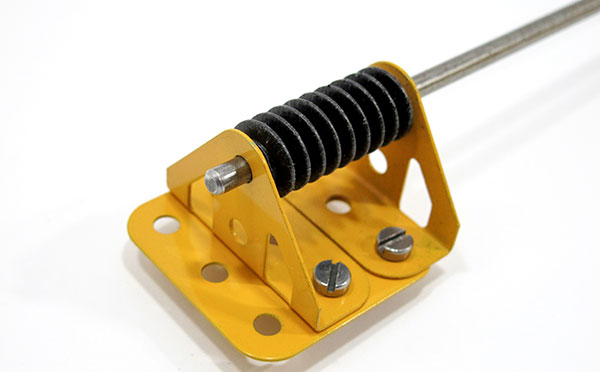
At the baseboard edge, the operating rod emerges through a 4mm diameter hole. A square plate is screwed in place to act as a bearing. The rod can be cut to length with a junior hacksaw and the handle assembled and fitted.
Motorised mechanism
1
If you prefer electrical power, a kit is available but this time you have to choose between OO and N and the final drive wheels differ in size. A switch and power supply (I used four AA batteries) must be provided by the modeller.
2
The basis of the kit is the well-regarded Clearbox motor and gearbox unit. These are popular in larger scales for battery-powered locomotives, so should would work for a long time powering a turntable. The speed can be adjusted by adding or removing gears. FMR recommends four – a compromise between whirling around like a roundabout and waiting forever to turn a locomotive.
3
Here's the setup I ended up with. When gears are removed, spacers have to be added to the drive shaft to stop gears slopping around. No glue is required with this and I added a slight smear of grease to reduce the noise.
4
In the same way as with the manual setup, the gearbox is attached with small bolts to the turntable well. Sadly, they aren't at the same position as those for the manual drive – we'll fill the excess holes later. It's important to get a tight mesh. Luckily, having coarse gears, absolute precision isn't essential.
5
An on/off switch is required and if you don't fancy soldering, FMR can supply one from its 'Plug-It' range – the motor is already fitted with suitable plugs for this. Flick the switch and away you go. Job done!
Expert tip
![]()
The speed a locomotive can be turned, in reality, depends on a number of factors – the weight of the locomotive, whether the crew managed to park it in the middle of the bridge and the power used to make it turn.
The electric turntable at the NRM can rotate a 'Merchant Navy' around in a minute, whereas a few men pushing takes just under two minutes. Vacuum-powered drive seems to be about the same speed as manpower but could be as long as two and a half minutes.
How fast should a model turntable rotate? That's up to you, but I'd suggest 30 seconds looks about right for our miniature locomotives.
Your weekly World of Railways newsletter
Are you subscribed to our weekly email newsletter? Don't miss the latest news, reviews, modelling advice and competitions.