The high street is changing. Take a look at photographs of your local town from the 1950s and compare them to today. Most of us will notice that rows of independent traders have been replaced by chains. Shops are bigger and wider too. It's all very efficient, but there's not much character.
Petite Properties Station Road range of shops are the perfect antidote to the modern high street. They could fit into any town or city from the steam era and wouldn't look out of place in smaller rural towns today. The kits provide a basic building, but the finish is left to the individual modeller.
Setting the period can also be achieved by your choice of shop name. Some chains have long since disappeared, but will be fondly remembered by anyone looking at your model. C&A for clothes shops, or perhaps Beatties if you fancy reminiscing about drooling over models you couldn't afford.
Local shops were often simply named after their owners, but years ago this would be very formal. I've built 'P.S.Parker' for my baker's shop as this is firmly pre-1960s. 'Phil's Cakes' would be much later and 'Cakes@Phil's' pretty much up-to-date.
An all-important part of any shop is the window display and for the baker's and hardware store, I'm using kits from Langley Models. It's worth taking a good look at its stand if you see it at a show. As well as complete kits, many of the individual castings are sold separately for pennies. For many years I've bought many useful bits for models this way.
Somewhere along the line when discussing this project with my colleagues, I rashly promised a working train set in the window of the model shop. The result is easily the smallest model railway I've ever built, but it works and wasn't too difficult to achieve. People I've shown it to are both impressed and think I'm mad!
What we used
Bachmann
WSL Scenecraft (44-275) Low Relief Model Shop
Petite Properties
No. 10 Station Road
No. 12 Station Road
Model Railway Scenery
4mm lettering (LX037A) (Swindon)
4mm lettering (LX037C) (GWR)
Scale Model Scenery
Roof Slates (LX228-OO)
Expo Tools
Clearbox Motor and Variable Gearbox (26210)
Content continues after advertisements
The Bakers
1
I'm using Petite Properties 'No. 10 Station Road' kit. Like all the models in this range, it is supplied in laser-cut MDF and cardboard parts, which the modeller has to assemble and decorate. Instructions cover the basic build of the model and provides details explaining how the model seen on its stand has been decorated. You can adapt the building to make yours different from others.
2
After a dry-run, I assembled the shell of the building using PVA glue. Check everything is square, wipe away glue that has oozed from the joints and leave to dry.
3
On the front, I add the main shop window parts as a guide for the next stage, but left the doorway separate as it's easier to paint and detail this way. Be sparing with the glue, keep a tiny screwdriver handy to run around the insides of the mouldings to deal with excess glue.
4
For the brick finish, I'm using Slater's English Bond embossed Plastikard. Cut it oversize and fix with a smear of all-purpose glue (I'm using UHU Power). Run liquid plastic glue down the corners to ensure they bond fully. Once dry, trim to size with a sharp knife.
5
The rounded window top decoration isn't available commercially, but can be made by scribing an arc on the back of brick Plastikard with a pair of compasses. Keep running the points along the sheet and eventually you'll form enough of a groove that it can be snapped along the line. Scribe some vertical lines with an Olfa cutter or blunt knife to complete the piece.
6
The shop sign is from Model Railway Scenery laser-cut letters. I'm using a serif font for a vintage look. Before starting, put them in place without glue, to make sure the words fit. Aligning the letters can be tricky - look along the model from the side and turn it upside down. It's amazing how doing this shows badly-positioned characters. A slow-setting glue allows some wiggle time.
7
Glazing, including the rather attractive stained glass, is included in the kit and just needs to be fixed in place with a suitable clear glue. Don't use superglue for this as the fumes will be attracted to grease from your fingers on the clear plastic, fogging it.
8
Langley Models Baker's shop fittings are really intended to fill an interior, but one of the racks works just as well in the window, covered with a delicious selection of baked goods. I use a thick superglue to assemble the parts.
9
After much research staring into bakers' windows, I opted for a selection of pale brown colours with a few cakes topped with white and pink paint. This is a 1950s baker, so I doubt that some of the garish colours available today would be appropriate. For pink, I used flesh colour, even though the thought is distinctly unappetising.
10
While the rack of food hides most of the interior, before fitting the shop back, I add a printed photograph, found on the Internet to provide a suggestion that there is more inside the building. Finding a suitable photograph proved much harder than I expected, so if you're visiting a museum with shops, it would be worth snapping something suitable.
11
A finishing touch comes courtesy of some Humbrol Smoke weathering powders, brushed around the chimney tops and higher parts of the roof.
The Hardware Store
1
Petite Properties No. 12 Station Road is shorter than the No. 10 kit, but a variety of building heights will give the finished row of shops more character. They are used in a different order to the manufacturer's suggestion, simply because I think they look better this way round. It's my model, after all!
2
To model a rendered finish, build the basic shop without window detail. The area where this will be is masked off and the building sprayed with textured paint from a DIY store. While very quick to use, it's essential to practise on scrap wood with this stuff before working on your model. I needed to spray from well over 2ft away as the pressure in the can is very high. Thin coats look a lot better than thick ones too, but you can build up the effect very quickly.
3
As with the Baker's, the window detail is built up from the card parts. The sign is made using some old Mabex waterslide transfers that kept breaking when I applied them. I turned this into added character by dry-brushing the shop front to make it look as though Mr. Stanley's emporium is past its prime and could really do with attention from some of the products he sells.
4
Cardboard roof slates on this and the baker's are a scalemodelscenery product. Draw lines 5mm apart on the roof and use these as a guide for applying the strips of laser-cut slates, making sure you stagger the joints. I'll trim these to length once they are dry, because it's easier then trying to do this before fitting.
5
The chimney is a separately-applied part that has to be stuck on the roof. To hide the inevitable joint, cut 3mm strips of cigarette papers and stick them with PVA glue. A coat of greeny-grey paint later and you have realistic lead flashing just like a real building, and no gaps.
6
A fine selection of whitemetal parts from Langley Models Hardware Shop Fittings set. Some of these are designed to be hung on, or stood at the front of the building, a common way to display items for smaller shops.
7
Picking out individual products on the large display piece is a little fiddly. Metal items can be left untouched as the whitemetal is a good colour match for the prototype. Rather then worry about perfect painting, I wash the whole thing with some Earthshade from the Citadel range. This ink sits in the darker areas, sharpens the look and blends the colours.
8
Shopkeepers would normally live above their premises, so the upper-storey windows need curtains. I cut strips of paper from Sunday supplement magazines. If you look at the edges of the adverts, there's often blocks of colour big enough for our use, and it's quicker than painting.
The Train Shop
1
I'm using the Bachmann Low Relief Model Shop for this model. It's ready to use, but a little modern for the scene I'm building. As a resin model, the walls are a lot thicker then the kit-built models, but this shouldn't be a problem. The material is quite brittle so don't drop it, or you'll need some superglue to fix bits back on. Don't ask how I know this.
2
First job is to remove the windows before painting. These can be carefully pushed out from the back, taking care not to bend the fine etched-brass frames. Put these, and the glazing, to one side in a safe place so they can go back in later. The sign is a transfer, but can be scraped away with a knife blade.
3
Brickwork on this and the baker's are painted with Humbrol 121 (Pale Stone) and then dry-brushed with 70 (Brick Red) and 62 (Leather). It's important to do this rather than using the building as supplied so all the models have a consistent look, even though painting a pre-painted building might seem odd.
4
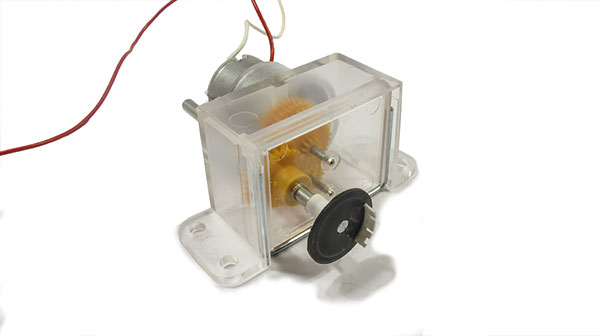
Building a working train set smaller than a 20p piece starts with fitting a disc of Plastikard to the top of a Clearbox motor and gearbox set. By using all the gears in the set, the disc turns at 4 rpm so the little plastic cut-out train isn't belting around unrealistically fast. The scale of the model is a mystery – big enough to see, but not so large it looks odd.
5
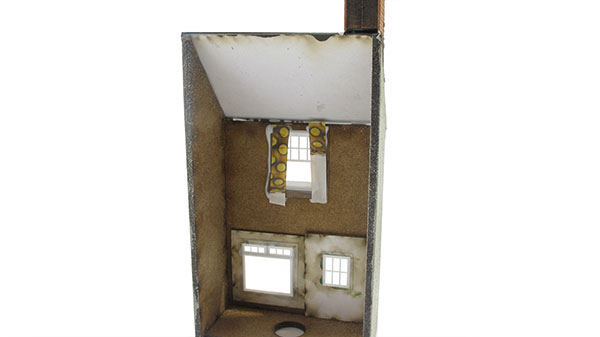
My scene sits on top of a box made from foamboard with the train on its disc poking through. Over this sits the layout made of 1mm Plastikard. The backscene and tunnels support the centre disc. It's important that the gap the train will run in is wider then the train itself so there isn't any friction between the two parts.
6
Some hills from Milliput and a couple of simple buildings cut from square-section plastic, and the model is complete. It's not that easy to see through the shop window so limited detail will be fine. Model railways of this era weren't that detailed, anyway.
7
No back is provided with the building, so I cut one from of a sheet of thick card and painted this black inside. An extension at the back covers the railway layout. And that's it - job complete! Three different shop windows created, plus working train set!
![How to make realistic show windows for model railways]()
Want some further buildings to complete your scene? Our guide on how to build and detail a card kit is worth a read. Or if you’re interested in creating some roads and pavements, our handy guide is filled with tips and advice.
For more help and tips for adding grass to your model railway - watch our video on how to create realistic scenery using static grass here.
And what about trees? Our online guide will help you get to grips with ‘planting’ trees on your model railway.
Need more advice? Take a look at the BRM Techniques page for all our latest guides and advice articles.