How to fit and program a DCC point motor


17 September 2021
|
Fitting point motors used to mean lots of time-consuming wiring and soldering, but there are now products to simplify this process.

One of the most significant differences between a ‘train set’ and a more advanced more railway is (in most cases) the step up from manually operated points to electrically switched, remotely driven motors.

There are many options available to the modeller working towards this end, from traditional solenoid motors activated by electromagnets to servos and various designs of geared points machines, sometimes known as ‘stall motors’. Whichever type you employ, the electrical connections required to power the motors, change the frog polarity of ‘live frog’ points, link to switches, control panels and mimic diagrams can lead to a veritable ‘rat’s nest’ of wires for every motor - and if you’re using Digital Command Control (DCC), you’ll need to factor in an accessory decoder to send instructions to the motor. To the uninitiated, it can be a daunting prospect and, for many of us, a ‘necessary evil’ before getting to the fun bits of building a layout.

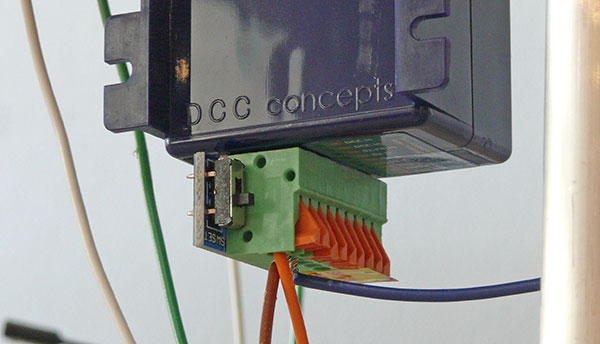
DCCconcepts’ ‘Cobalt’ motors have evolved through several generations, with different versions now offered for analogue and digital control. The Cobalt iP Digital variant (iP is short for ‘Intelligent Power’) has an integrated accessory decoder; installation is no different to other motors of this type and setup is suprisingly simple, especially once you’ve mastered the first one.

Content continues after advertisements

1

Each ‘Cobalt’ motor is supplied with everything needed for installation - a double-sided, self-adhesive foam pad to hold it in place, screws and point fulcrum bar.
Fit and program a DCC point motor

2

Mark out where your point will sit and drill a slot in your baseboard so the wire can comfortably fit through the board to the hole on the point.
Fit and program a DCC point motor

3

This motor is fitted with a 90-degree adaptor to reduce its depth below the board. Test fit to ensure the mechanism can move freely, then fix permanently with screws.
Fit and program a DCC point motor

4

Every Cobalt motor has clearly marked push-fit terminals. We only need three wires - two to the power bus, one to the point frog (blue), switching polarity as required.
Fit and program a DCC point motor

5

Connect the motor to your power or accessory bus - the orange and brown wires shown here. The blue wire is linked to the point frog. No soldering is needed.
Fit and program a DCC point motor

6

Move the switch on the motor to ‘SET’ and program the motor with a unique address. I’m using an NCE PowerCab, but most DCC systems have a similar process.
Fit and program a DCC point motor

7

Press ‘Select Acc’ and key in the desired number – in this case ‘301’. Press ENTER. Press ‘1’ to select ‘N(ON)’ and toggle back and forth a few times to set the address.
Fit and program a DCC point motor

8

Slide the switch back to ‘RUN’ and the address should be set to your required address. Ensure all your connections are securely fixed.
Fit and program a DCC point motor

9

Press ‘1’ to select ‘N(ON)’ again and your motor should burst into life. Press it again to change back, and check for possible obstructions.
Fit and program a DCC point motor

10

Run a train across the point. If it shorts when it hits the frog, swap the two wires to the power/accessory bus over at the terminals under the motor.
Fit and program a DCC point motor

Struggling to decide on the right DCC decoder for you? Our guide here should be your first port of call. 

If you'd like advice on how to set up a DCC decoder, our easy-to-follow tutorial should be your first stop. 

For more advice on about DCC, head to our dedicated section.