How to build a stone warehouse kit


01 September 2020
|
Phil Parker investigates a new range of laser-cut kits, ideal for modellers with ambitions of industrial grandeur.

Finding a new manufacturer in our hobby is always a joy, and when the owner of JS Models got in touch to tell me (via RMweb) about his new range of laser-cut buildings, I couldn't wait to take a look. 

We are well supplied with kits made this way, the difference here being the range covers big buildings – warehouses and factories – not huts and houses. As a firm fan of the industrial scene, I love these buildings. Why bother with a backscene when you can use honking great buildings to hide the background? 

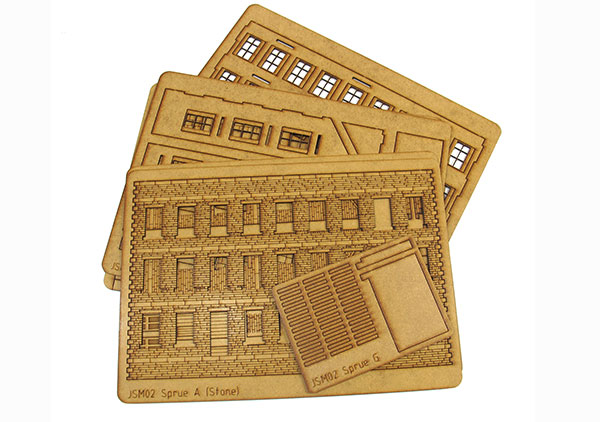
The kit arrived nicely packed in a cardboard box. All parts are cleanly-cut and there are a surprising number of laser board sheets. Examining the instructions, the reason became apparent – all the walls are two sheets of material thick. That's going to make for a strong model that will happily stand up to the rigours of the exhibition circuit, or just the handling by a clumsier modeller. At this point, I should make it clear that I haven't tested this by dropping the model off my workbench, but it's unlikely to be damaged by a fall. 

Content continues after advertisements

One problem is that, while laser board might be ideal for laser cutting, it is very smooth and slightly shiny. Even the dressed stone the surface purports to be has a little bit of texture, so the biggest challenge I could see was adding this. 

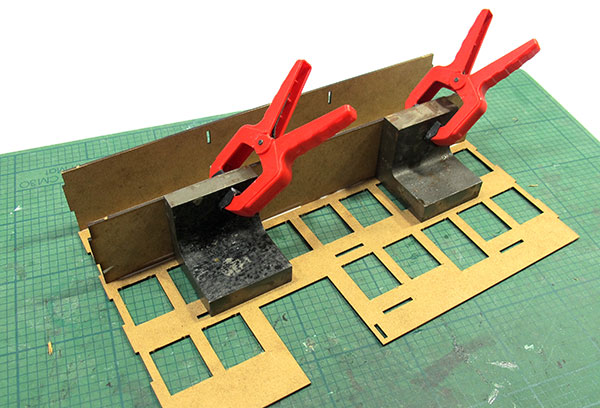
Handily, I'd been supplied with a reject wall to experiment on. I tried using a rolling pin to force coarse sandpaper into the surface, but it didn't leave a mark. A hammer was no better and even worse, left dents. I was going to have to do this with paint. After a few attempts I managed to do the job with a mix of paint and D.I.Y. store powdered wall filler. It's subtle, easy to do, very effective and could be used in many different places on a layout. 

The finished model measures 280mm wide, 70mm deep and 215mm high, big enough to fill a decent section of layout providing industry to justify those goods trains. Assembly takes a couple of hours if you don't paint it, putting the strips of roof slates on being the longest job. Decoration will at least triple this, but it's time well spent and needs to be spread over several evenings to let the paint dry. It's all pleasant though, as part fit is excellent. 

If you need a big building for your layout, the JS Models range is certainly well worth a look. The warehouse is available in both brick and stone finishes and appropriate for any layout from the Industrial Revolution onward. Even a modern image model could find a home for one, reborn as a set of apartments!

1

Opening the box, I find several laser-cut sheets of 2mm-thick laser board, a sheet of ready-cut card slate strips for the roof and some glazing material. Several pages of instructions with nice clear diagrams are also included.

2

To make painting easier, the windows are released from the inner walls. I find a heavy craft knife cutting the retaining nibs from the back (non-shiny) side of the sheet works quickly and effectively. Use a sharp blade as there is a lot of this sort of thing to be done.

3

Construction starts by attaching the floors to the inner shell with PVA glue. Everything slots together and I'm using some angled supports to hold them in place while the glue dries.

4

Once the floors are in place, the ends are fitted – and the inner shell is complete.

5

You can never have too many clamps, especially when fitting the outer walls with the stone or brick surfaces embossed on them. Plenty of PVA adhesive is required and I check that it hasn't oozed out into the window apertures as this will make re-fitting the windows difficult later.

6

The outer shell needs a little bit of sanding with a fine grit paper on the corners to flatten back the quoins at the corners.

7

Sills are fitted with a little bit of PVA. A Metcalfe Models fine tip glue applicator is ideal for the job. Again, check the inside of the window gaps and remove any excess with a cloth or small screwdriver.

8

To paint the windows, I fix them to a board with some double-sided tape. After a coat of primer, they are sprayed with a mid-brown colour and then dry-brushed with a lighter shade. It's a lot easier to handle large numbers of components that will all end up the same colour this way. A sharp knife is slid under the windows to release them when the paint has dried.

9

Steps are made up from a sandwich of eight components. Lining everything up as accurately as possible should reduce the sanding and filling required later.

10

Inside the door there is the option of a road or inset railway surface by the loading bay. I've used the road version, which is a single part that slots into place after painting. If you prefer a rail-served warehouse, you need to provide your own length of OO gauge Code 75 or 100 track.

11

The roof is marked up to make the process of sticking the laser-cut slates in the correct place. Note that the strips of slate are supplied in two spacings so they line up with the correct stagger. Once all the strips are fitted, the top edge of the board is trimmed back, again following a guide, painted and the roof stuck in place.

12

All the windows are glazed using strips of the clear plastic provided. Using a clear drying adhesive such as Glue'n'glaze avoids any chance of fogging the glass with glue fumes.

13

Seeing through the building ruins the realism, so I take a sheet of paper and spray it randomly with grey and black paint. Then some boxy shapes are marked on with a marker pen. Once fixed on the back of the model, these will give the impression of some sort of interior without the bother of building one.

14

Square section plastic strip makes suitable industrial downpipes. The hopper at the top is a fatter piece of plastic, sanded to shape.

To find out how to transform your laser board into stone, read our quick guide here. 

Want some further buildings to complete your scene? Our guide on how to build and detail a card kit is worth a read.

For more help and tips for adding grass to your model railway - watch our video on how to create realistic scenery using static grass here. 

And what about trees? Our online guide will help you get to grips with ‘planting’ trees on your model railway. 

Need more advice? Take a look at the BRM Techniques page for all our latest guides and advice articles.