How many times have you been to a model railway exhibition and witnessed a beautiful layout that runs smoothly, with no mishaps? The scenery has been carefully applied, the backscene blends harmoniously with the foreground and it all looks so convincing you become absorbed in the scene; until that is, a giant hand jumps into view from above. Down comes a hook with a bright torch that is shone between locomotive and rolling stock, clumsily nudging – sometimes derailing – said items and mutterings and sighs are heard. Sometimes this can last for minutes and almost instantly your interest in the scene wains as operations grind to a halt. Does this sound familiar?
Uncoupling locomotives from rolling stock can at times prove frustrating, particularly as the standard - yet notoriously tricky to uncouple - tension-lock coupling appears to be here for the foreseeable future. Those with shunting layouts will encounter the problem more-often than large layouts with express trains that can be uncoupled behind the scenes, unseen by the scrupulous yet judgemental eyes of the exhibition-goer. If smooth operation is the key to success on our models, surely there’s an easier way to perform the basic task of separating locomotives from stock?
Some modellers have turned to using electro-magnets under their boards, raising the coupling hooks of their stock at specific locations when current is applied, usually via a button on the control panel. However, this solution is location-specific – you can only uncouple in areas where the magnets are installed and operations can become a little repetitive and predictable.
Keen Systems produce a kit designed to be installed – space permitting – inside your locomotive of choice, providing autonomous control of uncoupling on your layout, wherever, whenever, all at the push of a button. Complete with instructions and sensibly priced, too. Installation isn’t beyond the average modeller, making it an accessible solution, too. A digital decoder with a function output is required. To test the system, we’ve chosen a Zen Black decoder from DCCconcepts and Hornby’s J36, proving it can be made to work with smaller tenders if required.
1
Keen systems' bag of components contains few parts. A set of instructions, diode, actuator, lifting arm, two-part resin coupler with pivot plate and nut and bolt. It's a simple, yet effective solution to remote uncoupling on your layout.
2
We’re installing this system in the tender of the locomotive, the smokebox door being too small to house the actuator. Remove the three axle plate keeper screws and keep safe to one side.
3
Access to the inside of the tender is gained via the two screws illustrated. Use a small spare plastic bag or tray for storing parts to prevent them being lost.
4
Unfortunately, the decoder board is located in the path of the new actuator. It can be relocated, but first, both its retaining screws must be removed.
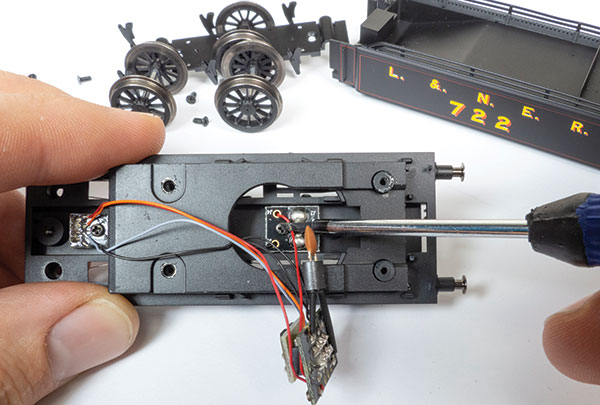
5
The pick-up board is removed to permit the removal of the tender weight. A single screw keeps this in place. Labelling each with masking tape will help ensure these are returned correctly.
6
The actuator requires a hole drilling in the chassis floor, made possible with a pin vice and 3mm diameter drill bit. Elongate the hole into a slot by working the drill bit at 45 degrees to the surface.
7
The slot allows for the passage of a file which we use to open the hole into a rectangular-shaped port. You don’t want interference to be an issue with the mechanism and this has no structural impact on the chassis.
8
The resin coupler and pivot are cleaned of flash with a small needle file, then clipped together. Test its height against your rolling stock and fit packing pieces of Plastikard to adjust as necessary. The pivot holes can be opened with a round needle, file if the coupler is reluctant to move.
9
Keen Systems' actuator is housed in a black styrene box that is wider than the chassis rails of the tender. To prevent fouling of the tender top, sand the corners a little to ensure it is a snug fit.
10
To ensure smooth operation of the coupling, a pivot point is required. Keen Systems provides a bolt which we cut to the correct length with a hacksaw. Cutters fit in the threads better, providing a firm grip and guide for the blade.
11
The length of brass wire between the coupler and actuator is model-specific. An over-length piece of pre-looped brass wire is provided. Test fit the mechanism to determine the location at which the piece must be bent.
12
Bend the brass rod at a sharp 90 degrees with brass-jawed pliers and the back of a pair of tweezers for a crisp bend. Brass-jawed pliers are softer than steel ones, hence preventing marring brass components, particularly useful when building etched kits.
13
Re-fit the pickup, decoder and tender-locomotive boards using the screws previously removed. Test-fit the tender top to ensure it fits without fouling connections.
14
The tender axle keeper plate is cut with a hacksaw to prevent fouling the uncoupler, then returned and fitted with the three screws.
15
Removing the blanking plug from the decoder board, a DCCconcepts 8-pin Zen Black decoder is installed. Check the colour coding of the wires against that of the board to ensure it is installed correctly. Job complete! The locomotive is re-united with its tender and fine tuning of the coupler and decoder can now commence.
![How to fit a DCC uncoupler]()
Content continues after advertisements
Struggling to decide on the right DCC decoder for you? Our guide here should be your first port of call.
If you'd like more advice on how to set up a DCC decoder, our easy-to-follow tutorial should be your first stop.
For more advice on about DCC, head to our dedicated section.