16 September 2020
|

Card kits are the staple of railway layouts nationwide, but how will a novice fare in their first attempt to build one?
The BRM crew chose a 00 gauge Metcalfe ‘Single Track Engine Shed’ kit to build. Opening the package reveals a handful of stiff part-cut cards, a sheet of plastic glazing, and several pages of well-illustrated instructions.
Shopping List
- Metcalfe Single Track Engine Shed
- Deluxe Materials ‘Roket’ card glue
- Metal Rule or reliable straight edge
- Black watercolour paint
- Grey and terracotta paint to shade wood and brickwork edges
- Craft knife
- Cutting mat
1
Metcalfe generally leaves only one edge of every shape attached to the carrier sheet, so it only takes a few passes with a craft knife to remove each piece. Pay attention to the instructions printed on the carrier at this point, as some pieces will need to be numbered manually. All the bits are then set aside in neat piles.

2
Where cutting with a craft knife allows for linear accuracy, cutting the glazing out freehand with scissors seems like an inaccurate endeavour. Take your time and the individual panes eventually square up precisely with their frames. The wall assemblies they fit into are quite substantial when built up.

3
The instructions are clear on which parts need to be glued first and to where. The front and rear gable walls come together easily.

4
Fixing the front, rear, and side walls together, the model is already starting to look like the finished product. The side walls are made up of several layers, so use a weight to make sure everything is kept nice and flat while the glue dries.

5
The workshop door assembly is a cinch to make, and it fits exactly where it is supposed to. The model feels quite solid now.

6
The basic shed frame is complete, so it’s time to add the workshop roof. The fine tip applicator is useful in drawing fine lines of glue just where needed.

7
Metcalfe’s advice to add spots of glue to the backs of the pre-folded roof trusses is important, again apply some weight while the glue dries. The trusses slide into notches on the smoke duct and the whole assembly locks into place on the side walls.

8
Paint the insides of the chimneys black can be a challenge and even more so to glue together the card spacers that stiffen them. The main shed roof is added now, but the tiny ridge tiles require a metal rule (or sturdy fingernail) to fold them to shape.
9
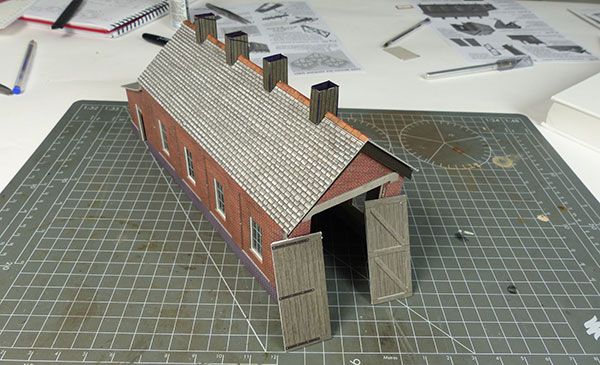
The workshop chimney is little more than a roll of paper and it looks passable in place. Now it just needs the lintels and sills adding to the widows, each fixed with a small dab of glue – and presto! One quite spiffing and eminently plonkable engine shed!

Looking for some more advice for beginners? The below articles should help.
How to build your first Metcalfe kit
Content continues after advertisements
How to build your first O gauge kit
How to build your first etched brass kit
For more help and tips for adding grass to your model railway - watch our video on how to create realistic scenery using static grass here.
And what about trees? Our online guide will help you get to grips with ‘planting’ trees on your model railway.