If you class yourself as an ‘active’ modeller – and by that, I mean you’re adapting models, or constructing kits, even if just occasionally, rather than collecting – you’ll have a set of modelling tools. With use, I find there’s a ‘go-to’ set of tools. These are the ones frequently used because they perform a task better than the rest, or fit in the hand better. Unsurprisingly, they’re always in arm’s reach, not buried under a pile of leftover bits, or worse, left in a drawer or toolbox as bought. Rarely are they damaged, however. Drop a pair of tin snips from the modelling bench and it’s likely your feet will suffer most! As ever though, there are exceptions.
When airbrushing the track for our project layout, my foot was caught in the airline when manoeuvring a baseboard, sending my favourite airbrush into a 4ft free-fall from its stand to the hard paving. Of all outcomes, the airbrush landed nozzle first with pretty harsh results.
Disheartened, I knew it was broken, but to what extent? And, more importantly, could it be repaired? I hoped so – its like-for-like replacement carries an RRP of £469.00!
Shopping List
The Airbrush Company
(IWS-5352) Head System (C1)
(IWS-5401) Needle (C1)
(SHA-NR) SharpenAir airbrush needle restorer
W www.airbrushes.com
1
The damage is localised to the airbrush fluid head system. Unfortunately, this is the most critical part, and the most delicate. Small imperfections to it have a large impact on the spraying qualities. The head nozzle cap thread is visibly bent beyond repair.
2
Behind the head nozzle cap sits the head nozzle and tip of the needle. Both are damaged, the needle being bent through 180 degrees, making it impossible to remove and testament to the force of the impact. It requires gentle straightening with pliers before removal.
3
Parts now unscrew, as with most high-quality airbrushes. To remove the nozzle, I use a spanner tool that is provided with the airbrush. Unless you’re familiar with the airbrush, take a mental, or written note of where parts fit for later.
4
Iwata is a popular brand of high-quality airbrushes, so spares are readily available from good stockists. Handily, an interactive parts list on The Airbrush Company website ensures fast identification, removing the guesswork.
5
The order placed, a new head system and replacement needle are received. The head system retails at £173.59, the needle at £26.60. This isn’t a cheap repair, but it must be right and it’s more cost-effective than a new custom Iwata airbrush. The new needle might not be required, however…
6
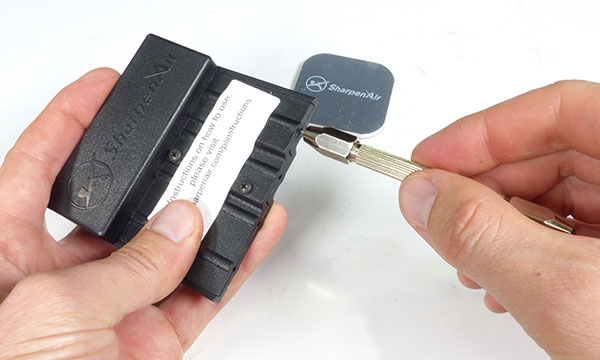
Only the tip of the needle is bent, so I’m keen to see if it can be repaired, using a SharpenAir tool, also retailed by The Airbrush Company. It restores airbrush needles from all brands – except those from Paashe and DeVilbiss – to their factory angle.
7
The four-step process starts from the right, each hole in the tool having a diamond grit-coated sharpening stone, set to the correct angle at the base. Rotate the needle until it is evenly ground, working from the coarse stones to the finer ones. A pin vice helps.
8
Needle restored (needle on the right)! The SharpenAir tool costs more than a replacement needle, so should be seen as an investment. How many times you use it depends on how clumsy you are with an airbrush, but for the professional painter, if spares aren’t available in time, it’s very useful.
9
Sadly, the nozzle isn’t salvageable, so this, along with the head cap, is replaced after cleaning the airbrush thoroughly with a solvent cleaning fluid that won’t damage the seals. Budget airbrushes often have seals that don’t last long, especially when exposed to solvents.
10
The airbrush is adjusted, its seals are lubricated, tested, and everything works as it should – a relief knowing the cost of the parts replaced! Lesson learned not to remove the crown cap when not airbrushing and to double check footing when around the air line!
Content continues after advertisements
Remember
With regular use, airbrush components wear. Unless you damage it first, it's the seals that are often replaced. Spares often aren't available for budget airbrushes because they're considered as being disposable, but a quality airbrush like this should last years.
Find out more...
What use is a cheap airbrush?
Airbrush maintenance guide
How to get started in airbrushing
Need more advice? Take a look at the BRM Techniques page for all our latest guides and advice articles.
Your weekly World of Railways newsletter
Are you subscribed to our weekly email newsletter? Don't miss the latest news, reviews, modelling advice and competitions.