


30 June 2022
|

Real railways run on a bed of crushed rocks called 'ballast'. In our latest guide, we explain how to add ballast to your model railway, plus share some top tips on the different options of model railway ballast available.
What is railway ballast
On the real railway ballast has three main purposes:
- To hold the track in place as the trains pass
- To provide drainage so that water does not affect the running of the trains
- To create a smooth running surface for the trains
Ballast is usually gravel or other aggregate. Its colour varies depending on the type of stone used and the age of the ballast. In general terms the newer the ballast the lighter is its colour.
Model railway ballast
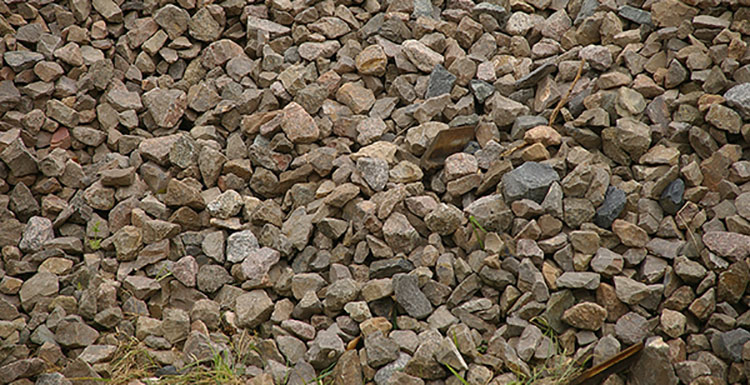
The commonly accepted way to ballast model railway lines is to utilise fine granite chippings, ideally in a scale smaller than the one you’re working in. The scale of ballast, its colour, quantity and appearance are considerations for better-looking track. For obscure reasons, model ballast is often sold in grades coarser than that for which it is most suitable. As such, ballast labelled as being suitable for 4mm:1ft scale is often better suited to 7mm:1ft scale layouts, while that labelled for 2mm:1ft scale is more realistic on 4mm:1ft scale layouts. The size of ballast used matters, and the grade of ballast rocks used on the real railway fit comfortably in the hand. Ballast is also very angular in shape, allowing it to be compacted into a stable bed with little movement. Model ballast can be found in all manner of shapes and sizes, including more rounded shapes, which are more suited to a model beach than track.
Sand is another option instead of granite, it being quite similar in colour to some of the paler ballast used on full-sized railways.
Sand, unlike granite chippings is produced by erosion over thousands and millions of years, this action creating little sphere like grains, which are easier to bed in around track than chippings because they roll into place more easily.
Some manufacturers retail track that is ready ballasted. While these track systems are usually more expensive than unballasted track, some may prefer to spend the extra money rather than tackle the task of ballasting themselves.

Model railway ballasting techniques
One of the most common methods of ballasting model track is to use fine stone chippings with slightly diluted PVA adhesive. The disadvantage with this method is that it can make the passing of trains quite noisy and the mixture of fine chippings and PVA around points can create operational trouble unless the ballasting is done very carefully. That said, the results using this method can be visually superb, which we will show you how to ballast effectively in a step-by-step below.
Ballasting can use strips of cork to raise up the height of the track. Various companies retail strips of cork sheet with angled edges that reflect the shape of real ballast.
Building a track bed in this way is a three stage process: firstly the cork strip needs to be fixed to the baseboard using PVA glue; then the track needs to be fixed to the cork (either adhesive or track pins can be used) and the final next stage is to use fine chippings with slightly diluted PVA glue to represent the ballast.
Some companies sell foam track underlay for a quick and easy way to provide a ballast appearance to the track. This underlay offers quieter running compared to when track is pinned down to a baseboard. Foam underlay can look quite realistic when it is toned down using paint, the track is weathered and the rails painted. There is one major disadvantage of this type of foam underlay – it has a limited life and is not really suitable for layouts that are envisaged to last more than 10 years. One advantage of this type of foam ballast strip is that the track can be removed from it at any stage and used on a subsequent layout.
List of popular ballast manufacturers
|
Manufacturer |
Ballast loose |
Ballast sheet |
Scales covered |
|
Hornby |
Yes |
No |
OO |
|
Woodland Scenics |
Yes |
No |
N / OO /O |
|
Gaugemaster |
Yes |
Yes |
N/ OO |
|
DCC Concepts
|
Yes |
No |
N/OO |
|
Javis |
Yes |
Yes |
N/OO |
|
Natural Scenics |
Yes |
Yes |
N/OO/O/G |
|
Noch |
Yes |
Yes |
Z / N/TT/OO/O |
|
Peco |
Yes |
No |
N/OO |
|
Scale Model Scenery |
Yes |
No |
OO |
|
Faller |
Yes |
Yes |
Z / N / TT / OO |
What is the best model railway ballast glue to use?
We’ve found that a strong PVA adhesive works best, which is then diluted in a 50:50 ratio with water. A drop of washing up liquid added to this mix helps breaks surface tension, allowing the mixture to seep into ballast, bonding it to sleepers and the baseboard, or cork base, if installed. Apply methodically with a pipette, slowly across track.
Shake the PVA glue/water/washing-up liquid mixture thoroughly, it is best left overnight to steep before applying for a more even distribution of the glue. When applied, it will always pool in lower areas, and to avoid glue leaving a sheen across track, avoid flooding the ballast with it. It’s better to apply glue a few times, leaving it to dry between each, than flood with glue in a single application.
What is a model railway ballast spreader?

A ballast spreader is a device designed to ballast track faster. Both devices featured are from Proses, left its HO/OO Advanced Ballast Spreader Car (BS-HO-02) and right its HO/OO Ballast Spreader (BS-HO-01). Both are designed to be filled with ballast and dragged across the rail surface, each depositing ballast between and either side of rails. The advanced spreader is adjustable in height to cope with different rail codes. Units now feature a ‘shut off valve’, allowing them to be lifted from track when full of ballast. If you’re feeling brave, the Advanced unit can be loco-hauled, and paired with its electronic ballast glue applicator wagon, too. Note – units can’t be used across points, and foul on trackpins, if fitted.
How to ballast a model railway
Below is a step-by-step guide, plus Phil Parker provides some top tips in this video...
Step 1

Secure track firmly in its definitive position – drawing pins or small track pins hold it in place temporarily before ballast dries. I’m using thicker Hornby track pins. Thinner versions are available, but are often more fragile. Droppers must be soldered to track.
Step 2

Sometimes, a ballast shoulder can be observed on tracks. Fixing track directly on a baseboard is fine, though adding cork underneath will raise it sufficiently to create a shoulder. This foam-based track underlay from Natural Scenics is available in common track shapes and reduces sound transmission, too.
Step 3

Though painting track is possible after it has been ballasted, it is often easier to do the majority of this beforehand. A paintbrush works well to paint sleepers a grimy colour, and track a dark rust colour, though an airbrush speeds up the process.
Step 4

Ballast is best applied slowly and methodically across track. A small container works best for even distribution of the material at a time. This section of track hasn’t been painted.
Step 5

Fingers or thumbs are best used to level and spread ballast evenly across sleepers. It might appear ‘old school’, but it’s what I’ve found works best and offers greater control. Avoid stray ballast on top of sleepers, unless modelling a more recent era.
Step 6

Another area to check regularly before applying glue is the ‘web’ of the rail. Here, stray ballast is more difficult to remove and can foul on wheel flanges causing derailment.
Step 7

With ballast evenly distributed, a quick alternative for small areas is to tap the handle of a small paintbrush or file on the rail, the vibrations ‘tamping’ the ballast into position. Note – this won’t remove an over-application of ballast.
Step 8

Ensure that ballast isn’t fouling point mechanisms. Remove stray ballast with tweezers and work point blades side-to-side manually, checking for interference.
Step 9

A builder’s strength PVA adhesive is diluted in a 50:50 ratio with water. A drop of washing up liquid breaks surface tension, allowing the mixture to seep into ballast, bonding it to sleepers and the baseboard, or cork base, if installed. Apply methodically with a pipette, slowly across track.
Ballasting model railway track: Top tips
- Ballasting track should be considered a permanent move. Once ballasted – correctly – model track is almost impossible to remove, so checking that your trackplan meets your needs beforehand is advisable.
- Dry soldered joints on track are easier to rectify before it is ballasted, too.
- Observation of the type of rock used for ballast will give a better idea of your options, grey not being the only colour of ballast observed on the network today. Though tinting model ballast through airbrushing or painting it the correct colour is possible when applied, it is better to use the right ballast from the start.
More information...
Phil Parker talks to Pete Waterman about the ballasting on his layout...
If you enjoyed this practical feature, you'll find a whole host of great practical advice and step-by-step guides in our Techniques section here.
Related articles
How to improve the appearance of track
Your weekly World of Railways newsletter
Are you subscribed to our weekly email newsletter? Don't miss the latest news, reviews, modelling advice and competitions.