Signal boxes are an essential part of the railway scene, but it's not always easy to find the right one for your layout. Those large windows, so important for the signalman to do his job, give us model makers a few problems. Big holes weaken walls and you need to think about some sort of interior detail to fill the void.
LCUT Creative produce this very reasonably-priced kit based on the 'box' found at High Dyke on the East Coast Main Line. It's slightly simplified, there aren't any handrails on the front verandah and other rails have been beefed up slightly, but it captures the look of the prototype convincingly.
Part fit is good, although it pays to test fit each one before gluing. Any modification is simple using a sharp knife, and the board the kit is made from cuts really cleanly. With a little thought, I'm sure other signal boxes could be produced, as these buildings turned up all over the network and were variations on standard designs. For kit-bashers, this is perfect, and made even easier as the firm can supply many of the component parts separately.
A couple of evenings' work will allow anyone to build themselves a signal box, perhaps with an extra one for the interior as it's tempting to go to town painting this, but that's part of the fun.
Tools needed
- Sharp craft knife
- Steel rule
- Cutting mat
- Deluxe Materials Roket Card Glue
- Deluxe Materials Glue'n'glaze
1
There are a lot of parts in this kit, including alternative sides for the box, so the builder can choose to put the steps on the left- or right-hand side of the finished model. They are also useful if you want to practice your painting on parts you won't be using later.
2
Pre-painting the parts makes producing a neat model a lot easier. You could assemble the kit and then paint it, but achieving clean lines around the windows would be fiddly. I'm using slightly-thinned Humbrol enamel paint, which covers well, but soaks into the card. Two coats would give a perfect finish, but one leaves a nicely-weathered look.
3
Parts are cut with identifying numbers on the side. Cut these off before assembly as they would be almost impossible to remove afterwards and several of the pieces won't fit. This one will stop the roof sitting down for a start.
4
Windows fit inside the holes and I find running a little glue along the inner sides of these, then sliding the glazing bars gives a neat finish. I'm using Deluxe Materials Roket Card Glue, which is quite thin. Apply sparingly and it works well.
5
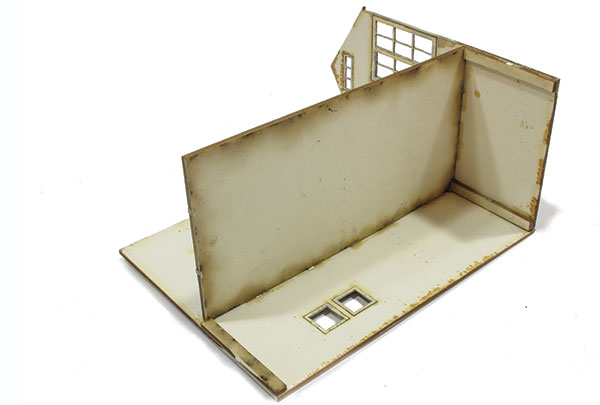
The floor helps keep the model square while the sides are assembled. Long spacers in the corners place it at the right height, and yes, I have put the one nearest the camera in the wrong place; there should be a gap down the edge for the side to fit in. It was quickly removed with a sharp knife after the picture was taken.
6
With all the sides in position, I run some glue along the inside corners for extra strength. The glazing can be fitted now using some clear plastic fixed inside with an all-purpose clear glue or Deluxe Materials Glue'n'glaze
7
The framing is fitted to the outside following the plank lines. On the back, it has to be cut to length to fit either side of the vertical piece. The colour on the real things varied a lot. I've chosen a classic look with the wooden frames picked out, but in later days, the boxes tended to be painted a grubby white colour all over thanks to British Rail economies.
8
Building the stairs looks fiddly, but it isn't. The end of each tread slots into a square hole and everything fits together tightly enough to hold without any glue. I don't trust this long term, so run a tiny amount of glue around each joint, letting it soak into the card. Once painted, these won't come apart.
9
Balconies are hung on the outside. The Roket glue is strong enough to 'grab' them and allow me to fit the brackets afterwards. Those under the front balcony need to be trimmed slightly where they touch the wooden framing.
10
The roof can be fixed straight to the model but, with a little care, can be left removable. Once all the bracing is in place, the result is surprisingly strong.
11
Inside, an LCUT interior kit is fitted. This is made up of a laser-cut card shelf, levers, instruments and clock, plus 3D-printed bells, desk, chair and fire. There are plenty of parts to fill the box. They would be useful for other makes of signal box, too.
12
All finished. Weathering is limited to a little dry-brushing on the green woodwork and a wash of thinned brown acrylic on the balconies.
Want some houses to complete your scene? Our guide on how to build and detail a card kit is worth a read. Or if you’re interested in building some roads and pavements, our handy guide is filled with tips and advice.
Content continues after advertisements
For more help and tips for adding grass to your model railway - watch our video on how to create realistic scenery using static grass here.
And what about trees? Our online guide will help you get to grips with ‘planting’ trees on your model railway.
Need more advice? Take a look at the BRM Techniques page for all our latest guides and advice articles.