When it comes to car repairs, I've never been a fan of main dealers. Yes, they might have shiny waiting areas and all the undrinkable machine-made coffee you could want, but the bills always seem suspiciously high and you can't talk to someone with grease under their fingernails about the finer points of your ignition system.
Fortunately, I know of a few proper 'grease-monkey' garages, situated in the less fashionable parts of town. They operate out of buildings that have fallen on hard times. Once proud new homes for light manufacture or engineering, over the years they have received less than sympathetic modifications to try to make working inside as practical as possible.
Inside is not the place to wear your best clothes. At least, if you do, be careful not to brush past anything or the resulting oil stain won't wash out.
My local garage is fascinating for anyone with an interest in cars. You might turn up with a modern Citroen, but one of the ramps will have an Austin Healey on it and besides that, a 1960s Mini sits under a cover of tarpaulin and discarded car parts. Outside, a few Morris Oxfords haven't turned a wheel in years.
Places like this are perfect corner fillers for a model railway. The 'higgledy-piggledy' nature of the building means they will fill an odd-shaped corner. This scene is only 30cm by 13cm and could be reconfigured to fit a less regular space.
For my model, I'm starting with an Auhagen car workshop plastic kit. You might think this makes life easy – just follow the instructions and the job is done. Well, not quite.
The kit is for a slightly twee German workshop. It's all very neat and tidy. Any oil will be safely sealed in the correct container. For a scruffy British workshop, I need to do some work.
Kit-bashing is the art of taking a model, and building what you want, unhindered by reading the instructions. In this case, I'm using the basic building but adding an extension and re-working the roof. Since I'm representing a modern scene, security is beefed up with roller-shutter covers for the doors, and grids over the windows. While I'm at it, there are rules on storing gas canisters, so we need the correct cage outside, and for parts and junk, the owners have bought a cheap ISO shipping container.
The Auhagen plastic kit is good and the interior details are fantastic. Like many such kits, it's designed to be modular, so if you want a bigger workshop, buy two kits and they are simple to join. The Auhagen range works like this – good news for the industrial modeller.
Scale is an issue. It's HO (1:87) not OO (1:76.2). That makes the model a little small, but as buildings come in all sizes, this isn't a big problem. Positioned towards the back of your layout, it will make the model look bigger with an element of forced perspective. If you want a car inside, use an HO scale one, there are plenty to chose from, and stick to shorter figures.
My little garage might not be beautiful, but I'd be much happier to take a car in here than the dealer, and as a model, it offers so much more character.
Shopping List
Golden Valley Hobbies
Auhagen (11 460) car workshop
www.goldenvalleyhobbies.com
Colchester A1 Models
Brass mesh
www.colchestera1models.co.uk
Scale Model Scenery
(LX167) 20ft ISO Shipping container
(LX187) Solid sided stilages
(LX261) Gas bottle cages
(LX262) Modern industrial/depot windows
(LX277 and LX280) Roller shutter doors
www.scalemodelscenery.co.uk
Slater's Plastikard
Embossed English Bond brick sheet
www.slatersplastikard.com
1
If built as intended, the result is a perfectly quaint little workshop that could be used for many different businesses, not just car repair. My first thoughts are that the brickwork is a bit fancy and those skylights will have to go. Because this is a catalogue shot, the building is painted, unlike that Mercedes outside, which is looking very crusty around the wheel arches. (Photo: Auhagen)
2
Inside the box are many sprues of plastic parts along with cardboard walls and two sets of instructions – one for the main kit and the other for details. Don't be put off by the number of bits, most sprues are common to the entire range and so many parts will be left for the scrap box once the model is complete.
3
Part of the reason for the high component count is for the range to be as flexible as possible, the walls need to be assembled from several pieces. Here, we have the ends to which sloping tops are added. These are attached to the sprues with very wide – but easy to cut – pieces of plastic with the part number clearly marked on them. The two pieces clip together and are fixed by running liquid solvent along the joint.
4
Auhagen's modular building style can be seen here. The front and rear walls are made from several panels joined with thin, brick pillars. Care is required to produce a flat wall. I initially assemble with plastic cement, to hold things together, then run solvent along the joint to fix things, then leave them to dry, flat on a board. This is especially important where the brickwork interlocks, but with care, invisible joints are possible.
5
Over time, most buildings gain extensions of varying beauty. I decided that a simple box on building on the side of the workshop would look good, and made it out of plastic sheet covered with embossed brick Plastikard. Because it will enjoy different bricks from the main structure, it's obviously a later addition.
6
To enhance the squat, ugliness of the extension, it gets a flat roof. Modelling roofing felt is easy – just use strips of masking tape. They have a little texture so, once painted, look the part.
7
Brick painting starts with a coat of Humbrol 121 (Pale stone) for the mortar. This needs to be left for several hours before the brick faces are coloured by rubbing pencil crayons over them. I try to cover the model with three different shades to produce subtle variations of colour seen on a real building.
8
A nice feature of this kit is the pre-painted windows. No need to mess around trying to keep paint on the glazing bars here! The plastic is quite brittle, so each glazing unit can be snapped off the sprue, handy as it doesn't cut easily with a knife and would need a saw. Sparingly applied, plastic cement holds them in their holes without clouding the glazing.
9
A pre-printed cardboard interior is provided, which is cut from the sheets and folded to fit the model. Since the printing is glossy, a quick spray of matt varnish makes things look more realistic. You could go further and scribe the details if this model is going to be prominent on your layout.
10
A dry test fit is a good idea, but the insides should slot into place without modification. A bit of clear all-purpose glue will hold them in place. The floor has two layers, a thick grey card topped with the printed surface. It slots between the sides, holding the building square.
11
There's a wealth of interior detail provided in kit form including tools, workbenches, cupboards, a car ramp, a compressor and fire extinguishers. There's far too much for a small building, but the leftovers will easily find a home elsewhere. Many of these pieces are available as separate kits, too.
12
Modern workshops need security so I fit roller-shutter doors, modelled mostly open. Over the windows, brass mesh is cut to size, sprayed grey, then dry-brushed with a rust colour. I use Mod-Podge, a matt drying glue to fit all these as it's impossible to hide but this is as close to invisible as glue gets.
13
Those weird skylights are replaced by a set of industrial windows. The roof is then covered with pieces of corrugated plastic sheet. These are cut to be a scale 6ft by 2ft sheets. They are painted with Precision Paints concrete colour and then lightly dusted with talcum powder to represent asbestos sheet.
14
Using Humbrol weathering powders, the building is dry-brushed with a layer of grime, with special attention paid to the 'nooks and crannies' around the brick pillars and beside the doors.
15
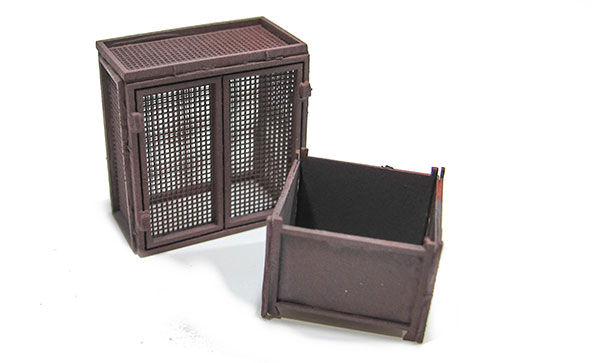
You can't just leave gas bottles lying around nowadays so a cage is made from a Scale Model Scenery laser-cut card kit, and while I am at it, a stillage box will add more detail. These are sprayed with grey primer, followed by a hint of red-oxide. For fine work like this, car aerosols are very handy, we don't want to clog up that lovely fine mesh, after all.
16
For more storage, I'm adding a 20ft long ISO container dumped at the end of the building. There are many ready-made options for these, but I'm using a laser-cut kit. If you'd like to know more about this kit, watch my build on the February 2019 episode of BRM TV.
Content continues after advertisements
More information
If you enjoyed this practical feature, you'll find a whole host of great practical advice and step-by-step guides in our Techniques section here.
Related articles
Build a coal yard kit
How to build a stone warehouse kit
How to build your first Metcalfe card kit
How to make realistic shop windows
Your weekly World of Railways newsletter
Are you subscribed to our weekly email newsletter? Don't miss the latest news, reviews, modelling advice and competitions.