


03 September 2020
|

Weighbridges were a feature of most steam-era goods yards. We build a 7mm scale resin kit for the essential hut that contained the scales - a useful building that could be put to many other uses.

A Skytrex resin and whitemetal kit is the basis for our model. A little cleaning up is required. Chamfers on the wall ends need sharpening up with either a coarse file or some abrasive sticks so that the join is as neat as possible when the two parts are brought together. Wear a facemask while carrying out this stage as you don't want to breathe in the dust. As we'll see later, the corners don't need to be perfect, but the neater they are, the better the finished model will look.

The windows have their flash removed with a sharp knife. It's a lot cleaner than abrasive as you generate a lot less fine dust, and after a couple of windows, it's very quick and easy, too. A little carving, a little scraping and the job is soon done. Mind you, I'm glad it's a hut, not a warehouse!

A real expert would spend hours carefully honing the chamfers in the corners of this kit. I am not an expert, I just trim them so the outside corner is OK and then glue things together using cheap epoxy resin that fills up the gaps.
The outside corners aren't perfect, of course, but a bit of Deluxe Materials Perfect Plastic Putty soon sorts that out. Once dry, I cut each brick course with a thin saw. Yet again, I'm glad this isn't a warehouse...

The roof is joined with superglue and then braced with more epoxy. I'm keeping it loose to allow for fitting some furniture inside in the future. The scales should be clearly visible through the window for a start, but this can be worked out once the model finds a home on a layout.
One area to be careful with is fitting the chimney. This needs to be a few millimetres inboard as the roof extends beyond the walls slightly, and the stack should be on top of the bricks, not fresh air. It's always worth thinking about exactly where the fires under a chimney will be. Even the RTR manufacturers have been known to get this wrong!
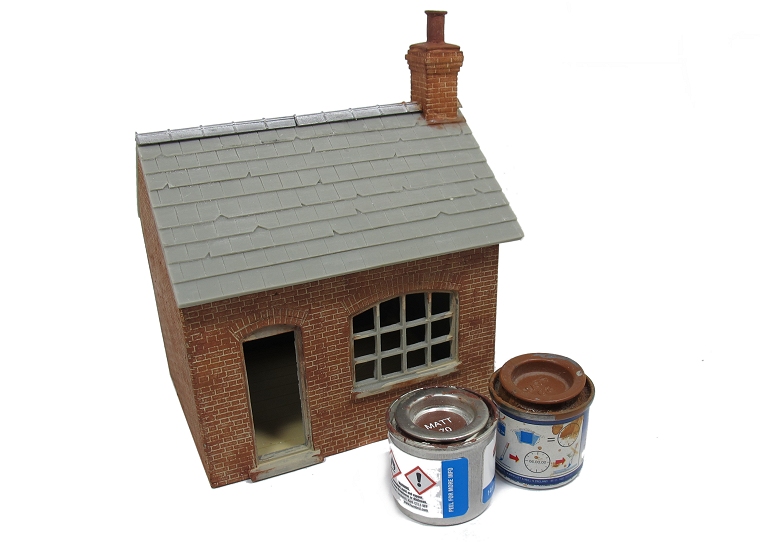
Brickwork painting starts with a coat of Humbrol 121 (Pale Cream) for the mortar colour. Once this is fully dry, the faces are dry-brushed with Humbrol 70 (Brick red), followed by some other random browns that aren't very different shades. Work quickly so the paints blend on the model and hope that not too much finds its way into the mortar lines.

After the brickwork is dry, the windows, doors and guttering are painted. I've used dull colours - Humbrol 147 (Pale grey) for the white and Revel 9 (Granite grey) for the black bits. Neither is a pure colour and looking all the better for it.
The roof is Humbrol 67 (Tank grey) dry-brushed while tacky with 66 and then a good dusting of talcum powder. Hardly any work but the effect is very good. I'm not a fan of picking out dozens of slates - you need to seriously blend things afterwards if the colour isn't to look forced.
Glazing is carried out using Deluxe Materials Glue'n'Glaze and then the model will be weathered with powders once I know where it will sit and how mucky the environment will be.
