This barn from Scale Model Scenery is typical of the quality of modern-day laser-cut kits. It is very strong because the main structure is made from fibreboard. Any mistakes can be hidden beneath the paper detailing wraps.
The kit is easily customisable. It would be easy to model the building in a run-down form, even derelict, or add a further structure such as a lean-to built from the spare sprue. It is the sort of building that can find a home on most layouts and you have a choice of building in brick or stone or using the basic structure to add a different finish, perhaps using modelling clay to give a more 3D effect.
You don’t need many tools in its construction or in-depth modelling skills and for the amount of time and effort required, good results can be achieved. It is also ideal for a project to spread over several small modelling sessions, such as an hour each evening after work.
There are no fiddly parts, such as guttering, to fit. It goes together beautifully and, since it is small in size, is an ideal starter project. If you haven’t made your first kit yet, this is your chance.
These notes are in addition to those supplied with the kit. Read the kit instructions and this article in their entirety before you begin, as some later steps refer back to earlier ones.
Shopping List
Scale Model Scenery Barn/Store kit (KX057-OO)
W: www.scalemodelscenery.co.uk
Content continues after advertisements
Lifecolor acrylic paints Tyre Black (UA733), Dust Type 1 (UA 705)
W: www.airbrushes.com
Weathering powders Rust (AV0008), Chrome Oxide (AV0005), Smoke (AV0004), acrylics black 33, white 34, Pale Grey 40
W: www.humbrol.com
1
Look over all the parts in the kit and familiarise yourself with the instructions. This will give you a good idea of what is required for the build and where the parts are located.
2
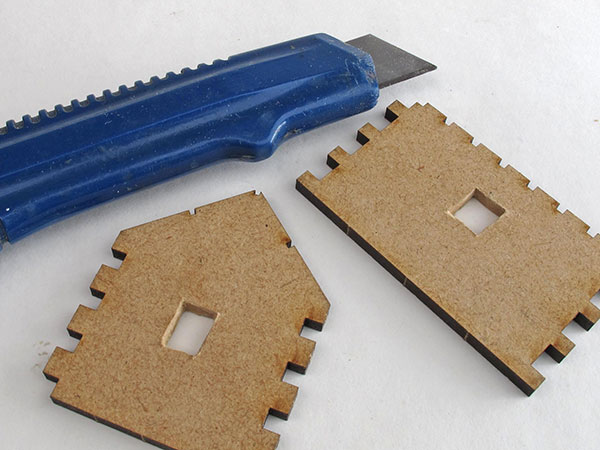
I decided to add a window. Use a set square and pencil to mark these out. Don’t make them too small as you will have to cut them out and will need room to get the tools in. This one measures 8mm x 10mm.
3
Practise on a piece of sprue before the main wall parts. Mark four spots in the middle of each side half the width of the drill and use an awl or suchlike to make small holes ready for drilling.
4
Drill each hole and use a spare piece of sacrificial wood underneath to prevent tear out when the drill exits. I used a 3mm drill. Now cut into the corners using a sharp craft knife.
5
Push loose material out and cut again from the other side. Ensure that all the material in the aperture is removed. Try to get the windows as square as you can, but it isn’t that important on a rustic building like this.
6
Mark the position of the window on the wall wrap before it is fitted. Put the wall piece on the wrap, align it carefully and use a pin to mark the four corners. Note which way round the wall piece is – you'll need to match this again later.
7
Glue the four sides together using a PVA glue. Use a setsquare to ensure that the building is rectangle in shape and not a parallelogram. Use a rubber band to hold the structure together. Leave it to dry for six hours.
8
While you wait for the main structure to dry, start to cut out the walls wraps. I prefer to cut these out roughly first using scissors as you are less likely to damage the parts later when using a knife.
9
Cut the wraps out on a cutting mat and use a sharp knife and metal rule. Make several light cuts rather than one heavy pass. It takes concentration to push down firmly on the rule while pressing the knife down lightly.
10
The wraps rely on you using the walls one way around. If you alter this, as I did, they will no longer fit. You can solve the problem by turning the wrap over and using it as a template to cut a new one from the spare walling.
11
Apply an even layer of glue with a brush onto the flat face that you want to mount the wrap to. I used a quick-drying PVA glue. Be sure to cover all the surface and don't apply glue anywhere but to the one plane.
12
Apply an even layer of glue with a brush onto the flat face that you want to mount the wrap to. I used a quick-drying PVA glue. Be sure to cover all the surface and don't apply glue anywhere but to the one plane.
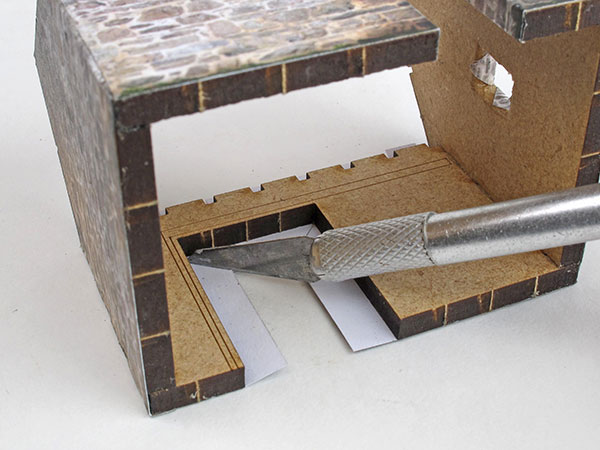
13
For a wrap containing a cut-out, such as a door or window, after gluing the wrap to the main face, turn over and cut at 45-degrees into the corner.
14
Burnish the edges with a blunt tool to get a sharp edge. Apply glue and fold the tabs into place.
15
Carefully cut internal wraps out using the spare outer wrap as a template. Spare walling is supplied should you make a mistake. Be careful when the paper is wet not to tear it.
16
You may well have gaps between wall wraps or wish to blend corners and marks in. Use grey or white and black acrylic paint for this using a small brush. Use an offcut of the wall wrap as a test strip to mix and match the colours before application.
17
The roof trusses are a tight fit into the wall recesses and are easy to break. To avoid forcing them, use a file and remove glue that has entered this area. Don't remove material from the trusses as this will weaken them.
18
Older buildings often have uneven roofs and you can model this by gluing strips of 2mm paper to the trusses to form an irregular surface for the roof covering. Paint the paper with a brown acrylic such as burnt umber.
19
When fitting the tiles, remove portions to make them of different lengths. Cut pieces away to imitate broken tiles. Glue some of the pieces lower down to represent slipped tiles. Paint them with a dark grey and dry-brush with an off-white colour.
20
Detail the rear of the doors by scoring the tongue and groove lines with a knife and rule. Transfer the lines from the front by marking the edge of the door first. I used the spare door-runner wheels and braces as door handles.
21
Paint the doors a dark grey, such as Lifecolor UA733. When dry, detail with an off-white colour such as Lifecolor UA705. Use a hog’s hair brush and remove most of the paint on a rag. Drag the brush over the wood in a vertical direction to give the impression of wood grain.
22
The final step is to use weathering powers applied with an old paint brush – rust colour around the runners and braces, dark grey around the base of the door and around the handles and green on the roof to represent moss.
Your weekly World of Railways newsletter
Are you subscribed to our weekly email newsletter? Don't miss the latest news, reviews, modelling advice and competitions.