Let's suppose your layout has seemingly reached that almost intangible point of completion. You've poured hours into the project, observing details, regional – perhaps even local – history, and yet, your roads are bare. Perhaps you've found a vehicle in the background of a photograph you'd really like to add to your model? Only, it isn't produced by a manufacturer because it's a little 'mundane' – too ordinary to grace the product catalogues because it doesn't carry a GTI, GT or SRI badge. Perhaps it's even a commercial truck with local branding, which by its very nature tells a story of local trade or a municipality? With such features, instant layout interest is almost guaranteed.
Now you're on a quest to populate those roads or streets with a few choice, period-looking vehicles. Is now the time to compromise and purchase an 'off-the-shelf', shiny, die-cast model, the likes of which many other modellers and collectors might have?
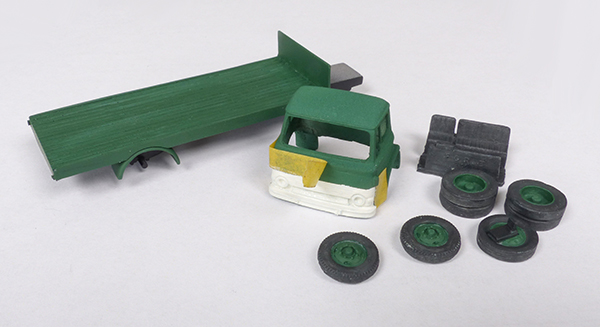
Seeking unique trucks for 'Runcorn Salt Union', I selected two kits from Road Transport Images and asked our social media followers to choose the one you wanted to see built. The Ford D series flat bed was chosen, so here's the account of how the kit went together. These are accessible models for those who dare to be different, and are suitable for intermediate modellers seeking more individuality on their layouts.
1
RTI kits are sold in a modular form, making customisation for the modeller easier. You purchase what you require, from wheels to cab, rigid, flatbed or tanker body, and construct the kit as you wish to match a specific vehicle type.
2
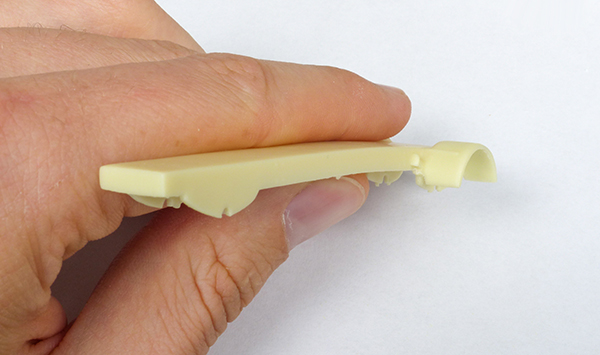
Parts – with the exception of the white-metal wheels – are moulded in resin. They're not to the same standard as an injection-moulded plastic component, but require little cleaning and a few pin holes can be observed.
3
Sanding sticks are my favourite tool for ridding surfaces of mould seams. The edge of this stick tucks neatly under the cab roof seam, ensuring the line is neat, and a quick sand with the 400 grit removes surplus resin.
4
The flash around cab windows is carefully cut flush with the frames using a new finger-grip scalpel, sold by Gaugemaster.com. For such intricate work, it offers greater control than a conventional scalpel, without wanting to rotate in the hand under pressure.
5
The cab interior moulding, with its seating and an impression of the dash, is where I found the most flash to reside on this kit. Paring back excess was required before sanding. Most of this detail will be hidden when fitted inside the cab.
6
Resin is a forgiving material, though it is well-known for its ability to warp after it has cured. The chassis was the only component affected as such, and this is remedied before gluing of parts commences.
7
Boiling water is poured into a glass – allowing me to see what's going on – and the part is submerged for 30 seconds. With the heat transfer, the part becomes malleable once more, and can be gently bent to the correct shape until it cools.
8
The smooth shiny resin surface is sanded to provide a good 'key' for the adhesive to bond parts together. It's important this is done where all parts are to be glued to ensure longevity of bonds.
9
Dust! Sanding resin soon creates quite a lot of it, and this sticks to hands, tools and parts. This small modelling brush from Gaugemaster is used to remove dust, before washing parts in the sink and leaving them to dry.
10
Rocket Hot from Deluxe Materials bonds components quickly and I find this adhesive has a longer shelf life than any other of its – or other brands – variants, provided the cap is returned soon after each use.
11
Mould marks are carefully pared back with a scalpel to the chassis transmission/axle keeper plate. Resin is a soft material, so be careful not to dig into the surrounding areas, keeping the blade flush at all times.
12
The wheels are moulded well and when consulting about this kit, I was directed to those with the correct bolt and slot pattern. The rears are 'dually/twin tyres' and, as with the fronts, must be drilled to accept the axles.
13
The wheels have sprue marks left from where they were cut free, so these are sanded flush, following the curvature of the wheel, again with the 400 grit sanding stick.
14
Axles are included with the wheels, consisting of lengths of solid brass round bar. These must be measured to the correct length by doing a 'mock up' with the wheels in place. Because it's an axle, not a fence post, I'm filing the crudely-cut ends flat with a needle file. The steel teeth cut better through brass than the abrasive sanding stick, which would soon disintegrate through such use.
15
Some prefer to paint components before assembly for ease of access, particularly if they're a different colour to adjacent parts. Where possible, I prefer to glue parts together before painting because gluing paint to paint won't guarantee a strong bond.
16
A fuel tank is included with the cab. Consulting photographs online shows roughly where this should be located, though its size and exact location varied across vehicles. Working from photographs always helps.
17
With the main sub-assemblies prepared, I spray them with a grey primer and leave them to dry. The primer highlights gaps in the moulds, for instance, at the rear of the flat bed, in the front bumper and to the cab roof.
18
A few scrapes of Humbrol Model Filler are applied to the areas concerned, using the scalpel like a spatula. I find an old piece of cardboard useful as a temporary palette, which can be later discarded without making a mess of the workbench.
19
With the filler dry, I'm using the sanding sticks for the last time to ensure the surfaces are smooth. If in doubt, another light application of primer will reveal potential flaws. Remember, paint can't hide these, so it's at this stage that defects should be rectified.
20
Choosing colours to spray your models can be difficult, so a quick search online for popular tones of your chosen era will ensure your vehicle won't look out of character. Painting commences with the underframe, which is treated to an even spray of Railmatch black.
21
For the cab, I don't have a green in aerosol format, so I resorted to using the airbrush, loaded with Humbrol Matt 48 – a dull green, which after a coat of gloss, will look suitable for the early 1970s. Spraying leaves a more-even finish than brush-painting.
22
The body finish isn't as important, so it's brush-painted to avoid masking and overspray on the black chassis, for speed. The process doesn't take long, working the slightly-thinned paint into the grooves with the brush.
23
The wheel centres are painted before the tyres, themselves an off-black colour. Tyres are never a shiny jet black colour, even when new or after an application of tyre shine. I'm masking the cab grille and painting it white.
24
After applying Ford lettering with a cocktail stick, dipped in black paint, the cab is sprayed with satin varnish to seal. The vacuum-formed glazing is fixed with Glue 'n' Glaze from Deluxe Materials to the roof. When dry, the components are superglued together – model complete!