It's regrettable that poor rubbish disposal, in all its many forms, is a fact of life. We may not like it in the real world, and may not want it invading our models, but to be realistic, we need to include it. Littering has changed over the years, and varies depending on location, and so, some observation is required to achieve realism. For example, logically, you’d expect there to be more rubbish around densely-populated areas. This is true, but a new phenomenon of dumping in the countryside has appeared, perhaps encouraged by the charges levied at businesses for disposing of commercial waste. At the same time, metal is no longer dumped due to the high demand from China keeping scrap prices high.
For expediency, it is satisfactory to portray the majority of rubbish as an anonymous and indistinguishable mass that you have retrieved from the bottom of your scrapbox or bits left over from modelling. However, it will look much more realistic if there are some clearly identifiable items. I have divided the subject up into three main areas and demonstrate using off-the-shelf and hand-made items to realistically portray rubbish, in all its many forms. I have also included a section on weathering, as rubbish left outside will soon be affected by the elements. Let's begin...
Shopping List
Auhagen (41649) Waste Bins
W: www.goldenvalleyhobbies.com
Modelscene (5055) Bicycles
W: www.peco-uk.com
Scale Model Scenery (AX012-OO) Litter, (LX110-OO) Rubbish Skips, (AX088-OO) Armchairs, (LX014-OO) Laser-cut Litter Bins
W: www.ScaleModelScenery.co.uk
Evergreen StripStyrene (255) 7.9mm square tube, (223) 3/32in tube. 0.020in plastic sheet, slate tiling
W: www.slatersplastikard.com
Skytrex (4A/012) steel drums
W: www.skytrexmodelrailways.com
Humbrol Weathering powders Rust, Smoke, Chrome Oxide and White
W: www.hornby.com
Content continues after advertisements
Street Litter
1
Street litter is made using a pre-printed sheet. Cut the parts out using a sharp craft knife. Scrunch them up to leave the detail on the outside and glue in place with PVA.
2
You can carefully reduce the thickness of the litter by separating the layers at a corner and then gently peeling back with a pair of tweezers. This makes it easier to form the shape you want.
3
To make cans, glue one end of a piece of litter to a 0.020in plastic rod using cyanoacrylate, then roll it up and glue the loose end down. Cut the plastic rod to length and paint the ends an aluminium colour.
4
Litter bins are made by gluing the central inserts onto one side, then adding the opposite side and the two adjacent sides until finally adding the top piece. Use a thick PVA glue.
![Modelling street litter]()
![]()
Illegal Dumping
1
If you don’t have tyres from old models, you can make your own. Start by punching discs of 10mm and 9mm diameter from 0.020in plastic sheet using a hollow punch. You will need 10 discs per tyre.
2
Use a 7mm punch to remove the centre from the discs. For two of the larger 10mm discs, use a 6mm punch to make outer discs.
3
Glue the discs together with Liquid Poly using alternately larger and smaller discs to form the tread. Glue the two outer discs in place. Bevel the outer edge, then score tread lines using a file. Paint black.
4
Cut single and double matresses from 0.060in plastic sheet. The former should measure 10mm x 24mm and the latter 20mm x 26mm. Score three lines across the length and bend the sheets without breaking them.
5
Cut strips of Slater’s slate tiling and glue using Liquid Poly. Trim the excess from the edges using a craft knife. When the glue has set, use a file to bevel all the edges and round the corners.
6
For an alternative pattern, mark out a series of 2mm grid squares using digital callipers. Drill 0.6mm holes at the grid line intersections and countersink these using a 3mm drill. Bevel all the edges and round the corners.
7
Clothes are made by painting tissue paper (mine came from a shoe box) with acrylic paint. Once the flat surfaces are covered, screw the shape up and they will dry in that position ready to be stuck in place with PVA glue.
8
Bin bags are made using thin black plastic. Mine came from dog ‘poop scoops’. Draw a circle using a two pence piece and cut around it. Form a pile of material in the middle, gluing it together with PVA.
9
Spread cyanoacrylate around the edges and fold the sides up. Twist the top as you would tie up a bag in real life, then snip off excess plastic using scissors. Leave some bags open for variety.
10
For the fridge, use a razor saw to cut a length of 7.9mm plastic 'H' section. My large fridge is 20mm tall and the smaller one 13mm tall.
11
Drill small holes and cut around them to form the compartment openings. Use a file to clean up the irregular edges. Cut 6.25mm square pieces of 0.040in plastic sheet to slide into the centre.
12
Make doors from 0.030in plastic sheet. Add some variety by posing some of these in the open position and some closed.
13
Prepare the bicycles by cutting away parts that are more liable to damage, such as wheels, using a sharp knife. You can remove all of the extremities to leave just the frame. Again, use variety.
14
Don’t place heavy items on top of long static grass, because it won’t displace it. Instead, place your rubbish first and then add the static grass around it.
![]()
Top Tips
- For steam-era layouts, portray ‘rags and bones’ left outside properties for collection. For a contemporary scene, leave scrap metal items outside instead. You could also depict a horse-drawn cart or a lorry piled with scrap metal doing the rounds.
- Often people with gardens will leave their grass and hedge clippings on ‘waste’ ground, verges, or on the edges of parks close to their residencies.
- Skips sometimes have their sides built up with flat waste material to increase their capacity.
Industrial/Household waste
1
Model wheelie bins are made by many manufacturers. Mine didn’t have opening lids, so I cut them off, hollowed out the centre and made new lids from 0.020in plastic sheet.
2
Make the skips using the instructions supplied with the kit, although I found it easier to hold the pieces together as shown when adding the opposite side. The larger skips are suitable for industrial use and the smaller for domestic use.
3
Use balsa wood for discarded timber. Cut to length using a sharp craft knife. Add variety by depicting virgin, old, and painted wood. Use dilute Indian Ink as a stain. Dry-brush the wood to give the paint an aged appearance.
4
Piping is made from 2.4mm plastic tube. To narrow the walls, I drilled the inside using a 1.7mm drill for a more realistic appearance. Paint yellow for gas pipe, blue for water pipe, or an earth colour for ceramic waste pipe.
5
Cardboard boxes are made from Manilla or brown envelopes. You can find nets online for square shapes. Draw these out and cut carefully using a sharp knife. Score the seam lines to aid bending and glue with PVA.
6
Add writing to your cardboard boxes using an ink pen and black acrylic ink. Add address labels using ordinary white paper.
7
Leftover scatters can be used to represent soil and aggregate from construction projects. Use formers like aluminium cake tins under big piles and fix in place using PVA and a drop of washing up liquid applied with a dropper.
8
Represent metal and asbestos sheeting by pressing aluminium foil onto a container.
![]()
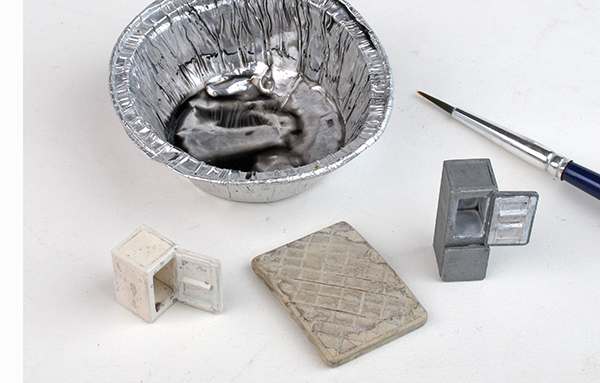
Painting and Weathering
1
To represent material, dab tacky paint with a cloth to create a textile effect. Use any moulded base as a paint handle or stick pieces to card using double sided tape. If hand-painting them. Make sure you thin the paint.
2
Use a ‘dirty’ wash to bring out detail in recesses. Make a thin mixture of paint using thinners and drop into crevasses where capillary action will draw the colour into all the corners for you.
3
Dirt is thrown up from the ground when it rains and discarded items may well be soiled from use. Use weathering powders, or spray a dark colour, around the base of items in contact with the ground to represent splashback.
4
Items left outside will soon turn green, especially in sheltered locations. Use an airbrush or weathering powders to represent this. Observe real world objects for inspiration.
5
Represent rust patches by scribing random scratches with a dip pen. Finish off with weathering powders, especially inside the skips. Use black, brown, and white weathering powders.
6
For the concrete rubbish bins, after painting with a base colour, flick lighter and differing shades of the base colour using a toothbrush. Acrylic is best for this as it dries quickly.
Want some further buildings to complete your scene? Our guide on how to build and detail a card kit is worth a read. Or if you’re interested in creating something rundown or derelict, our guide here can help.
For more help and tips for adding grass to your model railway - watch our video on how to create realistic scenery using static grass here.
And what about trees? Our online guide will help you get to grips with ‘planting’ trees on your model railway.
Need more advice? Take a look at the BRM Techniques page for all our latest guides and advice articles.